• Tech
    • Tech Category
      • Engine
      • Bottom End
      • Rods and Pistons
      • Head and Headwork
      • Cams and Valvetrain
      • Cooling and Heat Management
      • Intake
      • Headers and Exhaust
      • Rotary
      • Engine Management and Tuning
      • Drivetrain
      • Transmission
      • Clutch and Flywheel
      • Differential and Final Drive
      • Driveshaft and Axle
      • Axles
    • Tech Category
      • Suspension
      • Shocks and Coilovers
      • Springs
      • Swaybars
      • Arms and Links
      • Bushings
      • Steering
      • Geometry Correction
      • Suspension Setup and Tuning
      • Brakes
      • Wheels and Tires
      • Fueling
      • Forced Induction and NOS
      • Aerodynamics
    • Tech Cat
      • Electrical
      • Battery and Power Distribution
      • Electronics
      • Wiring
      • Electrical System Education and Troubleshooting
      • Lubrication
      • Interior and Controls
      • Exterior
      • Paint and Bodywork
      • Wraps and Film Protection
      • Exterior Care and Maintenance
      • Data Acquisition and Tuning
      • Fabrication and Safety
      • Tips and How-To
  • Projects
    • Make A-D
      • Acura
      • Integra (DC2)
      • NSX
      • CSF RSX (DC5)
      • BMW
      • E30 (SR20 Powered)
      • E36 323is
      • E36 M3 (Black)
      • E36 M3 (Silver)
      • E39 M5
      • E46 M3
      • E90 M3
      • E46 Racecar
      • Yost Auto E92 M3
      • Yost Auto F82 M4
      • Chevrolet
      • Camaro Gen5
      • Corvette Stingray (C7 Z51)
      • Corvette Stingray (C8 Z51)
      • GMC Canyon
      • Dodge
      • Viper GTS
    • Make E-I
      • Ford
      • E350 Tow Rig
      • F150 EcoBoost
      • Fiesta ST
      • Focus ST
      • Mustang 5.0 (Grey)
      • Mustang 5.0 (White)
      • Mustang S197 (Budget Track Car)
      • Mustang S550 GT
      • Honda
      • Civic EF Racecar
      • Civic Si (Coupe)
      • Civic Si (EP3)
      • Civic Si (Saloon)
      • EJ Civic
      • Polystrand CRX
      • S2000 (AP1)
      • S2000 (AP2)
      • Infiniti
      • G20 Racecar
      • G20 (P10 AWD Turbo)
      • G35
      • G37S
    • Make J-M
      • Isuzu
      • Vehicross
      • Lexus
      • ISF
      • SC300
      • Mazda
      • V8 RX7 (3rd Gen)
      • RX-7 (3rd Gen)
      • RX-7 Restomod (3rd Gen)
      • Skyactiv 3
      • Frankenmiata
      • Miatabusa
      • My Girlfriend’s Miata
      • Mitsubishi
      • EVO VIII
      • EVO IX
      • EVO X
      • CSF EVO X Racecar
      • Professional Awesome EVO VIII
    • Make N-P
      • Nissan
      • 200SX
      • 200SX SE-R
      • 240SX Land Speed Racer
      • 300ZXTT
      • 350Z
      • 350Z Drift Car
      • 370Z
      • GT-R (R33)
      • GT-R (R35)
      • GT-R (Team America BNR32)
      • LS S13
      • NX GTi-R
      • Pathfinder
      • S13 Drift/Grip Do-it-All Mega 240
      • Sentra SE-R
      • Sentra Spec V
      • Silvia
      • STurdteen Drift Car
      • Porsche
      • 991 GT3RS
      • Cayman (987)
      • Cayman T
      • Cayman GTS 4.0
    • Make S-Z
      • Scion
      • FR-S
      • Scion Tuner Challenge FR-S
      • TC
      • Subaru
      • Autocross BRZ
      • Legacy GT
      • STI (gen 2)
      • STI (gen 3)
      • WRX (GD)
      • WRX (VA)
      • Toyota
      • 4Runner
      • AE86 Corolla
      • GR Corolla
      • Starletabusa
      • Supra Mark IV
      • Tacoma
      • Tundra
      • Volkswagen
      • MKIV Jetta TDI
      • MKVI Golf TDI
      • MKVII Golf R
      • Sipster (Rabbit)
    • Other Projects
      • Powersports
      • Aprilia RS50
      • Aprilia SR50
      • Doodlebug
      • Ducati 998
      • Ducati Hypermotard
      • Honda Ruckus
      • Husqvarna TE610
      • Go Karts
      • Other
      • Sim Racer
      • Aurora Cobra
      • Garage
      • NP01 Prototype
  • Features
    • Features
      • Feature Cars
      • Drag Race Cars
      • Drift Cars
      • Land Speed Cars
      • Open-Wheel Cars
      • Rally Cars
      • Road Race Cars
      • Street Cars
      • Time Attack Cars
      • Drag Racing
    • Features
      • Events
      • Drifting
      • Land Speed Racing
      • Open-Wheel Racing
      • Time Attack Racing
      • Rally Racing
      • Road Racing
      • Car Shows
      • Columns
      • SlipAngle Podcast
  • Video
  • Shop *NEW*
  • MotoIQ Garage Services
  • About
  • Shop *NEW*
  • MotoIQ Garage Services
  • About
MotoIQ
MotoIQ
  • Tech
    • Tech Category
      • Engine
      • Bottom End
      • Rods and Pistons
      • Head and Headwork
      • Cams and Valvetrain
      • Cooling and Heat Management
      • Intake
      • Headers and Exhaust
      • Rotary
      • Engine Management and Tuning
      • Drivetrain
      • Transmission
      • Clutch and Flywheel
      • Differential and Final Drive
      • Driveshaft and Axle
      • Axles
    • Tech Category
      • Suspension
      • Shocks and Coilovers
      • Springs
      • Swaybars
      • Arms and Links
      • Bushings
      • Steering
      • Geometry Correction
      • Suspension Setup and Tuning
      • Brakes
      • Wheels and Tires
      • Fueling
      • Forced Induction and NOS
      • Aerodynamics
    • Tech Cat
      • Electrical
      • Battery and Power Distribution
      • Electronics
      • Wiring
      • Electrical System Education and Troubleshooting
      • Lubrication
      • Interior and Controls
      • Exterior
      • Paint and Bodywork
      • Wraps and Film Protection
      • Exterior Care and Maintenance
      • Data Acquisition and Tuning
      • Fabrication and Safety
      • Tips and How-To
  • Projects
    • Make A-D
      • Acura
      • Integra (DC2)
      • NSX
      • CSF RSX (DC5)
      • BMW
      • E30 (SR20 Powered)
      • E36 323is
      • E36 M3 (Black)
      • E36 M3 (Silver)
      • E39 M5
      • E46 M3
      • E90 M3
      • E46 Racecar
      • Yost Auto E92 M3
      • Yost Auto F82 M4
      • Chevrolet
      • Camaro Gen5
      • Corvette Stingray (C7 Z51)
      • Corvette Stingray (C8 Z51)
      • GMC Canyon
      • Dodge
      • Viper GTS
    • Make E-I
      • Ford
      • E350 Tow Rig
      • F150 EcoBoost
      • Fiesta ST
      • Focus ST
      • Mustang 5.0 (Grey)
      • Mustang 5.0 (White)
      • Mustang S197 (Budget Track Car)
      • Mustang S550 GT
      • Honda
      • Civic EF Racecar
      • Civic Si (Coupe)
      • Civic Si (EP3)
      • Civic Si (Saloon)
      • EJ Civic
      • Polystrand CRX
      • S2000 (AP1)
      • S2000 (AP2)
      • Infiniti
      • G20 Racecar
      • G20 (P10 AWD Turbo)
      • G35
      • G37S
    • Make J-M
      • Isuzu
      • Vehicross
      • Lexus
      • ISF
      • SC300
      • Mazda
      • V8 RX7 (3rd Gen)
      • RX-7 (3rd Gen)
      • RX-7 Restomod (3rd Gen)
      • Skyactiv 3
      • Frankenmiata
      • Miatabusa
      • My Girlfriend’s Miata
      • Mitsubishi
      • EVO VIII
      • EVO IX
      • EVO X
      • CSF EVO X Racecar
      • Professional Awesome EVO VIII
    • Make N-P
      • Nissan
      • 200SX
      • 200SX SE-R
      • 240SX Land Speed Racer
      • 300ZXTT
      • 350Z
      • 350Z Drift Car
      • 370Z
      • GT-R (R33)
      • GT-R (R35)
      • GT-R (Team America BNR32)
      • LS S13
      • NX GTi-R
      • Pathfinder
      • S13 Drift/Grip Do-it-All Mega 240
      • Sentra SE-R
      • Sentra Spec V
      • Silvia
      • STurdteen Drift Car
      • Porsche
      • 991 GT3RS
      • Cayman (987)
      • Cayman T
      • Cayman GTS 4.0
    • Make S-Z
      • Scion
      • FR-S
      • Scion Tuner Challenge FR-S
      • TC
      • Subaru
      • Autocross BRZ
      • Legacy GT
      • STI (gen 2)
      • STI (gen 3)
      • WRX (GD)
      • WRX (VA)
      • Toyota
      • 4Runner
      • AE86 Corolla
      • GR Corolla
      • Starletabusa
      • Supra Mark IV
      • Tacoma
      • Tundra
      • Volkswagen
      • MKIV Jetta TDI
      • MKVI Golf TDI
      • MKVII Golf R
      • Sipster (Rabbit)
    • Other Projects
      • Powersports
      • Aprilia RS50
      • Aprilia SR50
      • Doodlebug
      • Ducati 998
      • Ducati Hypermotard
      • Honda Ruckus
      • Husqvarna TE610
      • Go Karts
      • Other
      • Sim Racer
      • Aurora Cobra
      • Garage
      • NP01 Prototype
  • Features
    • Features
      • Feature Cars
      • Drag Race Cars
      • Drift Cars
      • Land Speed Cars
      • Open-Wheel Cars
      • Rally Cars
      • Road Race Cars
      • Street Cars
      • Time Attack Cars
      • Drag Racing
    • Features
      • Events
      • Drifting
      • Land Speed Racing
      • Open-Wheel Racing
      • Time Attack Racing
      • Rally Racing
      • Road Racing
      • Car Shows
      • Columns
      • SlipAngle Podcast
  • Video
  • Tech
  • Projects
  • Mazda

Arrive and Drive

  • PerSchroeder

,

First Run

Matthew’s advice for the first run is to approach it the same way for an unfamiliar car as you would one you’ve driven before. That is, to make sure you don’t miss any braking zones and be aware that braking too late will cost you way more time than braking too early. After all, if you brake a little earlier, you can get back on the gas a touch earlier as well, so it doesn’t hurt your final time as much.


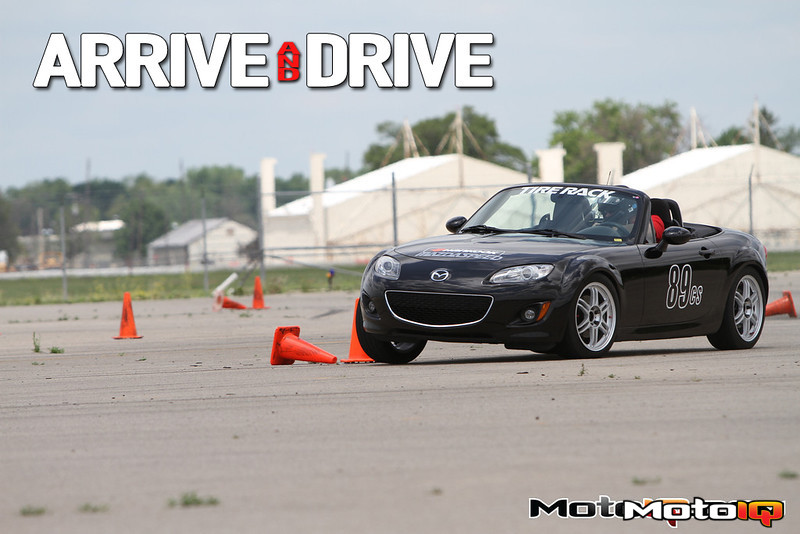
The key to the first run in an unfamiliar car is to try to be a little conservative on corner entry—but you need to carry enough speed so that you learn the limits of the car. Photo courtesy of John Rogers. 

Braun adds, “My first runs tend to be a little conservative in some places, but I can miss a couple high-speed sections by not being familiar with the car. It usually takes me one run to get familiar with the car, under driving some parts and over driving other parts. The key to learning on that first run is to not WAY under drive or WAY over drive the car, but to be somewhat close to the car's capabilities, otherwise you can't really learn much.”

Chris and our first runs went pretty smoothly. We laid down a high 56-second run, while Chris’ first was a 56 flat. Like Matthew, we tried to be conservative on braking points, but also worked to hustle the car through offset sections as quickly as possible on the first run. We weren’t quite used to the timing required to stay ahead of the steering on the slalom sections, but the run was in the ballpark and we were happy with our runs. They put Chris in first and we were third out of 10 competitors in the class.

Second Run

A good strategy for the second run is to push the car harder into the braking zones and slow down less in the slaloms and offsets. That’s our typical, generic plan for second runs at many events, but learning a new car’s optimal cadence through the cones can make that difficult to achieve. Matthew concurs, “With the second run, I can usually put in a pretty quick time…I step it up in the braking zones, and can attack the high speed transitions with more confidence in what the car will do.”


Matthew likes to use the second run to push a little harder into the braking zones as well as trying to carry more speed in fast offset sections. Photo courtesy of Shelly Monfort. 

Our execution of the plan wasn’t bad—we dropped .35 seconds, but clearly got behind in the highest speed section of the course. Our braking zones were much tighter, but the fact that we tried to flat-foot it through the slaloms while we were still out of step with the steering wheel probably cost us .4 or .5 in lost time. Chris dropped a touch under .2 seconds, so we were a little closer to the pointy end of the pack, but still had some time to make up.

Third Run

By the start of the third runs, we had been in the car for a total of 113 seconds of track time. We knew approximately where our turn-in points were for each of the course's corners and about where we needed to brake, but there was still the matter of how much speed could be carried through the wiggles, offsets and slaloms are where the real time can be made or lost.


Video helps us analyze our runs after the fact.   We could see, for example, where Per bobbled a bit on the first long slalom. 

Matthew advises, “By the final run, it is time to hit all your marks and put in your best. You need to be fast and clean, with no hit pylons. If you misjudge something, like a turn-in point, don't hope you are going to miss the cone, make the correction necessary to not hit the cone!”

Related

Previous page 1 2 3 4Next page
Previous Article
  • Features

Sneak Peek: GTSport Pirelli World Challenge Cayman S

  • Khiem Dinh
View Post
Next Article
  • Features

Corsa Performance Delivers No-Drone C7 Corvette Exhaust System

  • Jeff Naeyaert
View Post

Leave a Reply Cancel reply

Your email address will not be published. Required fields are marked *

Input your search keywords and press Enter.