• Tech
    • Tech Category
      • Engine
      • Bottom End
      • Rods and Pistons
      • Head and Headwork
      • Cams and Valvetrain
      • Cooling and Heat Management
      • Intake
      • Headers and Exhaust
      • Rotary
      • Engine Management and Tuning
      • Drivetrain
      • Transmission
      • Clutch and Flywheel
      • Differential and Final Drive
      • Driveshaft and Axle
      • Axles
    • Tech Category
      • Suspension
      • Shocks and Coilovers
      • Springs
      • Swaybars
      • Arms and Links
      • Bushings
      • Steering
      • Geometry Correction
      • Suspension Setup and Tuning
      • Brakes
      • Wheels and Tires
      • Fueling
      • Forced Induction and NOS
      • Aerodynamics
    • Tech Cat
      • Electrical
      • Battery and Power Distribution
      • Electronics
      • Wiring
      • Electrical System Education and Troubleshooting
      • Lubrication
      • Interior and Controls
      • Exterior
      • Paint and Bodywork
      • Wraps and Film Protection
      • Exterior Care and Maintenance
      • Data Acquisition and Tuning
      • Fabrication and Safety
      • Tips and How-To
  • Projects
    • Make A-D
      • Acura
      • Integra (DC2)
      • NSX
      • CSF RSX (DC5)
      • BMW
      • E30 (SR20 Powered)
      • E36 323is
      • E36 M3 (Black)
      • E36 M3 (Silver)
      • E39 M5
      • E46 M3
      • E90 M3
      • E46 Racecar
      • Yost Auto E92 M3
      • Yost Auto F82 M4
      • Chevrolet
      • Camaro Gen5
      • Corvette Stingray (C7 Z51)
      • Corvette Stingray (C8 Z51)
      • GMC Canyon
      • Dodge
      • Viper GTS
    • Make E-I
      • Ford
      • E350 Tow Rig
      • F150 EcoBoost
      • Fiesta ST
      • Focus ST
      • Mustang 5.0 (Grey)
      • Mustang 5.0 (White)
      • Mustang S197 (Budget Track Car)
      • Mustang S550 GT
      • Honda
      • Civic EF Racecar
      • Civic Si (Coupe)
      • Civic Si (EP3)
      • Civic Si (Saloon)
      • EJ Civic
      • Polystrand CRX
      • S2000 (AP1)
      • S2000 (AP2)
      • Infiniti
      • G20 Racecar
      • G20 (P10 AWD Turbo)
      • G35
      • G37S
    • Make J-M
      • Isuzu
      • Vehicross
      • Lexus
      • ISF
      • SC300
      • Mazda
      • V8 RX7 (3rd Gen)
      • RX-7 (3rd Gen)
      • RX-7 Restomod (3rd Gen)
      • Skyactiv 3
      • Frankenmiata
      • Miatabusa
      • My Girlfriend’s Miata
      • Mitsubishi
      • EVO VIII
      • EVO IX
      • EVO X
      • CSF EVO X Racecar
      • Professional Awesome EVO VIII
    • Make N-P
      • Nissan
      • 200SX
      • 200SX SE-R
      • 240SX Land Speed Racer
      • 300ZXTT
      • 350Z
      • 350Z Drift Car
      • 370Z
      • GT-R (R33)
      • GT-R (R35)
      • GT-R (Team America BNR32)
      • LS S13
      • NX GTi-R
      • Pathfinder
      • S13 Drift/Grip Do-it-All Mega 240
      • Sentra SE-R
      • Sentra Spec V
      • Silvia
      • STurdteen Drift Car
      • Porsche
      • 991 GT3RS
      • Cayman (987)
      • Cayman T
      • Cayman GTS 4.0
    • Make S-Z
      • Scion
      • FR-S
      • Scion Tuner Challenge FR-S
      • TC
      • Subaru
      • Autocross BRZ
      • Legacy GT
      • STI (gen 2)
      • STI (gen 3)
      • WRX (GD)
      • WRX (VA)
      • Toyota
      • 4Runner
      • AE86 Corolla
      • GR Corolla
      • Starletabusa
      • Supra Mark IV
      • Tacoma
      • Tundra
      • Volkswagen
      • MKIV Jetta TDI
      • MKVI Golf TDI
      • MKVII Golf R
      • Sipster (Rabbit)
    • Other Projects
      • Powersports
      • Aprilia RS50
      • Aprilia SR50
      • Doodlebug
      • Ducati 998
      • Ducati Hypermotard
      • Honda Ruckus
      • Husqvarna TE610
      • Go Karts
      • Other
      • Sim Racer
      • Aurora Cobra
      • Garage
      • NP01 Prototype
  • Features
    • Features
      • Feature Cars
      • Drag Race Cars
      • Drift Cars
      • Land Speed Cars
      • Open-Wheel Cars
      • Rally Cars
      • Road Race Cars
      • Street Cars
      • Time Attack Cars
      • Drag Racing
    • Features
      • Events
      • Drifting
      • Land Speed Racing
      • Open-Wheel Racing
      • Time Attack Racing
      • Rally Racing
      • Road Racing
      • Car Shows
      • Columns
      • SlipAngle Podcast
  • Video
  • Shop *NEW*
  • MotoIQ Garage Services
  • About
  • Shop *NEW*
  • MotoIQ Garage Services
  • About
MotoIQ
MotoIQ
  • Tech
    • Tech Category
      • Engine
      • Bottom End
      • Rods and Pistons
      • Head and Headwork
      • Cams and Valvetrain
      • Cooling and Heat Management
      • Intake
      • Headers and Exhaust
      • Rotary
      • Engine Management and Tuning
      • Drivetrain
      • Transmission
      • Clutch and Flywheel
      • Differential and Final Drive
      • Driveshaft and Axle
      • Axles
    • Tech Category
      • Suspension
      • Shocks and Coilovers
      • Springs
      • Swaybars
      • Arms and Links
      • Bushings
      • Steering
      • Geometry Correction
      • Suspension Setup and Tuning
      • Brakes
      • Wheels and Tires
      • Fueling
      • Forced Induction and NOS
      • Aerodynamics
    • Tech Cat
      • Electrical
      • Battery and Power Distribution
      • Electronics
      • Wiring
      • Electrical System Education and Troubleshooting
      • Lubrication
      • Interior and Controls
      • Exterior
      • Paint and Bodywork
      • Wraps and Film Protection
      • Exterior Care and Maintenance
      • Data Acquisition and Tuning
      • Fabrication and Safety
      • Tips and How-To
  • Projects
    • Make A-D
      • Acura
      • Integra (DC2)
      • NSX
      • CSF RSX (DC5)
      • BMW
      • E30 (SR20 Powered)
      • E36 323is
      • E36 M3 (Black)
      • E36 M3 (Silver)
      • E39 M5
      • E46 M3
      • E90 M3
      • E46 Racecar
      • Yost Auto E92 M3
      • Yost Auto F82 M4
      • Chevrolet
      • Camaro Gen5
      • Corvette Stingray (C7 Z51)
      • Corvette Stingray (C8 Z51)
      • GMC Canyon
      • Dodge
      • Viper GTS
    • Make E-I
      • Ford
      • E350 Tow Rig
      • F150 EcoBoost
      • Fiesta ST
      • Focus ST
      • Mustang 5.0 (Grey)
      • Mustang 5.0 (White)
      • Mustang S197 (Budget Track Car)
      • Mustang S550 GT
      • Honda
      • Civic EF Racecar
      • Civic Si (Coupe)
      • Civic Si (EP3)
      • Civic Si (Saloon)
      • EJ Civic
      • Polystrand CRX
      • S2000 (AP1)
      • S2000 (AP2)
      • Infiniti
      • G20 Racecar
      • G20 (P10 AWD Turbo)
      • G35
      • G37S
    • Make J-M
      • Isuzu
      • Vehicross
      • Lexus
      • ISF
      • SC300
      • Mazda
      • V8 RX7 (3rd Gen)
      • RX-7 (3rd Gen)
      • RX-7 Restomod (3rd Gen)
      • Skyactiv 3
      • Frankenmiata
      • Miatabusa
      • My Girlfriend’s Miata
      • Mitsubishi
      • EVO VIII
      • EVO IX
      • EVO X
      • CSF EVO X Racecar
      • Professional Awesome EVO VIII
    • Make N-P
      • Nissan
      • 200SX
      • 200SX SE-R
      • 240SX Land Speed Racer
      • 300ZXTT
      • 350Z
      • 350Z Drift Car
      • 370Z
      • GT-R (R33)
      • GT-R (R35)
      • GT-R (Team America BNR32)
      • LS S13
      • NX GTi-R
      • Pathfinder
      • S13 Drift/Grip Do-it-All Mega 240
      • Sentra SE-R
      • Sentra Spec V
      • Silvia
      • STurdteen Drift Car
      • Porsche
      • 991 GT3RS
      • Cayman (987)
      • Cayman T
      • Cayman GTS 4.0
    • Make S-Z
      • Scion
      • FR-S
      • Scion Tuner Challenge FR-S
      • TC
      • Subaru
      • Autocross BRZ
      • Legacy GT
      • STI (gen 2)
      • STI (gen 3)
      • WRX (GD)
      • WRX (VA)
      • Toyota
      • 4Runner
      • AE86 Corolla
      • GR Corolla
      • Starletabusa
      • Supra Mark IV
      • Tacoma
      • Tundra
      • Volkswagen
      • MKIV Jetta TDI
      • MKVI Golf TDI
      • MKVII Golf R
      • Sipster (Rabbit)
    • Other Projects
      • Powersports
      • Aprilia RS50
      • Aprilia SR50
      • Doodlebug
      • Ducati 998
      • Ducati Hypermotard
      • Honda Ruckus
      • Husqvarna TE610
      • Go Karts
      • Other
      • Sim Racer
      • Aurora Cobra
      • Garage
      • NP01 Prototype
  • Features
    • Features
      • Feature Cars
      • Drag Race Cars
      • Drift Cars
      • Land Speed Cars
      • Open-Wheel Cars
      • Rally Cars
      • Road Race Cars
      • Street Cars
      • Time Attack Cars
      • Drag Racing
    • Features
      • Events
      • Drifting
      • Land Speed Racing
      • Open-Wheel Racing
      • Time Attack Racing
      • Rally Racing
      • Road Racing
      • Car Shows
      • Columns
      • SlipAngle Podcast
  • Video
  • Cayman T

Project 718 Cayman T: Part 14 – E-Motion Engineering Strut Tower Reinforcement Brace

  • Khiem Dinh

Strut tower failures are a known issue on the 991 generations GT3s and the same-era GT4s. They typically occur from a sharp impact such as curbing at the track. I’m sure every 911 and Cayman/Boxster of the same era has the same vulnerability, it’s just that the GT3 and GT4 owners push their cars harder than the typical Porsche owner.

E-Motion Engineering decided to do something about it and designed a reinforcement brace system that’s superior to the factory Porsche Motorsport strut tower caps. I say ‘system’ because the setup is significantly stronger than the Motorsport caps and typical simple bar that connects the tops of the strut towers. Aside from the reinforcement brace system helping to prevent strut tower failure, the brace system significantly increases the rigidity of the frontend of the chassis.

I appreciate good packaging. Everything was well-protected in the cardboard box that the components were shipped in.

The E-Motion install video covers all the major steps. My car, having stock SPASM dampers, has some variation compared to the GT car with KW dampers in the video. Step 1 is to remove the main center cover. You’ll need to remove the two side covers also.

I pulled up this plastic housing that holds the air compressor; most new cars come with a compressor and goop instead of a spare tire. It’s annoying, but I get the desire to reduce weight (emissions/fuel economy, acceleration) and costs. The air compressor would live under the brace making it very inconvenient to get to in an emergency situation. So, I’ll just put the compressor into the frunk and ditch this housing for some weight reduction.

The air filter housing has a few clips on the backside of the lid that are a little tricky to get to.

E-Motion made a tool to mark where to cut the lid. I took some measurements instead of fabricating a tool.

Related

1 2 3 4 5 6Next page
Previous Article
  • Features

WATCH: Junkyard 5.3L to 530HP LS3 Killer! Budget Build with Pro Drift Durability

  • Jeff Naeyaert
View Post
Next Article
  • Features

WATCH: Budget Toyota 3SGTE Build That Can Handle 500HP – Underrated JDM Turbo Power!

  • Jeff Naeyaert
View Post
11 comments
  1. Bob says:
    May 16, 2025 at 6:47 am

    Shame they didn’t double bolt the bar. The bar can only handle tension and compression and no bending moment as designed.

    Reply
  2. Bob says:
    May 16, 2025 at 6:49 am

    Spoke too soon. My bad. Nice tie in to the subframe. Didn’t see it initially.

    Reply
    1. Khiem Dinh says:
      May 17, 2025 at 9:06 am

      Yup, it’s a super beefy support bar for the heavy factory battery. Quick search shows the factory battery is about 45 lbs.

      Reply
  3. Charles says:
    May 17, 2025 at 3:05 pm

    Strut/shock tower loads are basically vertical-a horizontal bar does little but add weight.

    Reply
    1. Khiem Dinh says:
      May 18, 2025 at 9:12 am

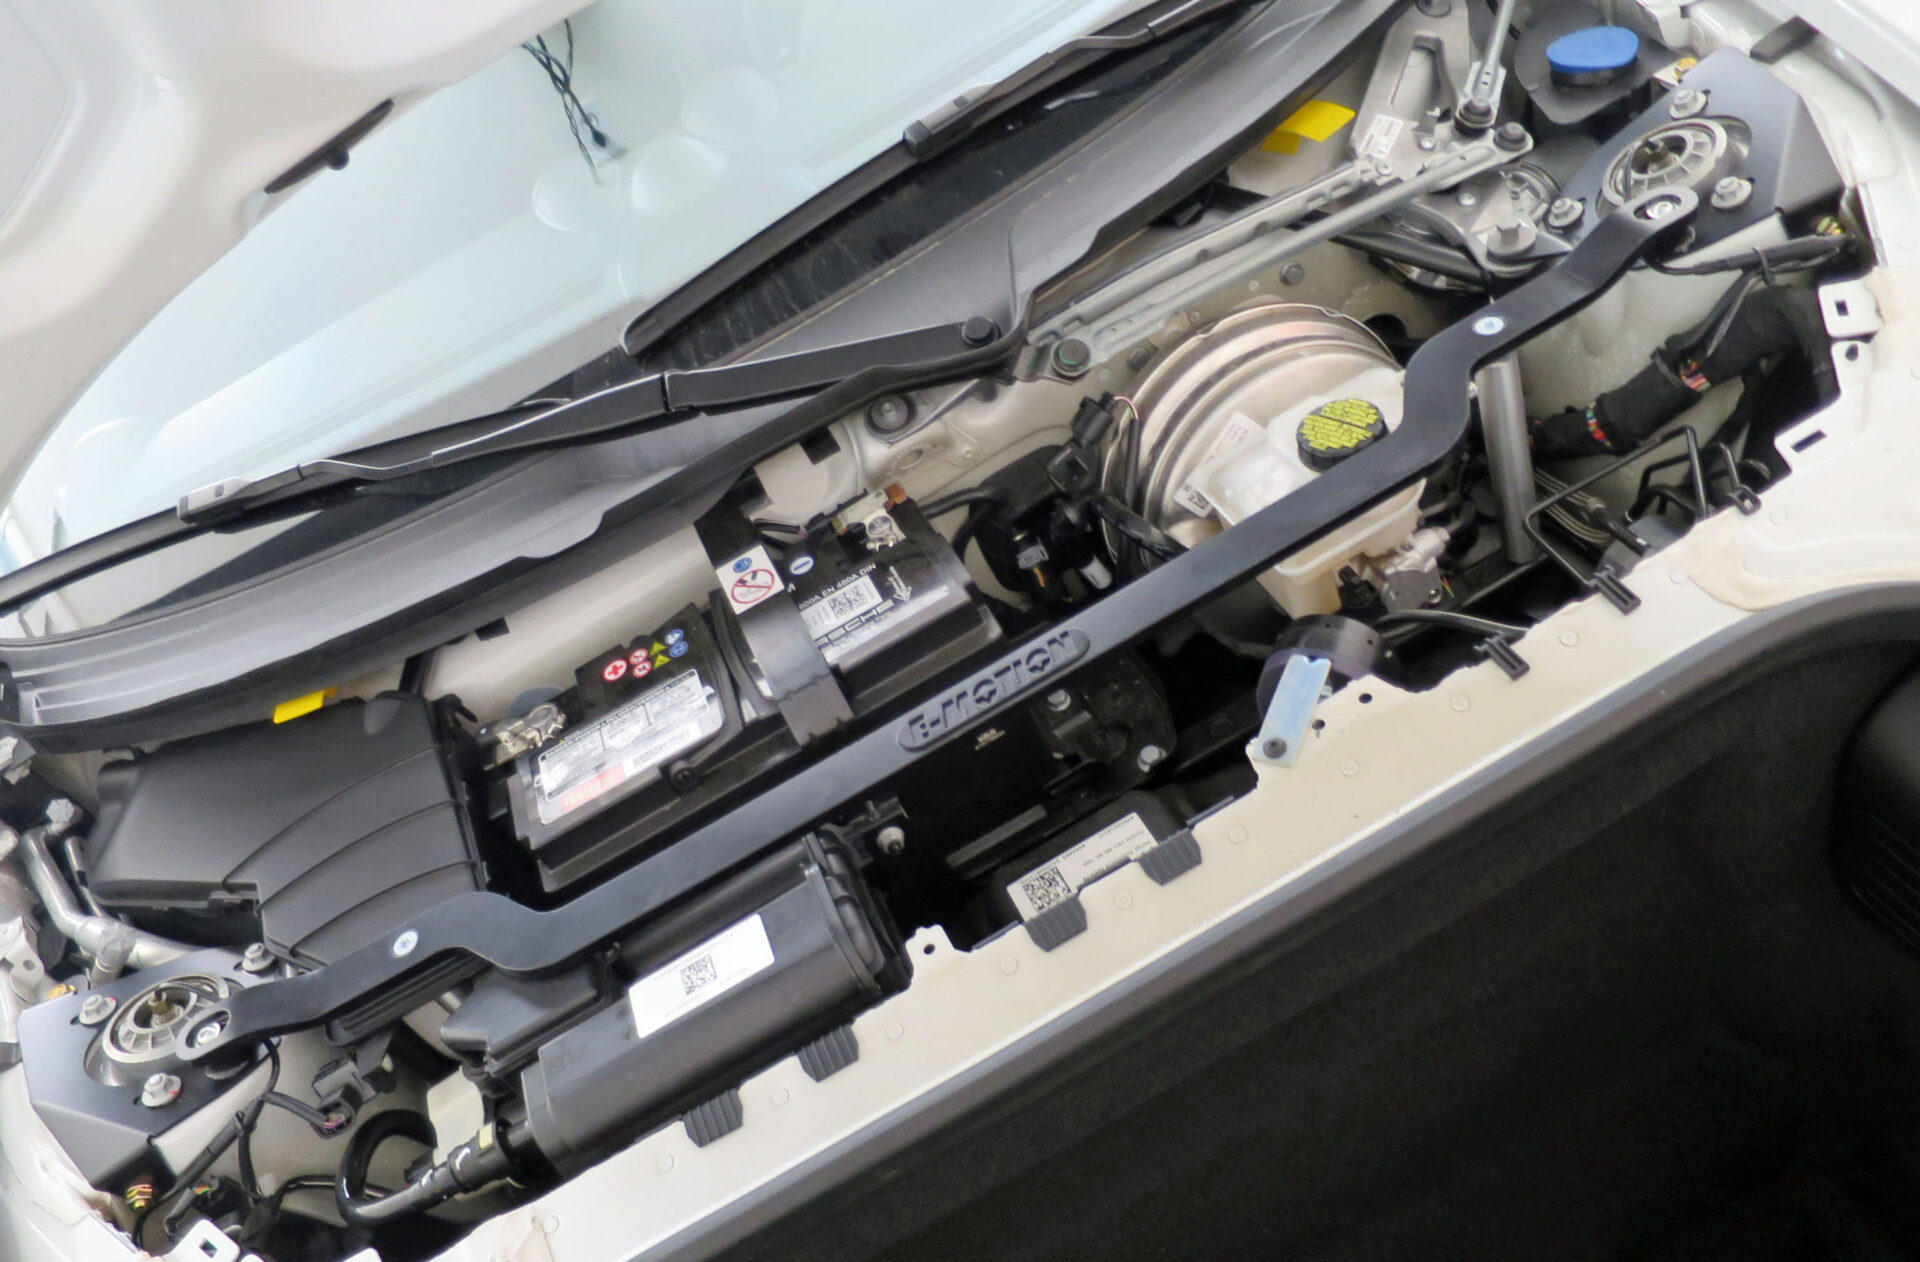
      Remember this is a strut setup, so lateral loads are transmitted into to strut towers. Notice Porsche has black bars going from the strut towers to the rear bulkhead to add strength. Uneven vertical loading, from bumps or cornering, will try to twist the chassis and a rigid horizontal bar can add some resistance against that twisting. This particular design from E-Motion ties the horizontal bar to the strong battery brace that runs the span of of the chassis, boxing it in. Additionally, by tying down the horizontal bar to the battery brace bar, it’s clamping down on the top of the strut towers to help resist the vertical loads which have lead to strut tower failure on this chassis.

      Reply
      1. Charles says:
        May 24, 2025 at 2:20 pm

        Lateral loads at the top of the strut are quite light as most lateral loading goes through the lower arm to the chassis.

        Reply
        1. Khiem Dinh says:
          May 25, 2025 at 12:28 pm

          I’ll calculate some approximate numbers. My car is about 3000lbs with 45%/55% weight distribution and I’ve pulled 1.4G lateral. At max lateral G, we can assume the inside front tire is not loaded to simplify the napkin calculation. I assumed the control arm is 6″ above ground and the strut tower is 24″ above ground. Crunching the numbers, it’s about 1890lbs at the tire contact patch, 2520 lbs at the control arm joint, and 630lbs at the strut tower. Those are all the lateral loads. Remember, there’s still the vertical load on the strut tower that’s about 1350lbs. And that vertical load is trying to cause displacement of the strut tower relative to the other strut tower; i.e. twisting the chassis. And the E-motion brace setup resists that vertical displacement and lateral loads. If you didn’t already look up GT4 strut tower failures, go ahead and look.

          Reply
          1. Charles says:
            May 26, 2025 at 6:56 am

            Photos of the strut tower failure imply a vertical component caused the failure, not a lateral load. Vertical loads are considerable when the suspension is fully compressed. That bar you are hawking does nothing for vertical loads.

          2. Khiem Dinh says:
            May 26, 2025 at 9:02 am

            Of course it’s a vertical load that causes the failure of the strut tower. And I mentioned that in the article when I mentioned sharp impacts. I would note, I never asked E-Motion for any type of discount and they didn’t even know I was writing an article on the reinforcement brace; so, I’m not ‘hawking’ anything. Same goes for their suspension components; I paid full price including the installation costs.

            And of course the brace system counteracts vertical loads. Even if it were just the bar alone, it would have some resistance to vertical loads because the bar attaches to the strut tower cap piece as a rigid joint which resists bending, as opposed to many bars that have a heim joint that would rotate. But what really helps this brace system resist the vertical loads are the two vertical posts that tie the bar to the battery sub brace. Those two posts are fastened with M8 size fasteners; you could lift the front of the vehicle from the E-motion brace because of how the braces uses the vertical posts to tie to the chassis.

            Go ahead, draw out the free body diagram and analyze the loads and interactions.

  4. Charles says:
    May 26, 2025 at 11:14 am

    You’re the one selling something. You draw a diagram and be sure to include the CG, roll center, and wheel diameter this time. You left out those items in your last calculation.

    Reply
    1. Khiem Dinh says:
      July 12, 2025 at 8:57 pm

      Selling would imply I’m getting something of value in return, which I’m not. You’re the one who made a blanket statement, “Lateral loads at the top of the strut are quite light” without providing any quantitative value. So, I did a quick estimation using some values specific to my car. If you don’t like my simplified calculation, then do your own work and show it in order to provide a value that backs up your statement.

      You said the bar does nothing for vertical loads. I described how the brace system does counteract the loads. If you dispute my analysis, draw it out and prove it.

      Reply

Leave a Reply Cancel reply

Your email address will not be published. Required fields are marked *

Input your search keywords and press Enter.