• Tech
    • Tech Category
      • Engine
      • Bottom End
      • Rods and Pistons
      • Head and Headwork
      • Cams and Valvetrain
      • Cooling and Heat Management
      • Intake
      • Headers and Exhaust
      • Rotary
      • Engine Management and Tuning
      • Drivetrain
      • Transmission
      • Clutch and Flywheel
      • Differential and Final Drive
      • Driveshaft and Axle
      • Axles
    • Tech Category
      • Suspension
      • Shocks and Coilovers
      • Springs
      • Swaybars
      • Arms and Links
      • Bushings
      • Steering
      • Geometry Correction
      • Suspension Setup and Tuning
      • Brakes
      • Wheels and Tires
      • Fueling
      • Forced Induction and NOS
      • Aerodynamics
    • Tech Cat
      • Electrical
      • Battery and Power Distribution
      • Electronics
      • Wiring
      • Electrical System Education and Troubleshooting
      • Lubrication
      • Interior and Controls
      • Exterior
      • Paint and Bodywork
      • Wraps and Film Protection
      • Exterior Care and Maintenance
      • Data Acquisition and Tuning
      • Fabrication and Safety
      • Tips and How-To
  • Projects
    • Make A-D
      • Acura
      • Integra (DC2)
      • NSX
      • CSF RSX (DC5)
      • BMW
      • E30 (SR20 Powered)
      • E36 323is
      • E36 M3 (Black)
      • E36 M3 (Silver)
      • E39 M5
      • E46 M3
      • E90 M3
      • E46 Racecar
      • Yost Auto E92 M3
      • Yost Auto F82 M4
      • Chevrolet
      • Camaro Gen5
      • Corvette Stingray (C7 Z51)
      • Corvette Stingray (C8 Z51)
      • GMC Canyon
      • Dodge
      • Viper GTS
    • Make E-I
      • Ford
      • E350 Tow Rig
      • F150 EcoBoost
      • Fiesta ST
      • Focus ST
      • Mustang 5.0 (Grey)
      • Mustang 5.0 (White)
      • Mustang S197 (Budget Track Car)
      • Mustang S550 GT
      • Honda
      • Civic EF Racecar
      • Civic Si (Coupe)
      • Civic Si (EP3)
      • Civic Si (Saloon)
      • EJ Civic
      • Polystrand CRX
      • S2000 (AP1)
      • S2000 (AP2)
      • Infiniti
      • G20 Racecar
      • G20 (P10 AWD Turbo)
      • G35
      • G37S
    • Make J-M
      • Isuzu
      • Vehicross
      • Lexus
      • ISF
      • SC300
      • Mazda
      • V8 RX7 (3rd Gen)
      • RX-7 (3rd Gen)
      • RX-7 Restomod (3rd Gen)
      • Skyactiv 3
      • Frankenmiata
      • Miatabusa
      • My Girlfriend’s Miata
      • Mitsubishi
      • EVO VIII
      • EVO IX
      • EVO X
      • CSF EVO X Racecar
      • Professional Awesome EVO VIII
    • Make N-P
      • Nissan
      • 200SX
      • 200SX SE-R
      • 240SX Land Speed Racer
      • 300ZXTT
      • 350Z
      • 350Z Drift Car
      • 370Z
      • GT-R (R33)
      • GT-R (R35)
      • GT-R (Team America BNR32)
      • LS S13
      • NX GTi-R
      • Pathfinder
      • S13 Drift/Grip Do-it-All Mega 240
      • Sentra SE-R
      • Sentra Spec V
      • Silvia
      • STurdteen Drift Car
      • Porsche
      • 991 GT3RS
      • Cayman (987)
      • Cayman T
      • Cayman GTS 4.0
    • Make S-Z
      • Scion
      • FR-S
      • Scion Tuner Challenge FR-S
      • TC
      • Subaru
      • Autocross BRZ
      • Legacy GT
      • STI (gen 2)
      • STI (gen 3)
      • WRX (GD)
      • WRX (VA)
      • Toyota
      • 4Runner
      • AE86 Corolla
      • GR Corolla
      • Starletabusa
      • Supra Mark IV
      • Tacoma
      • Tundra
      • Volkswagen
      • MKIV Jetta TDI
      • MKVI Golf TDI
      • MKVII Golf R
      • Sipster (Rabbit)
    • Other Projects
      • Powersports
      • Aprilia RS50
      • Aprilia SR50
      • Doodlebug
      • Ducati 998
      • Ducati Hypermotard
      • Honda Ruckus
      • Husqvarna TE610
      • Go Karts
      • Other
      • Sim Racer
      • Aurora Cobra
      • Garage
      • NP01 Prototype
  • Features
    • Features
      • Feature Cars
      • Drag Race Cars
      • Drift Cars
      • Land Speed Cars
      • Open-Wheel Cars
      • Rally Cars
      • Road Race Cars
      • Street Cars
      • Time Attack Cars
      • Drag Racing
    • Features
      • Events
      • Drifting
      • Land Speed Racing
      • Open-Wheel Racing
      • Time Attack Racing
      • Rally Racing
      • Road Racing
      • Car Shows
      • Columns
      • SlipAngle Podcast
  • Video
  • Shop *NEW*
  • MotoIQ Garage Services
  • About
  • Shop *NEW*
  • MotoIQ Garage Services
  • About
MotoIQ
MotoIQ
  • Tech
    • Tech Category
      • Engine
      • Bottom End
      • Rods and Pistons
      • Head and Headwork
      • Cams and Valvetrain
      • Cooling and Heat Management
      • Intake
      • Headers and Exhaust
      • Rotary
      • Engine Management and Tuning
      • Drivetrain
      • Transmission
      • Clutch and Flywheel
      • Differential and Final Drive
      • Driveshaft and Axle
      • Axles
    • Tech Category
      • Suspension
      • Shocks and Coilovers
      • Springs
      • Swaybars
      • Arms and Links
      • Bushings
      • Steering
      • Geometry Correction
      • Suspension Setup and Tuning
      • Brakes
      • Wheels and Tires
      • Fueling
      • Forced Induction and NOS
      • Aerodynamics
    • Tech Cat
      • Electrical
      • Battery and Power Distribution
      • Electronics
      • Wiring
      • Electrical System Education and Troubleshooting
      • Lubrication
      • Interior and Controls
      • Exterior
      • Paint and Bodywork
      • Wraps and Film Protection
      • Exterior Care and Maintenance
      • Data Acquisition and Tuning
      • Fabrication and Safety
      • Tips and How-To
  • Projects
    • Make A-D
      • Acura
      • Integra (DC2)
      • NSX
      • CSF RSX (DC5)
      • BMW
      • E30 (SR20 Powered)
      • E36 323is
      • E36 M3 (Black)
      • E36 M3 (Silver)
      • E39 M5
      • E46 M3
      • E90 M3
      • E46 Racecar
      • Yost Auto E92 M3
      • Yost Auto F82 M4
      • Chevrolet
      • Camaro Gen5
      • Corvette Stingray (C7 Z51)
      • Corvette Stingray (C8 Z51)
      • GMC Canyon
      • Dodge
      • Viper GTS
    • Make E-I
      • Ford
      • E350 Tow Rig
      • F150 EcoBoost
      • Fiesta ST
      • Focus ST
      • Mustang 5.0 (Grey)
      • Mustang 5.0 (White)
      • Mustang S197 (Budget Track Car)
      • Mustang S550 GT
      • Honda
      • Civic EF Racecar
      • Civic Si (Coupe)
      • Civic Si (EP3)
      • Civic Si (Saloon)
      • EJ Civic
      • Polystrand CRX
      • S2000 (AP1)
      • S2000 (AP2)
      • Infiniti
      • G20 Racecar
      • G20 (P10 AWD Turbo)
      • G35
      • G37S
    • Make J-M
      • Isuzu
      • Vehicross
      • Lexus
      • ISF
      • SC300
      • Mazda
      • V8 RX7 (3rd Gen)
      • RX-7 (3rd Gen)
      • RX-7 Restomod (3rd Gen)
      • Skyactiv 3
      • Frankenmiata
      • Miatabusa
      • My Girlfriend’s Miata
      • Mitsubishi
      • EVO VIII
      • EVO IX
      • EVO X
      • CSF EVO X Racecar
      • Professional Awesome EVO VIII
    • Make N-P
      • Nissan
      • 200SX
      • 200SX SE-R
      • 240SX Land Speed Racer
      • 300ZXTT
      • 350Z
      • 350Z Drift Car
      • 370Z
      • GT-R (R33)
      • GT-R (R35)
      • GT-R (Team America BNR32)
      • LS S13
      • NX GTi-R
      • Pathfinder
      • S13 Drift/Grip Do-it-All Mega 240
      • Sentra SE-R
      • Sentra Spec V
      • Silvia
      • STurdteen Drift Car
      • Porsche
      • 991 GT3RS
      • Cayman (987)
      • Cayman T
      • Cayman GTS 4.0
    • Make S-Z
      • Scion
      • FR-S
      • Scion Tuner Challenge FR-S
      • TC
      • Subaru
      • Autocross BRZ
      • Legacy GT
      • STI (gen 2)
      • STI (gen 3)
      • WRX (GD)
      • WRX (VA)
      • Toyota
      • 4Runner
      • AE86 Corolla
      • GR Corolla
      • Starletabusa
      • Supra Mark IV
      • Tacoma
      • Tundra
      • Volkswagen
      • MKIV Jetta TDI
      • MKVI Golf TDI
      • MKVII Golf R
      • Sipster (Rabbit)
    • Other Projects
      • Powersports
      • Aprilia RS50
      • Aprilia SR50
      • Doodlebug
      • Ducati 998
      • Ducati Hypermotard
      • Honda Ruckus
      • Husqvarna TE610
      • Go Karts
      • Other
      • Sim Racer
      • Aurora Cobra
      • Garage
      • NP01 Prototype
  • Features
    • Features
      • Feature Cars
      • Drag Race Cars
      • Drift Cars
      • Land Speed Cars
      • Open-Wheel Cars
      • Rally Cars
      • Road Race Cars
      • Street Cars
      • Time Attack Cars
      • Drag Racing
    • Features
      • Events
      • Drifting
      • Land Speed Racing
      • Open-Wheel Racing
      • Time Attack Racing
      • Rally Racing
      • Road Racing
      • Car Shows
      • Columns
      • SlipAngle Podcast
  • Video
  • Uncategorized

Curly’s Corner: A Nerd’s Eye on Formula 1 – Spain & Monaco Grand Prix

  • Dave Zipf
Fernando Alonso had an even better view of the action.  This is a great view as you can see that at no point is the nose of the VF-18 pointing to the left.  Again, we can see that Grosjean has chased the car to the outside of the track. Grosjean catches the tank slapper, but once he hits the paint, the car immediately snaps right.  He hits the painted line and the lack of grip on that paint sets the car off into its spin. At this point, he is just along for the ride.
And this is where Grosjean has to make a split-second decision.  Notice where his helmet is pointing. He’s looking at the wall of cars coming up the hill directly at him.  See, Grosjean’s car is at an incredibly vulnerable angle right now. He is broad side across the track and sliding towards the racing line.  Worse yet, he is sliding, nose first, into a blind, fast corner, on the opening lap. He is going to be completely unsighted as cars head up Turn 3.  He has two choices: hit the brakes and either skid across the track into an even worse situation, or hit the gas and attempt to get out of the way. Grosjean chose the latter.


I believe that Grosjean thought he could send the car into a full spin on the outside of the track.  This would have been the best thing to do in this scenario.  Fewer cars are going to be at that part of the track.  Unfortunately, the layout of the corner just sends him back across the track and into oncoming traffic.

Keep in mind that despite all of the advances in Formula 1, the front of the car is still relatively weak.  It’s been years since we’ve seen an F1 car get T-boned, but we do know what happened to Alex Zanardi when this same situation happened to him in 2001 (WARNING: the linked video is incredibly graphic).  Yes, motor racing safety has made leaps and bounds in the last 17 years, but the fact remains that Grosjean getting t-boned could have been a career ending crash.  Impact structures, anti-intrusion plates, and carbon fiber advances can only go so far: it’s still a large amount of energy being applied to a small area. Obviously we will never know what would have happened if Grosjean’s car had been clipped in the front instead of the back.  He could have walked away. He could have broken his feet, ankles, or legs. Perhaps he would have ended up like Zanardi and spent the next two weeks in a coma, and the following six months learning how to walk with prosthetic legs. Maybe he would not have survived at all. The one thing we can be certain of, is that Romain Grosjean did not want to find out.  When he spun into traffic, he panicked and slammed his foot on the throttle. And while the armchair critics can all sit around and look down their noses at a professional driver who made a mistake, they can all piss off if they think they would not have panicked in the exact same situation.


If the penalty for panic bailing is a three-place grid penalty and two measly Superlicense points, I’d say Grosjean came out well ahead.

Random Observation

It’s been five races in 2018 and we’ve seen five safety cars.  This is becoming quite the trend. I’m not sure when was the last time that there were 5 Safety Cars in as many races, but it’s not within recent memory.  Safety Cars are annoying, but I would argue they’ve improved the show. Between bunching the field, throwing a wrench into team strategies, allowing drivers to save fuel, and altering the tire temperatures, Safety Cars add a nice layer of unpredictability to a race.  While the SC and VSC didn’t affect the winner, the VSC helped Mercedes pull off the 1-2. Without it, Bottas would have needed another stop and Vettel would not have been blocked by Perez. This would have put Vettel 2nd and Bottas 3rd or worse. Source

Monaco: A Tale of Two Bulls

There really was only one story in Monaco: Red Bull Racing.  On one side of the garage were the highest of highs: Daniel Ricciardo finally broke through to win the most prestigious race of the year and claim victory at the Monaco Grand Prix.  In the sister garage, Max Verstappen’s team settled for a lowly 9th and were left to wonder what could have been.


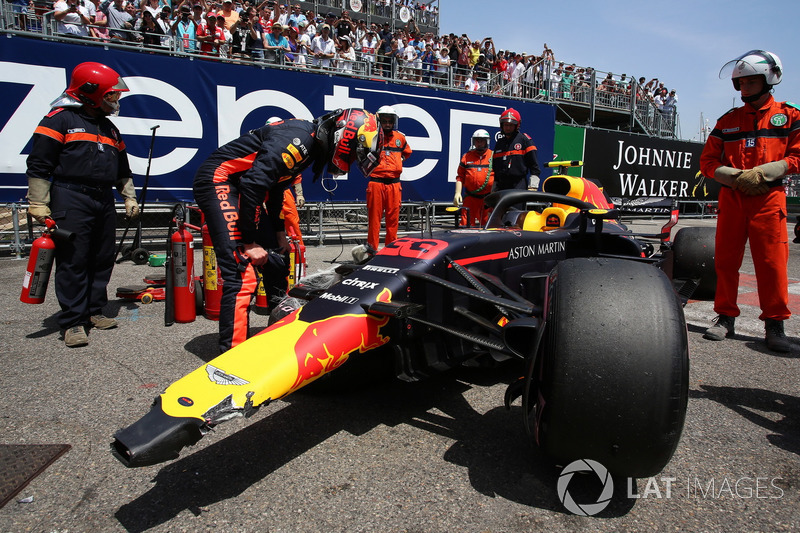
We’ll start with Max Verstappen.  After Baku, Max was in the dog house with Red Bull Racing and needed a solid race to recover points.  He mostly delivered that in Spain with his 3rd place finish. He should have been prepared to do the same in Monaco.  Monaco in particular was the perfect track for Red Bull to begin closing in on its rivals. The tight, twisty confines of Monaco require tons of efficient downforce and the RB14 has that in spades.  Sure enough, the Red Bulls were 1-2 in every practice session. However Ricciardo was outpacing Verstappen and for Max, this simply wouldn’t do. He started to push, harder and harder, looking to squeeze out that last 1/1000th of a second to beat his teammate.  Unfortunately, Max pushed just a bit too hard.

We’re not kidding about that 1/1000 of a second either.  Verstappen’s best lap was exactly 0.001 slower than Ricciardo’s in FP3.  That’s how close they were and how hard Max was pushing when he crashed in the Swimming Pool.  Source

The crash was a disaster for Red Bull.  There was no way the car could be repaired in time for qualifying, which meant one of their cars, a car that would easily land on the front row, was starting dead last.  Turns out there is a worse place to be than the dog house and Max just found it. Max quickly realized there was only one person to blame in this situation; himself. His other incidents throughout the year could be somewhat rationalized since they involved other drivers.  Clipping the barriers while completely on his own left no excuses to hide behind.

Related

Previous page 1 2 3 4Next page
Related Topics
  • Formula One
  • Curly's Corner
Previous Article
  • Tech

We Check Out AMS Performance’s Turbo Test Rig

  • Khiem Dinh
View Post
Next Article
  • Tech

Product Test: Chipex Paint Chip Repair System

  • Ainsley Jacobs
View Post

Leave a Reply Cancel reply

Your email address will not be published. Required fields are marked *

Input your search keywords and press Enter.