,
Plumbing
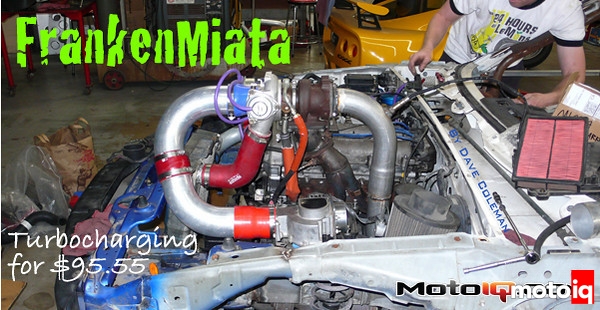
Oil: 1.6-liter Miatas used the B6 engine, which was a very, very close relative to the B6T found in the much loved but seldom purchased 323 GTX. Despite its 116 hp stock output, the Miata’s B6 has forged connecting rods, piston cooling oil squirters, and even a turbo oil feed on the side of the block. All we had to do was buy $22 worth of -4 oil hose and fittings and we were able to feed the turbo.
 |
|
 The single most expensive part of our turbo conversion was the $22 bag of oil feed hose and fittings. The feed hose (on the right) bolts into the turbo oil feed hole Mazda conveniently left at the back of the block. At the turbo side, we brazed a -4 AN fitting to the stock oil pipe (going into the top of the turbo). The single most expensive part of our turbo conversion was the $22 bag of oil feed hose and fittings. The feed hose (on the right) bolts into the turbo oil feed hole Mazda conveniently left at the back of the block. At the turbo side, we brazed a -4 AN fitting to the stock oil pipe (going into the top of the turbo). |
The turbo’s oil drain is slightly more complicated. Before installing the oil pan, we welded an oil drain bung as high up in the pan as possible, directly below the turbo. The Dodge oil drain line was only long enough to get about 1/3 of the way to the pan. The rest we cobbled together with chunks of Nissan power steering hose from our scrap hose box.
Water: The center housing is water cooled, and even though the majority of half-assed aftermarket turbo kits don’t use any water cooling, any fool knows an endurance race car is going to need the water lines to be hooked up. Any damn fool except our turbo engineers. The water cooling, it turns out, it primarily there to minimize heat soak after shutdown. Since we would only turn our car off twice per race, and since it would be up in the air with plenty of natural cooling, the water really wasn’t necessary.
Besides, once the engine is shut off, water circulates through the turbo by the pumping action of the boiling water. As water in the CHRA boils, the bubbles travel uphill on their way back to the radiator, pushing the water in front of them, and drawing in new water behind them. For this to work, of course, the water outlet must be continually uphill, with no traps for those bubbles. With our turbo mounted higher than any other part of the cooling system, this would have been impossible.
Air: For modestly-powered turbo cars, it’s hard to go wrong with an intercooler from a Ford Probe Turbo/Mazda MX-6 Turbo. They have a reasonably good end tank design and the core has a large flow area, meaning they’re reasonably unrestrictive for a small cooler. They’re also hidden behind the grille of innocuous cars, so they aren’t as likely to already be gone as the more flashy front-mount intercooler in, say, a Mitsubishi Starion. Besides, we already had one.
 |
|
| 5 car geek’s worth of leftover project crap gave us plenty of material to work with. | |
 |
The Probe intercooler had been sitting under a bench ever since we decided not to turbocharge an SE-R. For our LeMons accounting, we valued it at $20, even though we bought a much better BMW 745 intercooler a few months later for only $7. By that time, our Probe intercooler was doing its job so the BMW cooler sits on a bench and waits…
Years of turbo kits and intakes have left us with a box of used and surplus hoses, pipes and bends. With no bodywork restricting our mounting options, we simply pieced together hoses, pipes and intercooler in the shortest, simplest way possible and called it good.
The intake was equally simple, at first. A few scraps of old intakes, a few hoses, and voila, air went from the airflow meter to the turbo as it should. But then we got nervous, Those scraps were shiny. What if people saw shiny parts and thought they were expensive? This is the peril of LeMons. Building a car for $500 is only the first challenge. Convincing the BS judges and all your competitors that you did it for $500 is the next challenge. Periodic panic attacks rolled through the team whenever we started imagining some detail of our car was simply too cool to be believed. Usually we’d talk ourselves down, but for the shiny intake we actually took action. After our first test, but before the first race, we removed the shiny aluminum intake that actually was free, and replaced it with one we made from ABS plastic pipe from Home Depot. This looked cheaper, but cost us $15.
We’re dumb.
 |
|
The only hose that fit our throttle body was this red hump hose, which only fit this steel elbow that happened to have a flared end that stepped up to Miata throttle body size. We think this was originally made to fit exactly here on a Jackson Racing supercharger, though the other end of it had been cut off years before we found it. Making this work with our intercooler meant plugging the original outlet, and welding a new outlet right where we needed it. The horrible weld quality is a result of all the oil soaked into the aluminum of the end tank. The cherry on our intercooler sundae is the mounting bracket. Though most of the load is carried by the hoses themselves, we wanted something to locate it more positively. There was a handle from a screw jack on the floor. We had a welder. And an M10 x 1.5 die that could thread the end of the jack handle. And just like that, we had a bracket. |
 |