,
 |
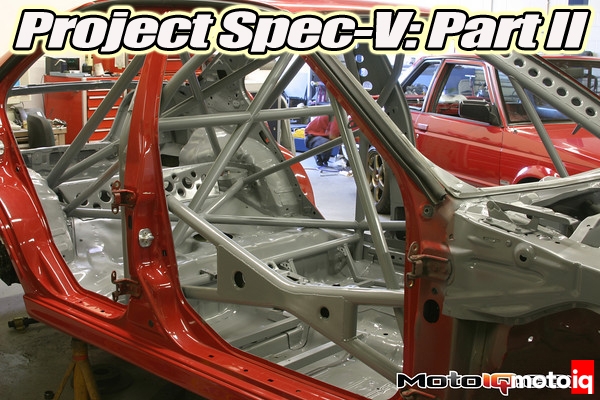
| We used Rustoleum industrial paint and aircraft zinc chromate primer to paint the cars interior |
Proper surface preparation is important for a long lasting paint job. First the entire interior of the car must de degreased. We used MEK saturated rags for this job. It is important to wear a respirator and chemical resistant gloves when doing this. Remember that these chemical are also highly flammable so do this in an area with good ventilation and of course don’t smoke or be near any source of flame or ignition. After degreasing we sanded the cage and the entire interior of the car with a combination of scotchbrite red pads and 220 grit sandpaper. The surface doesn’t have to be perfect, just clean, free of rust and welding scale with some roughness to assure paint adhesion. This part of the job is pretty much a bitch. When sanding, be sure to wear a particle mask so you don’t inhale the sanding dust.
 |
| After masking the car we applied the primer. That’s what the weird green color on the roll cage. Zinc Chromate primer etches into the metal bonding harder than any other primer to it |
After sanding, mask off the outside of the car. We used 3M blue painters tape because it peels off cleanly and real masking paper as it is dust free and handy although newspaper will work. We must stress that you must use a fume and vapor type respirator when doing this or you will get very sick. Particle masks won’t cut it. We first sprayed on a thin layer of aircraft self-etching zinc chromate primer. Although it’s real toxic, nothing sticks to bare metal and resists corrosion better than this. This is the weird green looking stuff that you might see inside panels of a plane or finishing off the inside of JDM race cars. Because of its toxicness, you won’t find this at home depot, but at professional aircraft supply stores. We got ours from Aircraft Spruce a local airplane and racers supply house.
 |
| The painted interior makes the car look way more complete |
After the primer dries, which takes a few hours, we scuffed up the primed surface with a scotchbrite pad and applied the paint starting at the roof and working down, being careful to make sure that all surfaces were painted. This is tough to do with a cage and if you are not wearing a respirator you will suck down enough fumes to puke and develop lung cancer. We let things sit for an hour or so to let the new paint flash over, then removed the masking paper and tape. After a couple of days the paint is cured enough to work on without damage. We painted the entire engine compartment and interior of the car. Now that the cage fab is done, its time to get on with some of the more interesting parts of the build.
 |
| The interior also included the trunk |
 |
| The engine compartment got paint as well. The light color here helps us spot leaks easier |
Sources
Nitto Tire
NT01 Tires
Technosquare
Fabrication
Ground Control Inc.
Camber/Caster Plates
Sparco USA
Seats, seat hardware, harnesses, steering wheel, pedals
Sweet Mfg
Steering column, brackets, steering quick release
Longacre
Main power cutoff switch
Related