,
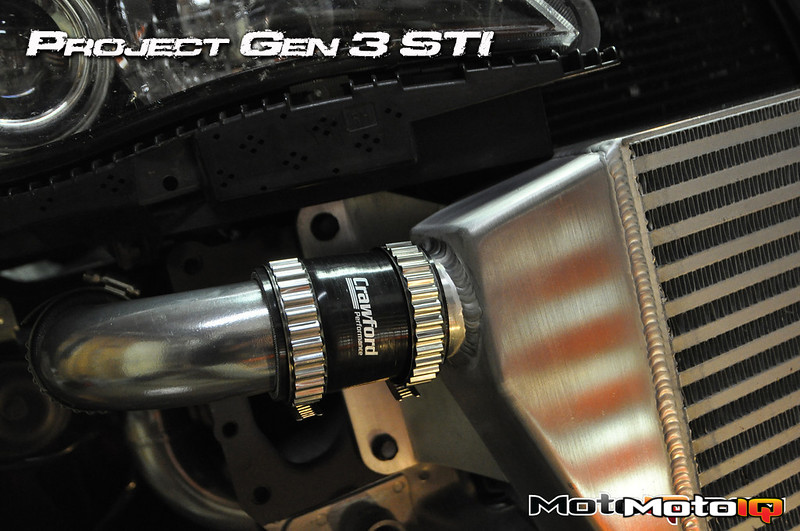
WOW… YEAH…. Lots of parts to install so let's get to it! As we parked the vehicle for the install we took proper safety precautions and pulled the fuel pump and cycled the fuel system to eliminate any residual pressure and then disconnected and removed the battery. After removing the TMIC we began removing hoses from the intake manifold and throttle body. One nice thing is that the intake manifold is not shrouded by the motor as it sits directly on top allowing fairly easy access to the ancillary systems that need to be removed. We then chose to unbolt the intake manifold from the TGV risers, we THOUGHT this would make for the easiest installation and of course hind sight is always 20/20.
As we tried to remove the intake manifold we realized that both the fuel hard lines as well as the main engine harness are bolted to the underside of the intake manifold. We proceeded the hard way and raised the manifold as high as we could to remove the turbo inlet and this exposed the connections for the fuel hard lines. After we removed those hoses (and properly huffed the fuel fumes) we tortured our knuckles to remove the two bolts that secure the plastic encrusted engine harness to the underside. This proved to be the last item and with that we freed the intake manifold from the car to reveal the TGV risers. As I stood there with bloody digits and the intake manifold in my hands I came to a sudden realization. FUCK did I do that the hard way.
If you are going to do this install leave the TGV's attached to the intake manifold, disconnect the main fuel lines, remove the turbo inlet, unplug the harness and lift the entire assembly out with the fuel hard lines still attached! Another trick we learned is that it really helps to remove the alternator to access the underside connections on the intake manifold. Considering that removing the alternator on an EJ is probably the easiest removal we've ever encountered (seriously 3 minutes start to OUT) it frees up a lot of space to work. Next we turned to the TGV riser's and quickly realized that Subaru Engineer's must be masochists because they engineered more finger munching brackets that shielded the fuel rails from what they thought might be a nuclear attack. All I could think about as we removed these parts was how happy I was that they did not have to go back ON the car! Once removed the risers came out with the fuel rails attached…. PHEW thank the lord for blood transfusions. What struck me as odd was the fact that despite the fact that the intake ports were exposed with the IM was completely removed, the engine bay still appeared PACKED with stuff.
 After removing the intake manifold you reveal this utter mess. Seriously look at all of this crap! Let's ditch as much of this stuff as possible eh'?
Underneath the IM were two valves and the plumbing for the Air Pump. That's right for the sake of reducing cold start emissions Subaru engineered a system that pumps air in to the exhaust stream through the cylinder head to assist the catalytic converter in lighting off sooner. The system appears to only operate at startup and for as much space as it takes up and the weight it adds to the top of the motor it had to go. We plugged up the intake ports with clean shop rags and got to work… Despite the severe pain the removal of these systems posed, it was very satisfying work, sort of like that guy with the big tractor that gets to demolish things all day! I literally would remove a part and toss it across the garage to the “shit pile” We started off by removing the harness connections at the air pump solenoids as well as the rubber air hoses that route from the pump to the valves.
 The pump itself resides on the front of the motor next to the AC compressor. If you look down along the side of the valve cover you can see the plastic supply duct for the solenoids. Yes, all of this to create a lower emissions vehicle out of an STi…
 After that we removed the pump itself from the front of the engine and the large cast iron bracket that secured it to the AC compressor. The bolts that secure the bracket to the compressor are too long to be replaced once the bracket is removed so we used a metal sleeve spacer to take up the excess length and re-installed them. We have seen other cars with the front mounted air pump deleted but all of those cars appear to leave this bracket in place due to the common bolt that holds the two components, the spacer works just fine or you can source 70mm M6 x 1.25 bolts, they are the proper length with the bracket removed. Once the pump was gone we worked our way back to the two air valves at the rear of the motor. These valves connect to the exhaust ports through hard lines similar to that of an EGR system and all of this crap has to go, or does it? In our research we learned that the barometric pressure sensor is located within the top of one of these valves and should be retained.
 Here you can see the two air pump solenoid's and us starting to remove the hard lines. The flange with the carbon buildup feeds the driver side cylinder head.
 The larger valve closest to the starter contains this sensor and most people just leave it in place. Being complete weight weenies and not wanting this thing cluttering up the engine bay we removed BOTH valves and got out our trusty vice and cutting wheel. In this case the sensor is a plastic piece that is basically pressed in to the top of the aluminum valve housing and we wanted to cut it out of there.
 We bastardized this solenoid in the name of weight reduction. And honestly we just wanted to take our frustrations out on this jackass system. Good riddance!