
,
Ok, this is where things really start varying from rack to rack. The pinion shaft on some of the other Miata racks is held on with a big nut on one end of the shaft. This one is held on with two allen bolts. Here, I’m using a Harbor Freight dead blow impact wrench to break them loose.

Make note of the shims you find under the pinion housing. If you don’t see any here, look down in the hole and see if they’re stuck in there. These guys are important, and you’ll want to be sure they go back where they belong.

Now, how to get the pinion shaft out of the pinion housing? I got stuck on this step for weeks, since every rack de-powering guide I found used some other kind of pinion design, and even my factory service manual disagreed with what was supposed to be in my car. After digging through several manuals, I finally found one that matched. According to the book, you just press it out. Duh…

And there it is, finally freed from his housing. That block with the 5 black rings on it is the control valve assembly that actually controls hydraulic pressure in the rack. Honestly, I have no idea how this crap works. Power steering is kinda like automatic transmissions. Shit that makes cars suck. I don’t need to know how to make cars suck.
Let’s get that thing off…

The valve assembly is trapped between two bearings, so we have to remove one. In theory, this bearing should just slide off the shaft by hand. In reality, it’s right up against some rust, so it had to be gently pressed off. After sanding the rust down, the bearing slid back on by hand.

Finally, you’ll need a pair of snap ring pliers to free the spool valve assembly from the pinion shaft. Once the ring is off, this part really does slide off by hand. Keep the bearing. The rest of that crap is going in the trash.

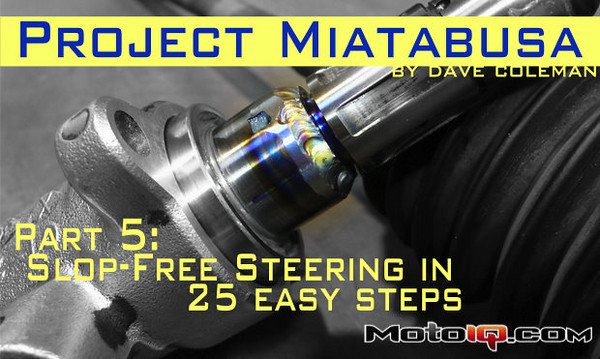
Finally, we have reached our goal. This is where the slop in a power steering rack comes from. See the splines? The pinion shaft is actually an upper and lower shaft splined together. Normally when two shafts are splined together, they rotate as one, but these splines don’t do that. They’re sloppy, and they’re that way for a reason.
The splines are really only there as a backup. They’re the bump stops at the end of a clever little hydraulic suspension system of sorts. Hidden down inside this interface is a little torsion bar valve thingy (remember, I don’t really know what it looks like). When you turn the wheel, it twists the bar, which opens a little passage that lets hydraulic pressure into the rack. That pressure helps push the rack the direction you were turning. With that help, you then don’t exert as much torque on the pinion shaft, and that takes some twist out of the torsion bar, closing off the hydraulic pressure. It’s an elegantly simple, self-regulating mechanism.
But once you remove the hydraulic assist, that elegant system turns into a bucket of slop. Turn the wheel now, and you just bend the torsion bar. That’s it. Ok, maybe the car turns a little, but not with much vigor, and certainly not with any direct connection to your hands. After a few degrees, the bar is maxed out and you run into the splines. Then, and only then, do the two ends of the pinion shaft move as one.

Just how much slop is this? Spend a few seconds watching the moving pictures:
video:
Miata spool valve slop. from Dave Coleman on Vimeo.
Time for the scary bit. Let’s weld this crap together and get that rigid connection once and for all.
This is scary, of course, because, well, steering is important. There’s always that little voice in the back of your head saying that someday your weld is gonna fail, and with it your steering. Maybe it will. I’m guessing it won’t though, and here’s my reasoning.
1: if the weld fails, the splines are still there to connect the two ends of the shaft.
2: Unless, of course, the failure comes from the weld screwing up the heat treat of the shaft, and the shaft itself snaps. Maybe, but consider how much torque this shaft sees. It sees exactly as much torque as you can exert with your hands. You have one steering wheel’s worth of leverage, now go break this 1″ thick steel bar. Yeah, I didn’t think so. Finally,
 3: It was TIG welded with mad skillz and Weld Mold 880 filler material, which is a Ni/Cr filler material made for repairing giant forged stamping dies that are too big to be heat treated after welding. Unlike most welds, a proper weld with this stuff remains ductile, so it can handle all the bending I’ll be doing with my huge muscles.
This happens to be the same filler material, and the same mad welding skillz, used to make the Angry Hamster’s front sway bar 6″ narrower. There is no better proof of a weld’s ductility than welding a sway bar together…

Now, when the pinion shaft goes back in the housing, don’t forget all those shims you were keeping track of when you took this thing apart.


3 comments
Great write up! The note about drilling out the dimple to prevent the end cap treads from being destroyed was really helpful!
You don’t know how happy I am to find this write up! My rack 90% stripped but spent a good hour last night trying to figure out how to get the rack out of the gear housing. Got the Ali nut off but the rack wouldn’t slide out like all the other videos and guides I’d previously watched.
Got a press at work so had this in mind but didn’t want to force anything if there was something securing it in place that id missed. I can press it out tomorrow now with some peice of mind so thanks.
By grind out the dimple, what exactly do u mean? do u grind the outside of the rack down where the dimple is with an angle grinder?