,
With the new engine looking healthy, the itch for power struck again. That old oil-is-low-octane theory? Still true, and now that we had an engine that probably didn’t burn oil, we might be able to get more power. Actually, this time around, we were looking for more torque. Look back at that accidental 45 hp we gained and you’ll see most of it was at high rpm. We could really use the flexibility of a wider torque band.
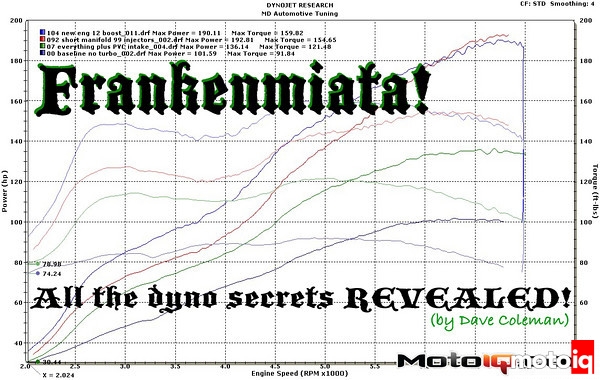
Our first attempt was simply advancing the timing 2 degrees. Nothing fancy, just grab a timing light and move the crank angle sensor. The results, seen here on Dyno Chart #10, were strange:

Just as we had hoped, torque picked up a bit, but strangely, power stayed the same. Why? Turns out advancing the timing also reduced the boost almost 1 psi. With the timing set at 10 degrees, boost was creeping to 7 psi, just as it had when we started this adventure (many races of not blowing up had given us confidence to stick with the boost creep this time). Now, with timing at 12 degrees, boost dropped to around 6 psi and exhaust temps dropped over 30 degrees C. What the hell?
Best explanation we can come up with is this: Advancing the timing doesn’t increase the amount of energy available in the fuel that’s being burned, it simply makes better use of that energy by timing it to turn the crank rather than spitting out the exhaust. More energy used to turn the crank means less energy sent out the exhaust in the form of heat, and less energy driving the turbine, which results in less boost. If the wastegate had been regulating boost as it should, we wouldn’t have seen the boost drop, but since we had the wastegate pegged, any change in exhaust energy would be reflected in our boost pressures.
This seemed like the perfect free mod. More torque, better boost response and lower EGTs all at the same time. Sadly, when did did our 5th gear abuse test, the dreaded ping returned. 12 degrees was simply not sustainable. We dropped back to 10 degrees and tried something more crude.
 McMaster-Carr part number 48935K25 is listed as a 1/4-inch brass adjustable vacuum/pressure relief valve (whatever that is), but with the right simple mods, it’s a ball-valve boost controller. A ball valve boost controller works on a different principle form the calibrated bleed we used before. The ball valve is simply a ball and a spring between the boost source and the wastegate actuator. The spring holds the ball against a seat, blocking the boost signal. When the force of the air pressure on the ball is more than the force of the spring holding it shut, the ball lifts off the seat and the boost signal gets to the wastegate.
The only things you have to do to turn this $8.32 McMaster part into a boost controller is screw a hose barb onto each end, and drill a teeny tiny bleed hole on the wastegate side of the ball. The bleed hole lets the boost pressure out after the ball valve closes again. Without the bleed, the wastegate would open and then stay open, instead of moving as boost conditions require.
Since we didn’t want to turn up the peak boost, a ball valve controller is perfect for our situation. Our boost would hover around 3.5 psi from 3000 to about 5500 rpm before starting the long creep up to 7 psi. If we could just get the low-rpm boost to jump up to, say, 5 psi for that stretch, the car should be much more driveable. A bleed valve will modify the boost signal all the time, but the ball valve can be adjusted to block the signal altogether until 5 psi hits, and from 5 and above, the signal will be honest and accurate.
When Project Silvia first started, we were using a McMaster-Carr ball valve boost controller, and after about 10 minutes of digging, I actually found it in my collection of used hose barbs. After sticking it in the wastegate line and making a few test runs to dial in the 5 psi midrange we were looking for, the results were perfect:

Finally, Dyno Chart #11 shows 20 lb-ft of torque right where we wanted it, no extra boost at high rpm where the knocking was occuring when we advanced to 12 degrees, and all of it for $8.32 that I spent 10 years ago!
The head-gasket popping story of the new engine’s debut has already been told here, but to summarize: second place by 36 seconds. That was, we expect, the best finish this engine will ever have. As the pace of the fastest LeMons cars ratchets up and up, a new level of speed, pit strategy, and fuel economy is required to stay on top. Keeping the car on the podium all year has required not only our constantly improving power, but also two other innovations.
In the pits, most teams fill their tanks with 5 gallon jugs, but we built a fuel rig that holds an 11-gallon jug in the air and lets us fill with a nozzle just like we’re at the gas pump. This shaved minutes off each pit stop and was decisive in that 3-win streak we had early last year. Soon, all the fast teams had similar rigs.
Our second trick was adding a secondary fuel tank. LeMons rules allow stock tanks and also allow fuel cells. We used both, adding a 5-gallon FIA fuel cell that simply pumped into the main tank at the flip of a swicth. That extended our range enough to stay in the hunt, but never quite got us the checkered flag.
For 2011, both the fuel rig and the 2-tank strategy are against the rules, so we’re back to 5-gallon jugs and the Miata’s tiny gas tank. a 24-gallon fuel cell is allowed in the rules, but will never fit in the Miata. Even the 5 gallon tank in the trunk had a drastic impact on our handling, so we’re stuck with the stock tank location. On the ultra-competitive west coast, it’s gonna take more than our 12-gallon tank to take any more wins.