

Honda S1000: How To Install A Motorcycle Engine In A Car
It is well established that: Small Car + Big Engine = Hot Rod. The bigger the engine and the smaller the recipient vehicle, the hotter the rod. Putting a 1.8 liter in your Honda CRX? Mild hot rod. Putting a Space Shuttle SRB in your Peel P50? The hottest of rods. Installing a motorcycle engine in a car seems to be a violation of this rule. I hope you will agree with me after reading this article: it is anything but.

Motorcycle engines have a few advantages that help bring the hot rod equation into balance: they are lightweight, they have integrated sequential transmissions, they are inexpensive, and many go well past 10,000 RPMs. What they lack in power, they make up for in power density; you can get 200 horsepower in a tiny package weighing 130 pounds, and that is with the transmission.
Sure, you can upgrade pistons and connecting rods and throw on turbochargers to squeeze out more power, but the approach to this project was: simple is good. I know, that sounds insane; we’re going to take an engine that was designed for an entirely different type of vehicle, and stick it into a car made half a century ago, but somehow we’re going to try to keep it simple.
With that in mind, the first step is to find a car that will still be fun with 150-200 horsepower. Fortunately, that’s pretty much any car that weighs less than a ton. Unfortunately, that’s not a lot of cars. Many Japanese cars from the mid-1980’s and earlier, older MG’s and Triumphs, even some later cars with liberal weight reduction could be done. There have been a few Miata motorcycle engine swaps, including the documented-on-MotoIQ Miatabusa project. This project is a fascinating read, though since simplicity was a goal here, heavy engine modifications and things like a custom CNC transmission adapter plate and output shaft were out of the question. I live in one of those emissions testing states, so for something like this, life is easier with an older, emissions exempt vehicle.
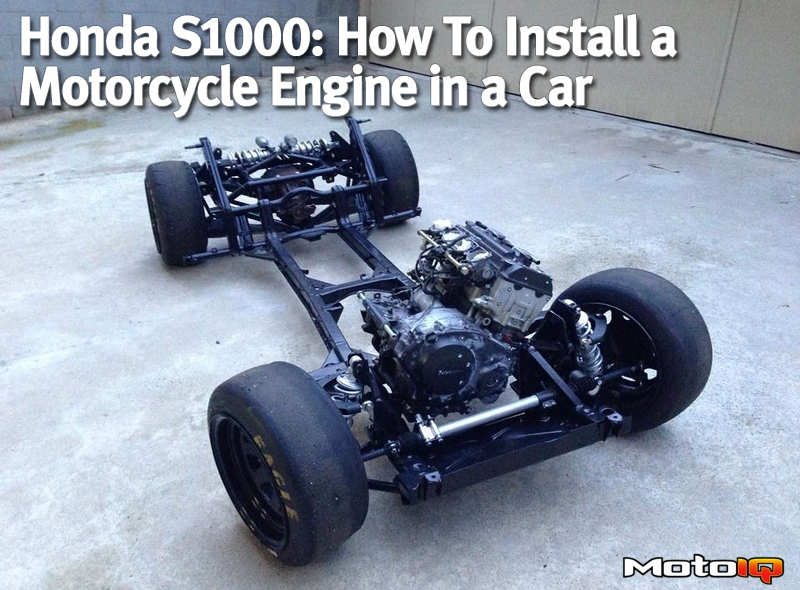
The perfect car for this? A 1964 Honda S600. It’s small and light, and it was Honda’s first mass-market car, so it has a story to it. Also, it still jives with the aforementioned Hot Rod Equation, as this car originally came with a 606cc engine, and the donor engine is a 1 liter that has over three times the power. Also, it’s cheap! Especially if you start with one that has, uh, seen better days.

A welder
That’s about it, actually. If you’re playing along, you’ll need some way to cut out sheet metal for brackets and such, so if you don’t have a waterjet in your garage, you might want a vertical bandsaw, a drill (possibly drill press), and grinder too.
Install the engine in the car, and
Connect the motorcycle output to the driveline
Super simple! Kind of. Actually, those steps have several sub-steps, some of which have sub-sub steps, so it looks more like this:
Install the engine in the car
Run fuel lines to and from your engine
Replace fuel pump
New fuel tank?
Weld up a custom header
Attach exhaust to header
(Probably just build all new exhaust)
New intake?
Attach gas pedal to throttle body
Attach motorcycle clutch MC to car clutch pedal
Attach shifter
Mount new gauges, or adapt engine to old gauges
Plumb the engine to the radiator
Connect the motorcycle output to the driveline
Attach the output shaft to the driveshaft
Adjust driveshaft length appropriately
Possibly add two piece driveshaft to account for offset
Possibly replace driveshaft, diff, half-shafts, and hubs to account for increased power
Add a driveshaft loop
Also, while we’re at it, upgrade the brakes, probably
Okay, that’s not so bad, that’s a doable list of things, right? Most of these things should exist in the knowledge base of a serious gearhead, so if you haven't done some of this stuff in the past, now is a perfect time to add it to your repertoire.
Cool, so here we are with our to-do list. All we need to do now is explain each item it a reasonable amount of detail. Let’s start at the beginning.
Install the engine in the car
Hopefully, before you’ve reached this point, you’ve removed all the stuff you plan on replacing, like the old engine and transmission. That’s actually the first step, so let’s start there.
Remove all the stuff you plan on replacing or not using

Remove the old engine, transmission, driveshaft, you probably don’t need a heater or air conditioner or any of those vents or tubes, possibly the entire dashboard, spare tire and jack, old heavy 12v, anything that looks emissions related, maybe even the windshield wipers; the lighter the better. If you’re planning on daily driving this thing, you might want to be a little more conservative with your weight reduction, you crazy badass.
Okay, stuff removed, back to step one:
Install the engine in the car
Oddly, there are no off-the-shelf motor mount kits for installing a 2007 CBR1000RR engine in a 1964 Honda car. Thankfully, building your own mounts is easier than it sounds; the only hard part is figuring out the reaction forces and placing the engine mounts in the appropriate locations. Stick a floor jack under the car where the engine will go, lower the engine onto the floor jack with an engine hoist, and adjust the height and location with the jack. An engine hoist is not required here, you can hang the engine from the middle of a ~6ft 4×4 wooden post (or a couple steel tubes you have lying around) and have a friend help you drop it in. Once on the jack, you may need to prop the engine up with some wood blocks to keep it from falling forward.

The engine location should be chosen with some concern for weight balance, but also of concern is minimizing the output angle of the driveshaft and efficient mounting to the frame. A higher angle will put more (non-torque) forces into the engine and the differential and may cause failure in a place you don’t want to have fail. You also want to place the engine as close to the frame as you can so you can have shorter, more efficient mounts. Keep in mind the items you may not have installed yet, like headers, intake, oil filter, etc… You don’t want to get it all mounted in and then realize you can’t change your oil without pulling the engine.


12 comments
Hi…This article is probable the most interesting thing a have read in a very very long time. I have done a few building projects and something like this one you have done really interest me. I will do more research and get things going. Thanks for sharing your project….
Thanks for the support!
Do you have any videos of this running?
What do you think of mounting an R1 engine trans and rear wheel with swing arm behind the passenger seat in a 1st generation Insight. Bike tank up front. Other than a side scoop and engine mounts, drive line modification was a 66 tooth rear sprocket instead of 44. Running weight is 1420#, 150 hp, 95 mph top speed at 12k and 12.8 quarter mile at 95. $1200 total spent. 350 car. 450 bike, 85 battery, 80 car tire on bike rim. Hoses, cable, extending length of dash wiring, exhaust extension pipe, etc. super easy build. Took as long to strip original car of interior and driveline.
I’ve been searching for a simple way to install a bike engine directly to the front wheel drive of my Honda Insight but like your idea. Would like to know more.
Hey I’m building a 07 cbr1000 crosskart and I was wondering how did you do the throttle system
What’s the acceleration from 0-60 like?
You mentioned possibly using a Goldwing as a donor because it offers a built in reverse. Honda bikes with drive shafts rotate the final drive in the opposite direction of conventional automotive drivetrains. You could end up with 5 speeds reverse and one forward.
Full disclosure, I walked into this trap with my Locost, I “solved”it by flipping my differential over. I am running 150 hp through a differential designed for 80 hp, backwards. This was humbling, please don’t laugh.
DUDE, Thanks for the insanity!!!!
How do you set up the gear linkage when the bike motor is mounted transversely? There’s a 90° turn to deal with. Is it best to use two pull cables?
i am currently doing a similar project for my university degree which i need to design and make a shifter and for a race car with a motorbike engine in it (GSXR 1000) and was wondering if anyone had a idea of what would be the easiest and quickest way of going about it. if anyone was any suggestions please share as with the time i have to complete this is very short and help would be appreciated thank you
If you have to ask this question you probably should not do this sort of project to earn your degree. It is a very general question that is impossible to answer without writing a book.