,
Build a new header
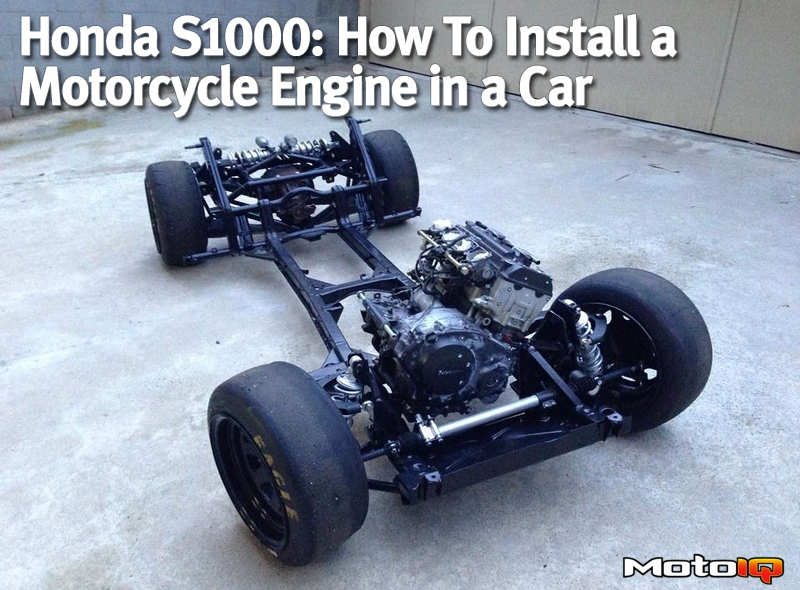
After placing the engine appropriately, near the frame and as low as reasonable, the headers didn’t fit anymore, and even if they did, they would have exited into the headlight.
I’ve seen a few motorcycle engine swaps that used the stock header, but the engine location is often compromised: too high and/or otherwise awkwardly placed. Look at your setup and decide; it might work great for you.
There are a ton of resources out there to help you make your own header, including Lego-style build templates and 3D computer modeling. My approach was to cut the stock headers off just after the first downturn, buy several bent pieces of tube with the same OD, and just sort of cut and weld pieces until it fit. It worked out pretty well.
I made a small effort to maintain equal length headers, but I’ve done dyno testing on various header configurations and lengths and most of it fell within the repeatability of the dyno, so for a road car like this, tuned headers weren’t worth the effort. Just smooth transitions, clean welds, and a nice ceramic coat to protect it and keep the underhood temperatures down.

Oh the Honda, the muffler from the motorcycle was installed right after the headers and then extensions were added to the muffler outlet to dump the exhaust in front of the rear tires. I’m considering a change to dump the exhaust out the back of the car as the side exhaust gets a little nauseating at long stoplights and the sound obnoxiously blasts directly at people's houses.

Intake
I built a new intake for this install, pretty much entirely because the stock one sticks awkwardly high out of the hood like some sort of injection molded tumor. Intakes on modern motorcycles are huge, like 40% of the volume taken up by the engine assembly is the airbox. As with most things, if you can carry over the bike intake without modification, that will make your life much easier.

The approach here was to model the new intake in CAD, flatten the pattern, cut it out of aluminum, fold it, and weld it. Yeah, the same thing as the fuel tank. I basically just made the intake as large as I could without having it be obnoxiously tall. I still had to cut a hole in the hood; there was just no way to fit an intake without part of it living above the hood. The engine runs totally fine, even though the intake volume is about a third as much as stock.

If you can keep the velocity stacks, do that; they’re probably worth a noticeable amount of power. The stock ones didn’t fit in the new intake; they were too tall.

I designed and 3D printed new, much shorter velocity stacks to go in my intake, but had fitment issues and I honestly can’t remember if they were left in. I’m not going to check because the intake is a total pain in the bleeding knuckles to get out, so we’ll just say they both are and aren’t there.
Throttle, clutch, and shifter
The throttle attachment was straightforward; both the car and the motorcycle used cables, so it was just a matter of going to the local bicycle shop and getting a cable made with the correct size ends. An adjustable pedal stop (just a bolt through the firewall behind the throttle) was added so that the cable wouldn’t be under any more tension than the spring force, no matter how hard the pedal is pressed. Also, the throttle plates on this engine went a little over full open and started to close before stopping, and the adjustable stop made sure foot to the floor was actually wide open throttle.
The clutch is a little more difficult, or possibly super easy, depending on your setup. If you’re using a bike and a car that both have cable activated clutches, you’re in luck. Repeat the aforementioned throttle cable process on the clutch cables (probably with a larger diameter, stronger cable) and bam!
For the S600/1000RR, both the car and the bike transmission used hydraulic clutches, but the car master cylinder was in bad shape, and probably didn’t have the correct bore for the bike slave cylinder, so I improvised. This is one of my favorite things about this car; the master cylinder is directly on the shift lever.

The shifter is connected with a bellcrank and pushrod system that is kind of unnecessary and really only exists because I happen to have several rod ends and bushings lying around. A push-pull cable is probably more advisable.
Gauges
Oh man, we’re almost there! Since the engine is using the stock motorcycle ECU, I just took the gauge cluster off the motorcycle, stuck it in the car on the dash, and plugged in the harness. If you’re using an aftermarket ECU, I would try to find one that comes with a dash.

The speedometer is corrected for the new final drive gearing and tire diameter using a little piece of electronics called SpeedoDRD.
Cooling
Okay, seriously, almost there. Just one more thing: keeping the engine cool. Easy approach: use the car's radiator. Slightly harder approach: use the bike's radiator and mount it behind the grill or somewhere with airflow. Unnecessarily difficult approach that I did: buy a new aluminum radiator and modify it to be the largest size that will fit in your tiny, tiny car. As far as plumbing it all together, drive to the local auto parts store, tell them what you’re doing, and ask if you can look at their custom molded hoses. Auto store employees love stuff like this, so they’ll usually let you go in the back and dig through their inventory. Grab a handful of the correct diameter hoses that have bends that look useful. You’ll then want to get some hose unions and hose clamps, and get to cutting and mounting your custom routed cooling lines. Make sure they are hard mounted to the body about every 8 inches so they don’t flop around. There are fancier ways to do this, but if you get the right pre-molded bends, it’ll be functionally great and look good, too.


12 comments
Hi…This article is probable the most interesting thing a have read in a very very long time. I have done a few building projects and something like this one you have done really interest me. I will do more research and get things going. Thanks for sharing your project….
Thanks for the support!
Do you have any videos of this running?
What do you think of mounting an R1 engine trans and rear wheel with swing arm behind the passenger seat in a 1st generation Insight. Bike tank up front. Other than a side scoop and engine mounts, drive line modification was a 66 tooth rear sprocket instead of 44. Running weight is 1420#, 150 hp, 95 mph top speed at 12k and 12.8 quarter mile at 95. $1200 total spent. 350 car. 450 bike, 85 battery, 80 car tire on bike rim. Hoses, cable, extending length of dash wiring, exhaust extension pipe, etc. super easy build. Took as long to strip original car of interior and driveline.
I’ve been searching for a simple way to install a bike engine directly to the front wheel drive of my Honda Insight but like your idea. Would like to know more.
Hey I’m building a 07 cbr1000 crosskart and I was wondering how did you do the throttle system
What’s the acceleration from 0-60 like?
You mentioned possibly using a Goldwing as a donor because it offers a built in reverse. Honda bikes with drive shafts rotate the final drive in the opposite direction of conventional automotive drivetrains. You could end up with 5 speeds reverse and one forward.
Full disclosure, I walked into this trap with my Locost, I “solved”it by flipping my differential over. I am running 150 hp through a differential designed for 80 hp, backwards. This was humbling, please don’t laugh.
DUDE, Thanks for the insanity!!!!
How do you set up the gear linkage when the bike motor is mounted transversely? There’s a 90° turn to deal with. Is it best to use two pull cables?
i am currently doing a similar project for my university degree which i need to design and make a shifter and for a race car with a motorbike engine in it (GSXR 1000) and was wondering if anyone had a idea of what would be the easiest and quickest way of going about it. if anyone was any suggestions please share as with the time i have to complete this is very short and help would be appreciated thank you
If you have to ask this question you probably should not do this sort of project to earn your degree. It is a very general question that is impossible to answer without writing a book.