While it looks a little complicated at first, assembly of the Magnaflow Overland Exhaust for the Toyota Tacoma is really easy. Sectioning the components in this way certainly helps with packaging and shipping.
The U pipe (image above) and the muffler below form to combine into a Helmholtz resonator tuning out droning noises.
For those wanting a little more noise the cap shown here can be placed on the end of the U pipe. Or for those wanting the most noise possible the cap can be placed directly on the end of the muffler.Impressively with the Helmholtz resonator and this relatively compact muffler, there’s a surprising amount of sound deadening for a full 3″ exhaust. I wish this muffler was available when I turbocharged my SE-R way back when.
Fitment and Configuration
You can see the helmholtz resonator just poking out above the main muffler above.
Is the Helmholtz resonator piping tunable? e.g. you can move it in and out for adjusting to things like perhaps an open element intake or headers sans cats that change the sound for the worse? Or it’s fixed per MF’s own tuning?
Also, great job on all the video cuts showing before and after in all the scenarios. One addition I would request, video of Duffy growling for food for comparison. I mean you did reference him…
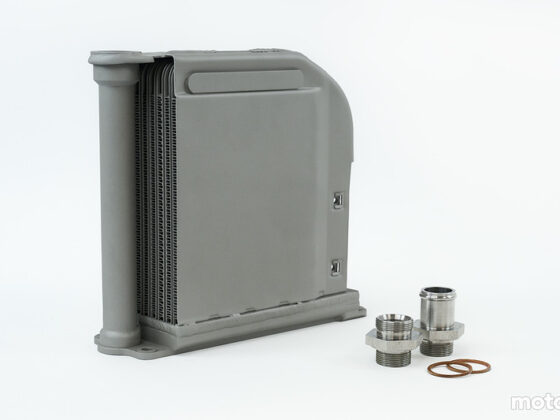
Good question. If you go to the top of page 2 you can see all the tube pieces for the resonator. So you can run: 1. The tube off the muffler with the helmholtz resonator (quietest) 2. The tube off the muffler with a cap on the end (louder) 3. The cap on the muffler (loudest)
I have only run option 1 and it’s both loud enough when I want it to be and quiet enough when I want it. My wife said it does get a little loud in the back when the RPM’s are up and the truck is loaded with people and gear. Wives are good for pointing out those details 😀 I would think part of the extra noise is due to the overland setup has the exit pipe underneath the bed where the conventional exhaust has the exit outside of the bed of the truck.
Bummer MF didn’t allow for “tuning,” of the helmholtz filter. Then again, packaging constraints could have prevented that.
The math to figure it out last I looked had you get the EGT, frequency, RPM, cyl count, and a few other things, into a formula.. Of which, I would have to pay someone to figure out for me… And bam you’re given a pipe length to use. Often just a section of j-pipe welded inline.
But perhaps later you change a variable in your intake and exhaust system, and your peak resonance changes by 300 RPM, and your set length doesn’t work as effectively. Re-do the math, and figure out the new length required to tone down that resonance. Here is where being able to slide the helmholtz setup in or out, changing it’s length was where I was getting at. I think I’ve seen a catback like that in the past for a Focus or something like that?
In the end, I do like that the manufacturers are doing more and doing better to control sound in cabin. Not to mention MF nailed it with a great price.
These sorts of nerd level comments are why I love MotoIQ (shameless plug). I had professor Khiem Dinh author of fameous projects like S2000 and Cayman T work up a custom resonator like your mentioning for my now long gone Civic SI exhaust featured here. I never got around to it even though I had all the parts. Welding stainless can get expensive and I decided I needed a car with more torque and then started on project G37. Sorry for all the rabbit hole comments 😀


5 comments
Is the Helmholtz resonator piping tunable? e.g. you can move it in and out for adjusting to things like perhaps an open element intake or headers sans cats that change the sound for the worse? Or it’s fixed per MF’s own tuning?
Also, great job on all the video cuts showing before and after in all the scenarios. One addition I would request, video of Duffy growling for food for comparison. I mean you did reference him…
Good question. If you go to the top of page 2 you can see all the tube pieces for the resonator. So you can run:
1. The tube off the muffler with the helmholtz resonator (quietest)
2. The tube off the muffler with a cap on the end (louder)
3. The cap on the muffler (loudest)
I have only run option 1 and it’s both loud enough when I want it to be and quiet enough when I want it. My wife said it does get a little loud in the back when the RPM’s are up and the truck is loaded with people and gear. Wives are good for pointing out those details 😀 I would think part of the extra noise is due to the overland setup has the exit pipe underneath the bed where the conventional exhaust has the exit outside of the bed of the truck.
Duffy is a little camera shy but I’ll do my best.
Bummer MF didn’t allow for “tuning,” of the helmholtz filter. Then again, packaging constraints could have prevented that.
The math to figure it out last I looked had you get the EGT, frequency, RPM, cyl count, and a few other things, into a formula.. Of which, I would have to pay someone to figure out for me… And bam you’re given a pipe length to use. Often just a section of j-pipe welded inline.
But perhaps later you change a variable in your intake and exhaust system, and your peak resonance changes by 300 RPM, and your set length doesn’t work as effectively. Re-do the math, and figure out the new length required to tone down that resonance. Here is where being able to slide the helmholtz setup in or out, changing it’s length was where I was getting at. I think I’ve seen a catback like that in the past for a Focus or something like that?
In the end, I do like that the manufacturers are doing more and doing better to control sound in cabin. Not to mention MF nailed it with a great price.
These sorts of nerd level comments are why I love MotoIQ (shameless plug). I had professor Khiem Dinh author of fameous projects like S2000 and Cayman T work up a custom resonator like your mentioning for my now long gone Civic SI exhaust featured here. I never got around to it even though I had all the parts. Welding stainless can get expensive and I decided I needed a car with more torque and then started on project G37. Sorry for all the rabbit hole comments 😀
Oh yeah… I remember doing some estimated calcs back in the day!