,
Whenever possible it is ideal to use the LEAST amount of bends possible in both line routing and AN fittings. While our line routing was good we were forced to use 90 degree fittings. Luckily our oil pressure was still within factory tolerances after the oil cooler install. The Mocal sandwich plate screws on between the oil filter and the block and we were happy to not have to relocate the oil filter for 2 reasons. Firstly the location of the filter makes for relatively simple changes and secondly we did not want to introduce any additional fittings or failure points to the lines/assembly.
 |
| We used Earl’s adel clamps and hose separators to secure the AN lines. |
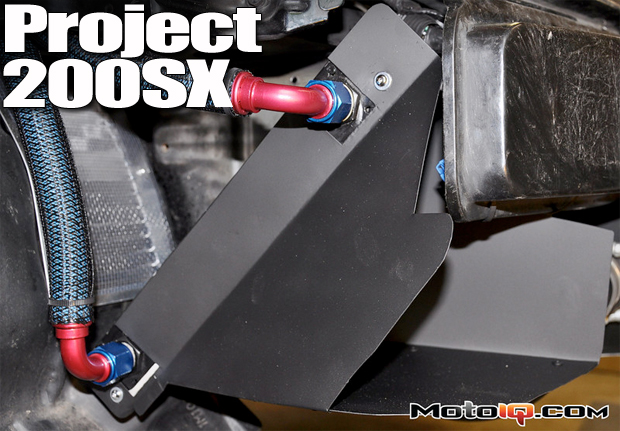
With the cooler installed and plumbed we fabricated ducting to utilize all of the incoming air from the fog light hole, and to aid in evacuation from the back side of the cooler we installed a vent in the fender well liner. We finished the setup off by using stainless steel racer’s mesh over the fog light opening to protect the cooler from any debris.
 |
 |
| The ducting is simple yet effective. You can also see the vent we installed in the fender well liner to assist in evacuating air from the back side of the cooler. |
Just like our ducting experiment with the radiator it paid dividends with the oil cooler setup. On track oil temp. never rose above 240 degrees even at 90 degree ambient temps and 30 minute sessions with no cool down laps! It’s safe to say that if you are going to take the time to install a part you might as well take the time to optimize it! Ducting works, PERIOD!
With the temps managed it was time to bring the brakes up to snuff. You may have noticed pics. of our current brake setup lurking in other article pictures however we have never covered the system we chose in detail. So without further ado, here it is…. Previously the car was using NX2000 front brakes and while they were pretty good, we wanted something that offered more pad choices and was cheaper to maintain. Enter the Fastbrakes 11″ Wilwood brake kit. Fastbrakes offers a few different iterations of this popular kit, for our application we chose their 11″ diameter two piece rotor that is clamped by Wilwood’s popular forged Dynalite caliper.
 |
| The Fastbrakes 11″ two piece kit alongside the NX2000 front brakes. The Wilwood caliper and Fastbrakes 2 piece 11″ rotor are both lighter than their stock counterparts. |
We like this setup because rotors are fairly inexpensive and last longer than an OEM NX2000 rotor, brake pads are VERY cheap starting at about $60, and in the event of a caliper issue they are inexpensive and easy to replace. Add to this long list of positives the reduction in unsprung weight with the lighter rotor and caliper! We filled the calipers with Hawk DTC60 brake pads as they are easy on rotors, have great initial bite and are easy to modulate. They also last quite a while!
 |
| Fastbrakes also offers this kit with standard rotors although we prefer the bling and replacement cost of the 2 piece setup. |
With the fronts sorted we ditched the OEM rear drums in favor of the Fastbrakes rear drum to disc. conversion kit. Again Fastbrakes offers different options here and we chose to use their 10.9″ Nissan Maxima kit. This setup replaces the OEM drums with a 10.9″ disc and the calipers from a 95-99 Nissan Maxima. The kit comes with rotors and all the hardware you need to bolt up the caliper. In order to retain the emergency brake we had to source e-brake cables from a 95-98 200SX SE-R. All of these items are a bolt on affair and are relatively easy to install! Hats off to Fastbrakes for making a complete kit!
The last thing we did in our brake upgrade was to change the master cylinder. This was necessary as the stock MC used proportioning valves engineered to work with much smaller front brakes and drum brakes in the rear. We used a U13 chassis Altima Master cylinder as it has a larger 15/16″ piston. We Bench bled the master cylinder and then installed it with Motul RBF600 fluid. We also advocate bedding in pads and rotors properly so that was done before the car was taken to the track.
Once at the track this setup provided improved stopping power session after session with no signs of fade. We will point out that we initially ran Hawk’s HP+ pads which are advertised as being track day compatible…. The results were NO BUENO, if you have ANY track experience we recommend a pad designed for track use. The HP+ pads were toast after three laps…. Once we switched to the Hawk DTC 60’s we were back in business.
We combined all of our new track oriented improvements with some fresh race rubber from Toyo. Toyo’s RA1 race tire is a tried and true compound that is not only quick around the track but also lasts a long time. In our opinion these tires are PERFECT for someone doing track days and/or someone learning to drive on race tires. Perhaps once we are competing we will switch to some of the more expensive and uber-sticky options that exist, but for now the RA1’s are a great fit. We are using both their 225 50 15 and 225 45 15 offerings with very pleasing results!

In summation the car is pretty damn quick around the track. It has a nice usable power band, ZERO reliability issues, brakes that don’t give up, and lots of grip from the R compound tires. At several track days the car and its mediocre driver have humbled many high performance machines! While all of this is in good fun we want more. The next step will be running the car through the required HPDE ranks with the National Auto Sport Asociation (N.A.S.A.) to work towards our time trial license and in typical MotoIQ fashion we are going to document our experience in doing that. Stay tuned for full coverage of our NASA experience complete with in car footage!
Thanks to our sponsors:

BAT Incorporated
7630 Matoaka Rd.
Sarasota, FL 34243 USA
phone (941) 355-0005
phone (602) 323-2110
sales@fastbrakes.com