• Tech
    • Tech Category
      • Engine
      • Bottom End
      • Rods and Pistons
      • Head and Headwork
      • Cams and Valvetrain
      • Cooling and Heat Management
      • Intake
      • Headers and Exhaust
      • Rotary
      • Engine Management and Tuning
      • Drivetrain
      • Transmission
      • Clutch and Flywheel
      • Differential and Final Drive
      • Driveshaft and Axle
      • Axles
    • Tech Category
      • Suspension
      • Shocks and Coilovers
      • Springs
      • Swaybars
      • Arms and Links
      • Bushings
      • Steering
      • Geometry Correction
      • Suspension Setup and Tuning
      • Brakes
      • Wheels and Tires
      • Fueling
      • Forced Induction and NOS
      • Aerodynamics
    • Tech Cat
      • Electrical
      • Battery and Power Distribution
      • Electronics
      • Wiring
      • Electrical System Education and Troubleshooting
      • Lubrication
      • Interior and Controls
      • Exterior
      • Paint and Bodywork
      • Wraps and Film Protection
      • Exterior Care and Maintenance
      • Data Acquisition and Tuning
      • Fabrication and Safety
      • Tips and How-To
  • Projects
    • Make A-D
      • Acura
      • Integra (DC2)
      • NSX
      • CSF RSX (DC5)
      • BMW
      • E30 (SR20 Powered)
      • E36 323is
      • E36 M3 (Black)
      • E36 M3 (Silver)
      • E39 M5
      • E46 M3
      • E90 M3
      • E46 Racecar
      • Yost Auto E92 M3
      • Yost Auto F82 M4
      • Chevrolet
      • Camaro Gen5
      • Corvette Stingray (C7 Z51)
      • Corvette Stingray (C8 Z51)
      • GMC Canyon
      • Dodge
      • Viper GTS
    • Make E-I
      • Ford
      • E350 Tow Rig
      • F150 EcoBoost
      • Fiesta ST
      • Focus ST
      • Mustang 5.0 (Grey)
      • Mustang 5.0 (White)
      • Mustang S197 (Budget Track Car)
      • Mustang S550 GT
      • Honda
      • Civic EF Racecar
      • Civic Si (Coupe)
      • Civic Si (EP3)
      • Civic Si (Saloon)
      • EJ Civic
      • Polystrand CRX
      • S2000 (AP1)
      • S2000 (AP2)
      • Infiniti
      • G20 Racecar
      • G20 (P10 AWD Turbo)
      • G35
      • G37S
    • Make J-M
      • Isuzu
      • Vehicross
      • Lexus
      • ISF
      • SC300
      • Mazda
      • V8 RX7 (3rd Gen)
      • RX-7 (3rd Gen)
      • RX-7 Restomod (3rd Gen)
      • Skyactiv 3
      • Frankenmiata
      • Miatabusa
      • My Girlfriend’s Miata
      • Mitsubishi
      • EVO VIII
      • EVO IX
      • EVO X
      • CSF EVO X Racecar
      • Professional Awesome EVO VIII
    • Make N-P
      • Nissan
      • 200SX
      • 200SX SE-R
      • 240SX Land Speed Racer
      • 300ZXTT
      • 350Z
      • 350Z Drift Car
      • 370Z
      • GT-R (R33)
      • GT-R (R35)
      • GT-R (Team America BNR32)
      • LS S13
      • NX GTi-R
      • Pathfinder
      • S13 Drift/Grip Do-it-All Mega 240
      • Sentra SE-R
      • Sentra Spec V
      • Silvia
      • STurdteen Drift Car
      • Porsche
      • 991 GT3RS
      • Cayman (987)
      • Cayman T
      • Cayman GTS 4.0
    • Make S-Z
      • Scion
      • FR-S
      • Scion Tuner Challenge FR-S
      • TC
      • Subaru
      • Autocross BRZ
      • Legacy GT
      • STI (gen 2)
      • STI (gen 3)
      • WRX (GD)
      • WRX (VA)
      • Toyota
      • 4Runner
      • AE86 Corolla
      • GR Corolla
      • Starletabusa
      • Supra Mark IV
      • Tacoma
      • Tundra
      • Volkswagen
      • MKIV Jetta TDI
      • MKVI Golf TDI
      • MKVII Golf R
      • Sipster (Rabbit)
    • Other Projects
      • Powersports
      • Aprilia RS50
      • Aprilia SR50
      • Doodlebug
      • Ducati 998
      • Ducati Hypermotard
      • Honda Ruckus
      • Husqvarna TE610
      • Go Karts
      • Other
      • Sim Racer
      • Aurora Cobra
      • Garage
      • NP01 Prototype
  • Features
    • Features
      • Feature Cars
      • Drag Race Cars
      • Drift Cars
      • Land Speed Cars
      • Open-Wheel Cars
      • Rally Cars
      • Road Race Cars
      • Street Cars
      • Time Attack Cars
      • Drag Racing
    • Features
      • Events
      • Drifting
      • Land Speed Racing
      • Open-Wheel Racing
      • Time Attack Racing
      • Rally Racing
      • Road Racing
      • Car Shows
      • Columns
      • SlipAngle Podcast
  • Video
  • Shop *NEW*
  • MotoIQ Garage Services
  • About
  • Shop *NEW*
  • MotoIQ Garage Services
  • About
MotoIQ
MotoIQ
  • Tech
    • Tech Category
      • Engine
      • Bottom End
      • Rods and Pistons
      • Head and Headwork
      • Cams and Valvetrain
      • Cooling and Heat Management
      • Intake
      • Headers and Exhaust
      • Rotary
      • Engine Management and Tuning
      • Drivetrain
      • Transmission
      • Clutch and Flywheel
      • Differential and Final Drive
      • Driveshaft and Axle
      • Axles
    • Tech Category
      • Suspension
      • Shocks and Coilovers
      • Springs
      • Swaybars
      • Arms and Links
      • Bushings
      • Steering
      • Geometry Correction
      • Suspension Setup and Tuning
      • Brakes
      • Wheels and Tires
      • Fueling
      • Forced Induction and NOS
      • Aerodynamics
    • Tech Cat
      • Electrical
      • Battery and Power Distribution
      • Electronics
      • Wiring
      • Electrical System Education and Troubleshooting
      • Lubrication
      • Interior and Controls
      • Exterior
      • Paint and Bodywork
      • Wraps and Film Protection
      • Exterior Care and Maintenance
      • Data Acquisition and Tuning
      • Fabrication and Safety
      • Tips and How-To
  • Projects
    • Make A-D
      • Acura
      • Integra (DC2)
      • NSX
      • CSF RSX (DC5)
      • BMW
      • E30 (SR20 Powered)
      • E36 323is
      • E36 M3 (Black)
      • E36 M3 (Silver)
      • E39 M5
      • E46 M3
      • E90 M3
      • E46 Racecar
      • Yost Auto E92 M3
      • Yost Auto F82 M4
      • Chevrolet
      • Camaro Gen5
      • Corvette Stingray (C7 Z51)
      • Corvette Stingray (C8 Z51)
      • GMC Canyon
      • Dodge
      • Viper GTS
    • Make E-I
      • Ford
      • E350 Tow Rig
      • F150 EcoBoost
      • Fiesta ST
      • Focus ST
      • Mustang 5.0 (Grey)
      • Mustang 5.0 (White)
      • Mustang S197 (Budget Track Car)
      • Mustang S550 GT
      • Honda
      • Civic EF Racecar
      • Civic Si (Coupe)
      • Civic Si (EP3)
      • Civic Si (Saloon)
      • EJ Civic
      • Polystrand CRX
      • S2000 (AP1)
      • S2000 (AP2)
      • Infiniti
      • G20 Racecar
      • G20 (P10 AWD Turbo)
      • G35
      • G37S
    • Make J-M
      • Isuzu
      • Vehicross
      • Lexus
      • ISF
      • SC300
      • Mazda
      • V8 RX7 (3rd Gen)
      • RX-7 (3rd Gen)
      • RX-7 Restomod (3rd Gen)
      • Skyactiv 3
      • Frankenmiata
      • Miatabusa
      • My Girlfriend’s Miata
      • Mitsubishi
      • EVO VIII
      • EVO IX
      • EVO X
      • CSF EVO X Racecar
      • Professional Awesome EVO VIII
    • Make N-P
      • Nissan
      • 200SX
      • 200SX SE-R
      • 240SX Land Speed Racer
      • 300ZXTT
      • 350Z
      • 350Z Drift Car
      • 370Z
      • GT-R (R33)
      • GT-R (R35)
      • GT-R (Team America BNR32)
      • LS S13
      • NX GTi-R
      • Pathfinder
      • S13 Drift/Grip Do-it-All Mega 240
      • Sentra SE-R
      • Sentra Spec V
      • Silvia
      • STurdteen Drift Car
      • Porsche
      • 991 GT3RS
      • Cayman (987)
      • Cayman T
      • Cayman GTS 4.0
    • Make S-Z
      • Scion
      • FR-S
      • Scion Tuner Challenge FR-S
      • TC
      • Subaru
      • Autocross BRZ
      • Legacy GT
      • STI (gen 2)
      • STI (gen 3)
      • WRX (GD)
      • WRX (VA)
      • Toyota
      • 4Runner
      • AE86 Corolla
      • GR Corolla
      • Starletabusa
      • Supra Mark IV
      • Tacoma
      • Tundra
      • Volkswagen
      • MKIV Jetta TDI
      • MKVI Golf TDI
      • MKVII Golf R
      • Sipster (Rabbit)
    • Other Projects
      • Powersports
      • Aprilia RS50
      • Aprilia SR50
      • Doodlebug
      • Ducati 998
      • Ducati Hypermotard
      • Honda Ruckus
      • Husqvarna TE610
      • Go Karts
      • Other
      • Sim Racer
      • Aurora Cobra
      • Garage
      • NP01 Prototype
  • Features
    • Features
      • Feature Cars
      • Drag Race Cars
      • Drift Cars
      • Land Speed Cars
      • Open-Wheel Cars
      • Rally Cars
      • Road Race Cars
      • Street Cars
      • Time Attack Cars
      • Drag Racing
    • Features
      • Events
      • Drifting
      • Land Speed Racing
      • Open-Wheel Racing
      • Time Attack Racing
      • Rally Racing
      • Road Racing
      • Car Shows
      • Columns
      • SlipAngle Podcast
  • Video
  • EVO IX
  • Tech
  • Projects

Project EVO IX Part 5: ARK Designs and Mitsubishi Products

  • Mike Kojima

ARK Design MFD

Over the past few months we have been busy tuning Project EVO’s Engine, Brakes and Suspension.  This month we focused on some of the minor but important details that every performance car needs.

ARK Design products
Every car with aspirations of track driving needs accurate instruments, the EVO is no exception.  Factory gauges are very inaccurate, often lagging far behind what is actually going on.  In the case of the EVO, most of the important gauges are simply missing.  The EVO only has a water temperature gauge, ridiculous for a high performance car.

A turbo charged car that is always being tuned on needs a boost pressure gauge.  All cars need an oil pressure gauge and cars that are track driven need very accurate water temperature and oil temperature gauges, as turbo cars always seem to run on the edge of meltdown when pounded on a road course.  Factory gauges are notoriously inaccurate, usually only signaling trouble once the damage has already been done.

ARK Design
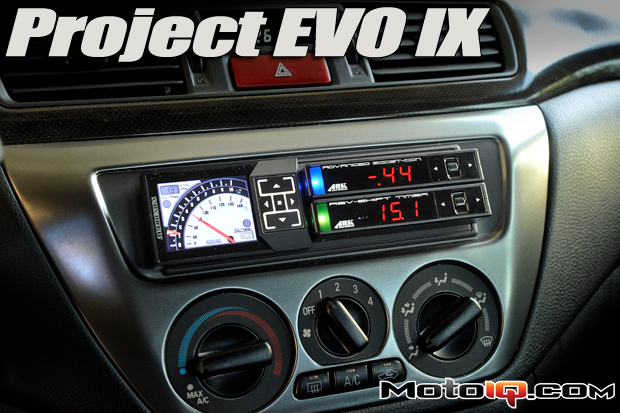
The Mitsubishi radio relocation kit moves the radio to the lower DIN bin on the dash so we could mount the ARK Gauges to the upper DIN location where the radio used to be.  They are easier to see there.


In the past getting decent gauges in your car would mean a triple gauge pod and the installation of a few more gauges in the dash.  Some people like the lots of gauges look but some people don’t.  A pillar pod with three big gauges is a pull me over signal for the police and a dash full of aftermarket gauges in all sorts of places screams Knight Rider.  If gauges are hidden in a glove box, they are not doing much good either; I mean what good is a hidden gauge?   With a lot of wires to hook up and run around, a plethora of gauges usually results in a bunch of untidy wiring under the dash and in the engine compartment with a problematic bunch of wires going through the firewall where they can chafe.  In our experience about 70-80% of all on-track failures are related to wiring and plumbing issues and frankly, stringing a bunch of wires around the car makes us nervous and proper wiring is a lot of tedious work.

ARK came to our rescue with their MFD1 or Multi Function Display.  The MFD1 can monitor 10 different engine vital signs; boost/vacuum, water temperature, RPM, vehicle speed, throttle position, injector duty cycle and O2 A/F signal through OEM sensor input signals to the vehicles ECU. The MFD1 has additional analog inputs using their very accurate stand alone sensors for critical functions such as water temperature, oil temperature, and oil pressure.  Importantly, the MFD1 has a peak hold feature and user limit settable warning alarms for monitored parameters. The warning function provides an audible and/or visual notification when a user defined level is reached. The MFD1 features an easy to read 2.4’’ widescreen color TFT display which replaces a huge number of gauges. The MFD1 offers six different display options where one, two, four or even eight vehicle vitals can be viewed at a single time with a choice of a traditional analog meter view or a digital bar graph display.

ARK Design MFD1
The ARK MFD takes the place of a bunch of conventional gauges.  It can be configured to monitor up to 4 parameters at once with warning limits.  We have it configured to read just oil pressure and temperature, two gauges the EVO lacks that are critical to monitor for a track driven car.  You can configure the display to show a bunch of different digital and analog ways.


The MFD1 wires into the vehicle’s engine harness to read the ECU’s sensor inputs directly, which is a little bit of an involved installation.   ARK tells us that tapping directly into the sensor wiring gives more accurate and faster readings with less latency, especially on many late model cars where CAN data traffic is very high.  For an easier plug and play installation there is the MFDII which plugs into the vehicles OBDII CAN port.  Look for a review of the MFDII soon as we are evaluating one of these on Project S2K as this is being written.

Although tapping into the engine harness seems pretty scary, the MFD1 is still very easy to wire; we used ARK’s plug and play E-Harness which is available for most popular Japanese made performance cars to speed installation and to ensure the quality of our wiring job.  The E-Harness is a jumper that fits in-between the ECU and the factory wire harness with output plugs that snap right to the MFD’s own wire harness.  The E-Harness also has additional inputs for some of ARK’s other products.  For oil pressure and temperature, we installed the sensors into the cars factory oil distribution block leading to the oil cooler, by removing some block off plugs that were handily there (thanks Mitsubishi).  Howard Watanabe of Technosquare then helped us out by machining an adaptor so the sensors could screw right into the block.  Howard also welded a bung into the engine’s water outlet for the temperature sensor.  The sensors plugged into the E-harness, no cutting or splicing required.

The MFD has quite a bit of mounting flexibility.  The unit itself is ultra thin with a pre fabricated wire harness.  It also has a fairly small footprint, slightly bigger than a credit card. It is so thin, compact and light it can be securely mounted to any flat surface with double stick tape.  To further increase mounting flexibility, the MFD has the unique ability of allowing its display to be rotated 180 degrees, so a user can choose to have the controls on the right or left of the screen.  This made it extremely easy to do a sanitary installation job.

Related

1 2 3 4Next page
Related Topics
  • Electrical
  • Electronics
  • ARK Design
  • Gauges
  • Interior
  • Turbo Timer
  • A/F Meter
Previous Article
  • Features

Redline Time Attack Announces Direction for 2011 Season, Partnership with MotoIQ.com

  • Jeff Naeyaert
View Post
Next Article
  • Tech
  • Projects
  • E36 M3 (Silver)

How To Rebuild Brake Calipers

  • Mike Kojima
View Post

Leave a Reply Cancel reply

Your email address will not be published. Required fields are marked *

Input your search keywords and press Enter.