,
 |
| Don’t try this at home! Frank flame seals the burnished edges of the tint with a propane torch. The torch also tacks down the edges of the film which greatly reduces the chances of damage in case the windows are accidentally rolled down before the film has cured. |
Of course a good tint job requires good installation. An ultra high end film like Crystalline is somewhat tricky to install and we wanted a really clean professional installation. Another thing is that 3M Crystalline is only available through authorized 3M installers. We had The Tint Factory in LA expertly install our Tint. We had often tinted our own cars in the past and were curious to see how real pros do it.
 |
| A large piece of film is laid down on the outside of the windshield and squeegeed down. |
We decided to use the darkest 40 Crystalline film on the side and rear windows and the light, nearly clear 70 on our front windshield. First, The Tint Factories Ace installer Frank Garrido, thoroughly cleaned the inside and outside of our windows and laid down the film on the outside of our windows using a large amount of soapy water. Then he trimmed them to exact fit using a razor knife. For the compound curved windshield, Frank used a heat gun to skillfully shrink the film to the shape of the windshield so that it could be done in one piece. This is pretty cool as we would always have to do curved windows in many pieces with seams.
 |
| Frank uses a heat gun to shrink the film to the windshield’s complex compound curves. This is so the windshield can be done in one seamless piece without wrinkling. This is probably another one of those don’t try this at home tricks. |
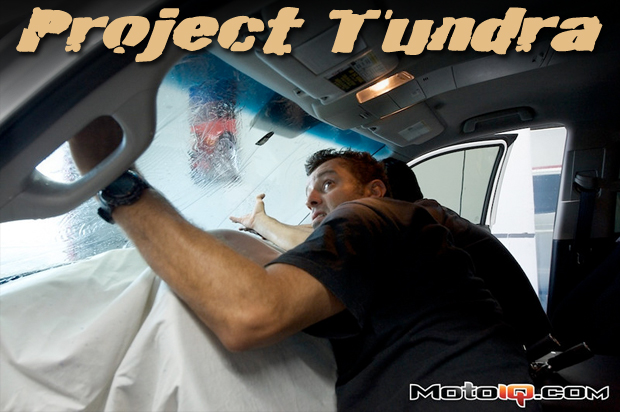
Frank also used techniques such as bumping and shaving to do a very thorough job. Bumping is partially rolling down the window in the trimming process to make sure that the entire window is covered with film, even under the weatherstrips and other parts that are not so easily seen. Shaving is cutting the film to the very edge of the glass, then burnishing the film slightly over the edge, sealing it with the careful use of a propane torch. Careful use of the propane torch also helps getting the film to stick without wrinkling in difficult to work areas. It is not good to try this unless you are pretty skilled, you could easily end up setting fire to the car’s interior panels, melting the film or cracking the glass!
 |
| After shrinking the film is trimmed and transfered to the wall glass where the backing is removed and the film sprayed with liberal amounts of soapy water. |
Frank’s work was amazing; with no seams or visible edges it was clearly the best tint job we had ever gotten! When popping for a high end film, it is really worth it to go to a top notch installer like Frank at a reputable shop like The Tint Factory especially if you are doing the job on an expensive new vehicle. The Tint Factory’s work shames our old DIY skills by a large factor! They are many semi shady, super cheap fly by night tinters out there and it is best to pick an established shop even if you have to pay a little more. A 3M authorized installer means that you are more likely to get a quality job.
 |
| The inside of the windshield is carefully cleaned and sprayed with liberal amounts of soapy water. The film is then transfered to the window and squeegeed down. When the water is squeegeed out, the edges are given a final trim and difficult spots may be tacked down by careful use of the torch on the outside. Leave that trick to the pros please! |