
,
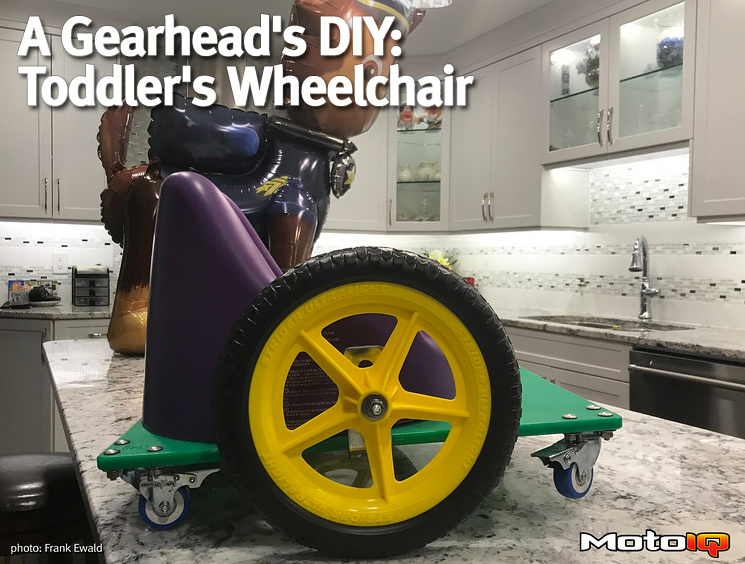
Castor wheels and a cutting board were as easy as pie to find. Small, lightweight bicycle wheels. Once again I struck out when I went to Amazon. I was surprised because you can literally find everything there, but I was not looking for two piece wheels. I wanted one piece lightweight wheels to assist in keeping the overall weight down. I did a bit more intensive search using Google and found Stryder Bicycle's where I was able to buy lightweight replacement wheels for a push bicycle. They were ideal. And now I have to confess, I was starting to shop with a designer's vision in mind. You see, I knew that the cutting board was green. The Mega Seat was purple. The small castor wheels a bright blue. Looking at the rainbow of colours available on Stryder's website, I knew that the only colour that would not clash with my harlequin-themed tiny wheelchair was brilliant yellow. And so on this last piece of the puzzle there was a specific colour to be purchased – everything else was random. While I was placing my various orders, I also got some better wheel bearings to have on hand as spares and a couple of heavy duty brackets to support the wheels. Then it was simply a matter of waiting for the courier and postal system to start bringing these items from across the country.
 Who knew that you need to have a different colour of cutting board for the different type of material that you are cutting. Here's a public service announcement from MotoIQ – you may need more than that old wood or plain white cutting board to maintain a hygenic kitchen. (All we have in our house are wood and white ones!)
The cutting board was first to arrive. This is an essential piece, as it is going to serve as the base upon which the wheels will be mounted and the seat will rest upon. This cutting board is green and, according to literature affixed to it, green means that it is to be used for vegetables and such. This was a eureka moment for me, as I had not realized that you required different colours for cutting up food. I use a white cutting board for everything – granted, my wife has three different white cutting boards. But I should be using a red one for raw meat, the white one only for dairy, a blue one for sea food, and on it goes. This cutting board, however, just like Jonathan Livingston Seagull, has surpassed its initial calling and it has transcended from a lacklustre life in a kitchen into an exotic life as the base of a toddler's wheelchair.
 All of the bolts, nuts, and washers are stainless steel. If you're going to do a project, you might as well spend a little bit more and get hardware that is going to last without rusting.
An early morning walk to the hardware store netted a supply of stainless steel bolts, nuts, and washers to assist in keeping everything held together. For affixing the castors to the cutting board 1″x1/4″ carriage bolts were selected. The round heads on the carriage bolts would be ideal for a toddler to bump into and, I guessed, would sink into the plastic cutting board and the head would grip quite nicely. It was a good guess – it worked. For this project, 18 of these carriage bolts were required. One plan that I saw suggested using screws and the advantage of screwing the parts onto the base from the bottom is that nothing would be showing on the top side of the base and nothing would be protruding to potentially harm your little one. However, the downside of screws is that with some wear and tear in the plastic there is the concern that they would loosen and fall out. They simply would not provide the long term strength – in this case strength over appearance was more important. Plus the round headed carriage bolts should not cause harm to anyone. While the wheels came with axle bolts, they were designed for a push bike frame so not what was required. Two 3.5″ long 5/16″ bolts and accompanying nuts and washers did the trick.
 Cordless drill, a 1/4″ + 5/16″ drill bit, tape measure, 11mm and 13mm wrenches and sockets. As hard as I tried, I couldn't think of any new tools that I needed to buy in order to successfully complete this project. Sigh!
Collecting the tools was easy and, unfortunately, I had everything required so nothing new had to be purchased. Usually when planning out a project I figure out at least one piece of equipment that is a must have and, if it is not in my garage already, then must be purchased. Cordless drill, tape measure, magic marker, 11 mm and 13 mm wrenches and sockets, and I was ready to begin. As I progressed with the project, I added a grinder and wire wheel.
 While drilling always make certain that you're not drilling into your table surface. Especially when working with plastic that you go through in a heart beat. And no, I didn't drill the work bench. This is just a handy tip. I kept the edges of the castor base plate 1/4″ in from the edge of the cutting board.


4 comments
I have a 2 year old daughter who has spina bilfda and i am looking for a toddler wheel chair and i like to know prices on the wheel chairs.
Hi Lissette,
As I mentioned in my email to you, check out Bella’s Bumbas. This is a charitable organization and they provide toddler chairs similar to what I’ve built here, for the cost of shipping. It is an incredible organization.
Frank
WOW !
THANK YOU Frank for sharing our group Bella’s Bumbas LTD
May I ask how you hear about us ?
We would love to chat
Rebecca
Bella’s Bumbas LTD
Hi Rebecca,
Bella’s Bumbas is an incredible organization and I am proud to be able to share about it whenever I can. When I initially built this for my grandson, I went through a lot of online searching and in doing so discovered Bella’s Bumbas. I will try to contact you through your website.
Warm Regards,
Frank