
,
Drilling the holes in the cutting board was a piece of cake. 1/4″ bit was the perfect size for the castors that I had purchased. Online the DIY instructions for three or four versions that I looked at all called for the rear castors to be an inch larger than the front castors. The explanation given that it would be easier for the toddler to bend over to pick something up. I ignored that and used four identical castors. Partially because larger and smaller castors did not make sense to me and partially because a set of four was significantly more cost effective that two sets of two different sizes. Plus, the bike wheels will be the pivot point and they will allow for the unit to tip forward and backward to facilitate any bending and reaching, if required. As the castors went onto the cutting board, I found that drilling one hole and then bolting the castor firmly into place made it easier to have the subsequent holes in the ideal location. If you ever take this unit apart, you will see where I had to redrill one hole as my eagle eyes were off just a bit. Fortunately, the carridge bolt head on the top and the washer on the bottom cover up my error.
 From the top you'll see three smooth carriage bolt heads. There is room for a fourth in the castor unit that I purchased, and while I want to have strength in all aspects of this build, three 1/4″ stainless bolts will give more than enough strength. You'll also note that the tape measure is not metric. Canada is a metric country, but the building industry still uses imperial measurements.
You will also note that I only drilled and bolted three of the four castor holes. From a design perspective, I think it looks cool, as the carriage bolt's head outline the corner. Three bolts are cheaper than four and I think that they will provide more than enough strength. There is one online design that uses only two castors – one front and one rear – and they have a video demostrating how stable it is. On this point, I spent the money and put a castor at each corner so that there is absolutely no concern about stability. With the castors, our measurements were spot on. The 1″ bolts fit perfectly and allow the castors to spin freely with no grinding required.
 These brackets are galvanized but not stainless. Easier to drill and still should stand the test of time. These were pre-made and thus had holes that didn't suit this purpose, but we could work around that and they were inexpensive. You will also notice that the bracket corners look like sharp edges. A table mounted vice is ideal for drilling material like this.
The brackets that I bought came with massive holes built in but they simply would not work for anything I was doing. For the base, I put three 1/4″ holes in each bracket and then placed them on the cutting board. To ensure that the wheels allowed the cutting board to pivot the way I thought best, the axle brackets are centered. The placement of the seat, especially when combined with the toddler's weight, will cause the unit to tip back to rest on the rear castors. Even though I earlier discussed buying 18 carriage bolts for your project if you build this, I did not. I used regular 1″x1/4″ machine bolts for fastening these brackets to the base. In retrospect, I should have purchased more carriage bolts. Not because it is necessary as these heads are covered by the seat, but simply for a uniform look. Fortunately, while I may be a touch OCD, it was not enough to make me stop the project to get six more carriage bolts.
 Before mounting the wheels, I took the base out to the garage so that I could get Project NX GTi-R in a photograph. The NX needs a new axle; I recently took it out to a drag strip, and on my third run at Mission drag strip, I broke an axle. But, it was a bucket list night. I've always wanted to try my car out on a drag strip but have never had an opportunity. Paulo from AES Auto – who was a consultant on this DIY wheelchair project – invited me to join him. First run I got 13.7 running on tires that the car has sat on for two years. Second run I missed a shift. Third run I broke an axle. Sigh. The good news is that Paulo has run a 10.1, so he is really getting close to his 9 second street car run. But, I seriously got off-topic here … I went out to the garage because I needed to use the grinder to round off the sharp edges on the brackets. After grinding them down, I used a wire wheel to ensure that they were smooth. There should be nothing that can potentially harm a little one on this DIY project.
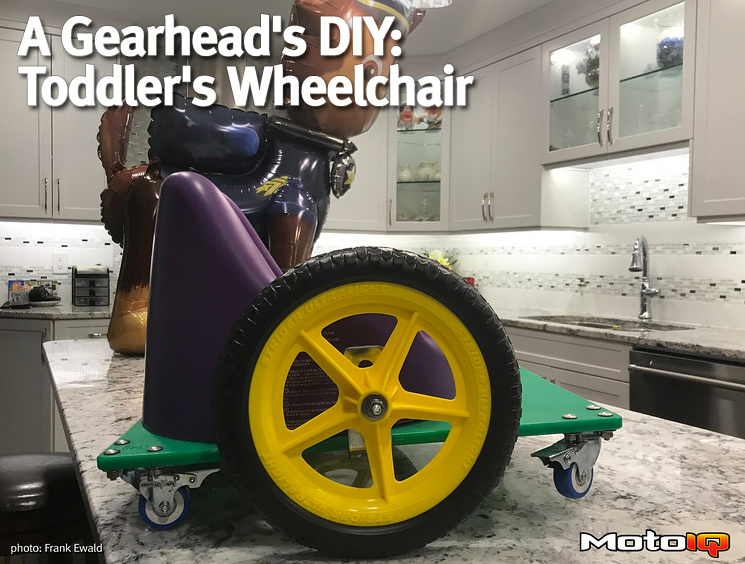
 I drilled the axle hole about 1 5/8″ up from the top of the base. For our purposes, this seemed to be the correct height. Of course, if you use different sized castors then this height will need to be different. The drill bit size was 5/16″ holes – this was in the brackets to support the axle bolts. I should point out that these brackets are probably 3/16″ thick material, so they are more than able to support the intended weight of a toddler plus the seat material. I drilled two holes so that I would be able to adjust the height of the wheels as needed. (Okay, the first hole that I drilled obviously put the cutting board base way too high for my liking so a second hole was necessary.)

4 comments
I have a 2 year old daughter who has spina bilfda and i am looking for a toddler wheel chair and i like to know prices on the wheel chairs.
Hi Lissette,
As I mentioned in my email to you, check out Bella’s Bumbas. This is a charitable organization and they provide toddler chairs similar to what I’ve built here, for the cost of shipping. It is an incredible organization.
Frank
WOW !
THANK YOU Frank for sharing our group Bella’s Bumbas LTD
May I ask how you hear about us ?
We would love to chat
Rebecca
Bella’s Bumbas LTD
Hi Rebecca,
Bella’s Bumbas is an incredible organization and I am proud to be able to share about it whenever I can. When I initially built this for my grandson, I went through a lot of online searching and in doing so discovered Bella’s Bumbas. I will try to contact you through your website.
Warm Regards,
Frank