
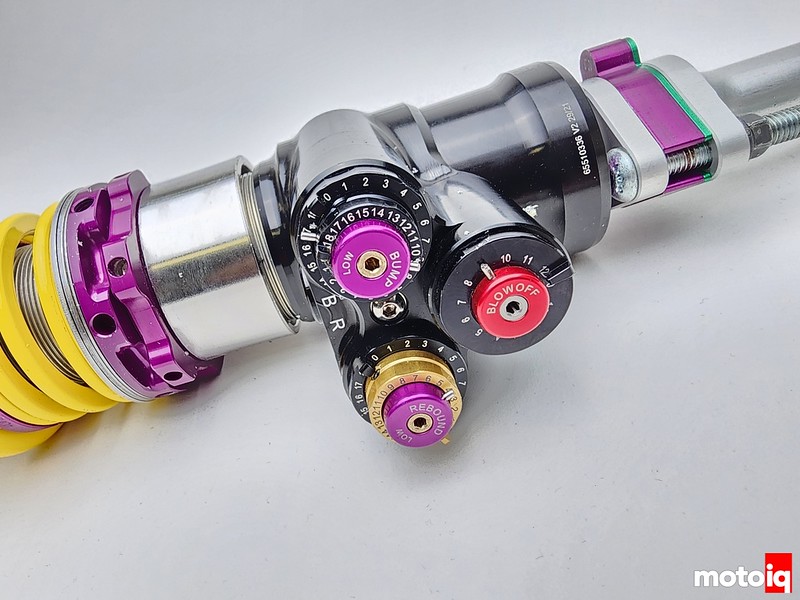

First start with the high-speed compression setting. You do this because the high-speed compression circuit on many shocks affects the other circuits. Turn the high-speed knob up until the ride gets harsh and back off until it isn’t. Next, you turn the low-speed compression knob up until the ride gets harsh, then back off until it isn’t. Finally, you turn up the rebound until the ride gets harsh, then back off until it isn’t. If you use this method to find your baseline, you will never jack yourself into a bad corner of shock adjustment and get hopelessly lost.
For 4-way shocks, after adjusting your compression, adjust your high-speed rebound first then your low-speed in the same manner. If you frequently change spring rates, you will find the high-speed rebound adjustment to be particularly useful to quickly re-dial in for a change of springs.
For 5-way shocks, adjust your other setting as we described with the blow-off 5th adjustment wide open, you probably won’t feel this adjustment much in regular driving. Go ahead and hit some FIA curbs or bumpy parts of the track that perhaps have been giving you problems, then turn up the blow-off until the car bounces off the bump. You may find that you can turn down your high-speed compression some with a little less blow-off. By playing the balance between your high-speed compression and blow-off settings, you should be able to really make your suspension response to bumps pretty smooth, even with high spring rates and aero loads.
Having high-speed compression adjustment is very useful, you can speed up your car’s response to initial steering input by adding high-speed compression. If your car is blowing through its travel and bottoming out, adding high-speed compression will reduce or eliminate this. Too much high-speed compression will cause the car to ride very harshly and skip and chatter on bumpy surfaces losing grip. Reducing high-speed compression in the back of a drift car can give you more surge and forward bite without making the car too floppy.
High-speed rebound control is very useful when changing springs, if you go to stiffer springs, adding high-speed rebound can help control the bounce that stiffer springs can contribute to. This enables you to go to stiffer springs without having to revalve. If you go to a softer spring, you can reduce the high-speed rebound and take advantage of more grip without sacrificing the low-speed rebound platform control.
For the other ways shock adjustment affects your car and can be tuned, please read my prior articles, part one and part two!
How to Adjust Your Shocks, Part One- Single Adjustable Shocks
How to Adjust Your Shocks, Part Two- Double Adjustable Shocks

Having shock pots and data logging with advanced math can be very useful. You can set up a histogram and look at the shaft velocity over time and the percentage of time spent in each speed range. Usually, the best grip can be found with the histogram centered and symmetrical. In this case, the car had a bit too much rebound damping. To reduce the amount of time a car spends in each speed range, increase the damping force in that speed range, to increase the amount of time, reduce it. Mess up your settings on purpose and see how the histograms change so you can learn and spot the signatures of problems. Histograms are great when you have a driver that can’t give good feedback.

The last histogram was a stiffly sprung, high aero time attack car. This is a pro drift car. See how the more compliant suspension has much more time in all the speed zones and really populates the high-speed areas of the histogram. The long centers of the histograms were because a drift car spends a lot of time sitting in between runs. We didn’t write the math yet to ignore that condition but we will. The rear shocks are showing a bit too little rear rebound.
9 comments
“KW and ST Suspension also have really good baseline settings for all of their products in the enclosed instructions.”
I did email KW a couple months ago, to ask what were the default settings on my KW v3’s, and the response wasn’t that, but rather to just start at full soft and work your way up +2, until it’s too stiff, then back off -2 or -1. No defaults were listed in the manual that I could find. In fact, I found the manual of theirs rather lacking. I ended up crowd sourcing some settings, started there, and ended up with something that is 90% there to my liking… I just need more time behind the wheel now to fine tune.
That being said, thank you thus far for the excellent content on this topic and each part you’ve created. Super valuable.
Next article could be on re-valves or choosing spring rates, why you want them, and how it relates to road or track performance. e.g. I recall reading examples of “abnormally,” high spring rates that would hurt you back, but with proper valving, was perfect to match the driving profile of the car.
The reality is that on the street, you’re not tuning for a time, you’re tuning for a driver and a road.
If you have crappy roads, and an older driver, you are going to go softer.
If you have smooth roads and a younger driver you can crank up the stiffness.
One thing I will say, is chuck the sway bar on your driven wheels and do roll control through the damper/spring. Its going to really suck up the bumps that way. I think super stiff sway bars are the work of the devil.
You can also find that stuff online on their website. Usually asking people on forums, etc is less than satisfactory. What I think is odd is that OEMs think 10% more spring is a lot, I mean we can go 100% or more stiffer, and with the right stuff, it can sometimes ride pretty nicely, even on the street. I sometimes am reluctant to write about some stuff that I develop. It’s what makes me valuable and it’s stuff I have figured out. I don’t mind writing about standard best practices in racing though.
Hi Mike,
Thanks for the information as always. Just one question and this might be a little off topic but when you tune your suspension bump , ride height and droop do you disconnect the swaybar? I have seen somewhere where they disconnect the sway bar when tuning and getting the measurements on these things but I can’t make sense of the fact why you have to disconnect it when you ran it on track with it on. If you can enlighten me on this please that would be great. Thank you so much.
No., only for corner weighting.
I really do appreciate these guides; I understand there’s a lot of nuance and tricks but for talking about your bread and butter it’s great that you’re giving good useful information other than “well more than one clicker and you need a data system” or “I’d be happy to help for my hourly fee”
On the second to last and last pages, I notice you had some histograms built in Motec’s software and then others in Excel – do you have any other data analysis software packages you prefer, or do you just have some macros and workflows in Excel? I tend to live in Excel for data acquisition analysis on my day job, but I can easily see how there’s, at least in theory, faster and smoother ways to do things.
Actually it’s not excel, its AIM race studio 3. Motec seems to be less glitchy. AIM always had tons of updates and patches and stuff not working.
Oh, I see why I assumed Excel… OK thank you.
actually race studio 2