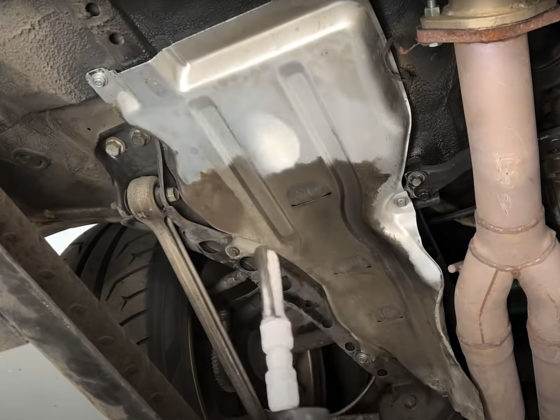
Except there’s a couple caveats. First, bolts that see this much heat cycling become hardened over time and are very, very hard to drill (drilling through the head of a single bolt would completely dull the drill bit). Second, bolts that have seen 30 years of use sometimes do not want to come out easily. We got incredibly lucky and with some heat, patience, and penetrating oil, were able to remove this particular bolt without snapping it off in the turbocharger. Snapping one of these off becomes a nightmare as repairing it means removing the turbo itself. This requires removing the passenger side engine mount and tilting the engine to get the turbo to clear the shock tower.Well this sucks. Easy option off the table, it’s time to throw money at the problem. One of the more annoying aspects of this repair is that Suzuki uses two different bolts for the turbocharger. All are M8x1.25 thread, but two are 60mm while the third is 35mm. This means buying two packs of hardened bolts and only using a couple of them. When drilling the bolt heads, I did them one at a time to keep the turbo in place. OF COURSE it was the last bolt that decided to cause trouble. Typical…For new bolts, we went straight to ARP’s catalog of chromoly bolts. We decided to replace all of our bolts and forego the safety wire. ARP’s bolts should be less prone to stretching and loosening which will still solve our problem.Before installing the new bolts, we quickly chased the threads of the turbocharger to ensure the new ARP bolts would seat correctly into the 30 year old turbocharger. We then ran them down and torqued them to spec. We then reinstalled the heat shield to wrap up this mini project.
Replacing our unmarked OEM bolts with the chromoly ARP bolts solves our immediate problem, but will the ARP bolts keep the turbo retained? Time will tell. At least we have spares we can safety wire and we know exactly where to go if we ever hear the banshee return.
Ever play with the Stage8 locking washer system? Wondering if you had a preference of that vs drilling and locking wire?
I’ve honestly got that on some header bolts, the Stage8 stuff, but it was a one-time install and never looked back. So I can’t really compare to say it’s good or bad.
I had not seen that system before. Would be a lot easier than drilling for safety wire that’s for sure. Doesn’t look like they have the bolt lengths I would have needed though.
My original plan was to fix it with tools and parts I had. That all went out the window when the last bolt broke its threads coming out.
Short length cobalt drill bits are about $2 each, and are the only way to go for drilling for safety wire. Buy at least 5, and you won’t worry about occasional bit breakage that would halt the job in the middle. The short length bits are much stiffer and less prone to breakage than the standard/jobber length. Standard high speed steel drill bits are just a waste of time and money for drilling safety wire holes.
If I were you, I’d still safety wire them – though that’s my bias of fixing helicopters bleeding through. At the very least, use some torque stripe so you can monitor them.


7 comments
Ever play with the Stage8 locking washer system? Wondering if you had a preference of that vs drilling and locking wire?
I’ve honestly got that on some header bolts, the Stage8 stuff, but it was a one-time install and never looked back. So I can’t really compare to say it’s good or bad.
I had not seen that system before. Would be a lot easier than drilling for safety wire that’s for sure. Doesn’t look like they have the bolt lengths I would have needed though.
My original plan was to fix it with tools and parts I had. That all went out the window when the last bolt broke its threads coming out.
Short length cobalt drill bits are about $2 each, and are the only way to go for drilling for safety wire. Buy at least 5, and you won’t worry about occasional bit breakage that would halt the job in the middle. The short length bits are much stiffer and less prone to breakage than the standard/jobber length.
Standard high speed steel drill bits are just a waste of time and money for drilling safety wire holes.
Probably smart to at least mark the heads with paint to know easily if they are loosening without having to wait until you hear banshee screaming.
I did etch a line into the heads and manifold after I took the photos. Had the same idea you did.
If I were you, I’d still safety wire them – though that’s my bias of fixing helicopters bleeding through. At the very least, use some torque stripe so you can monitor them.
Nordlock and Grade 10.9 fasteners, easy peasy