
,
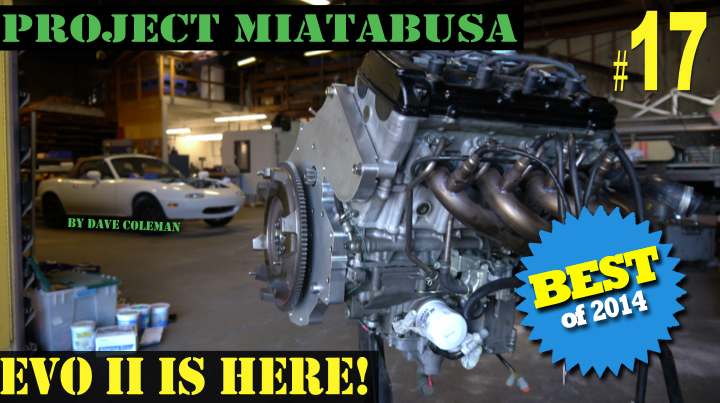
This single-piece shaft leads to yet another redesign. On Miatabusa EVO I, the bellhousing adaptor plate had a smallish hole for the flywheel shaft to poke through. Then, after the bellhousing plate was installed, the flywheel flange would be splined to the shaft, locking everything together. When you wanted to tear things apart to look for a leak or a horrible noise, those splines could be temperamental, sometimes requiring a puller and dry ice to get the flywheel flange off.
Our updated wedge plate pokes through the bellhousing plate so there's no interlocking of plates. Once the wedge plate is installed, the shaft is fully supported and sealed and ready to hold a flywheel.

With the bellhousing plate installed, there's no interlocking anything. To disassemble, just remove the bellhousing plate, remove the wedge plate, remove the shaft, then remove the clutch plug. No pullers required.

Finally, the bellhousing plate itself gets some updates. We designed and built the first plate before we knew how the engine mounts were going to work. Then, when we made a chromoly tube frame for the mounts, we needed to run a vertical brace from each mount to something strong on the case. On the passenger's side, the engine is short on strong spots, so we had to run a long, awkward tube all the way to one of the factory mounting points on the cylinder head. This time we added a tab to the bellhousing plate for a smaller vertical brace.

Now that the cylinder head mount points are no longer uncumbered by braces, we extended the bellhousing plate up to the back of the head. This should make the whole assembly much stronger, taking load away from the tiny clutch cover bolts and putting it where things are strong enough to handle it.

The engine is going back in the car now. Cross your fingers for better noises this time!

11 comments
Finally an update!!
Happy to see that the project is still alive!!
I have no idea when this was posted, since I did not recieve an update.
I also cannot see any comments, also not on older posts…
The redesign of the website looks great.
Hopefully ticking the notify boxes again enables me to see the comments again…
The comments unfortunately were part of the information we weren’t able to transfer over from the “old” MotoIQ 🙁
“The engine is going back in the car now. ” What’s the date on this article? I don’t know if this ‘update’ is from 2014 or….?
Good to see an update after 2 years. Hopefully it wont take that long for the next one….
What happened to the Part 18 content (with the clutch exploded clutch basket) ? Was the information lost somehow, or has it been omitted from the new MotoIQ site for… reasons? Those failures contain good, hard-won information. It would be a shame to not post them!
Stumbled onto this build the other day and I think it is the most relevant piece of kit I have seen in a very long time. Have looked at a Busa swap from many different angles and there always seem to be more cons than it is worth. Grafting the Miata trans to the Busa engine in this way is a game changer. eagerly waiting for another build installment and I hope you guys can produce a kit that is affordable to the shade tree swapper.
Cheers
Larry
And here we are over two years later. I really would like to see this finished….
Update please!
Is there a website where you guys sell this kit and what are we talking about price wise .
And any update on the car ?
So? Did this just get scrapped or something? Nothing in almost 4 years….
there is a miatabusa website which doesn’t have much info, but if you look up miatabusa on instagram looks like it is alive and well.