• Tech
    • Tech Category
      • Engine
      • Bottom End
      • Rods and Pistons
      • Head and Headwork
      • Cams and Valvetrain
      • Cooling and Heat Management
      • Intake
      • Headers and Exhaust
      • Rotary
      • Engine Management and Tuning
      • Drivetrain
      • Transmission
      • Clutch and Flywheel
      • Differential and Final Drive
      • Driveshaft and Axle
      • Axles
    • Tech Category
      • Suspension
      • Shocks and Coilovers
      • Springs
      • Swaybars
      • Arms and Links
      • Bushings
      • Steering
      • Geometry Correction
      • Suspension Setup and Tuning
      • Brakes
      • Wheels and Tires
      • Fueling
      • Forced Induction and NOS
      • Aerodynamics
    • Tech Cat
      • Electrical
      • Battery and Power Distribution
      • Electronics
      • Wiring
      • Electrical System Education and Troubleshooting
      • Lubrication
      • Interior and Controls
      • Exterior
      • Paint and Bodywork
      • Wraps and Film Protection
      • Exterior Care and Maintenance
      • Data Acquisition and Tuning
      • Fabrication and Safety
      • Tips and How-To
  • Projects
    • Make A-D
      • Acura
      • Integra (DC2)
      • NSX
      • CSF RSX (DC5)
      • BMW
      • E30 (SR20 Powered)
      • E36 323is
      • E36 M3 (Black)
      • E36 M3 (Silver)
      • E39 M5
      • E46 M3
      • E90 M3
      • E46 Racecar
      • Yost Auto E92 M3
      • Yost Auto F82 M4
      • Chevrolet
      • Camaro Gen5
      • Corvette Stingray (C7 Z51)
      • Corvette Stingray (C8 Z51)
      • GMC Canyon
      • Dodge
      • Viper GTS
    • Make E-I
      • Ford
      • E350 Tow Rig
      • F150 EcoBoost
      • Fiesta ST
      • Focus ST
      • Mustang 5.0 (Grey)
      • Mustang 5.0 (White)
      • Mustang S197 (Budget Track Car)
      • Mustang S550 GT
      • Honda
      • Civic EF Racecar
      • Civic Si (Coupe)
      • Civic Si (EP3)
      • Civic Si (Saloon)
      • EJ Civic
      • Polystrand CRX
      • S2000 (AP1)
      • S2000 (AP2)
      • Infiniti
      • G20 Racecar
      • G20 (P10 AWD Turbo)
      • G35
      • G37S
    • Make J-M
      • Isuzu
      • Vehicross
      • Lexus
      • ISF
      • SC300
      • Mazda
      • V8 RX7 (3rd Gen)
      • RX-7 (3rd Gen)
      • RX-7 Restomod (3rd Gen)
      • Skyactiv 3
      • Frankenmiata
      • Miatabusa
      • My Girlfriend’s Miata
      • Mitsubishi
      • EVO VIII
      • EVO IX
      • EVO X
      • CSF EVO X Racecar
      • Professional Awesome EVO VIII
    • Make N-P
      • Nissan
      • 200SX
      • 200SX SE-R
      • 240SX Land Speed Racer
      • 300ZXTT
      • 350Z
      • 350Z Drift Car
      • 370Z
      • GT-R (R33)
      • GT-R (R35)
      • GT-R (Team America BNR32)
      • LS S13
      • NX GTi-R
      • Pathfinder
      • S13 Drift/Grip Do-it-All Mega 240
      • Sentra SE-R
      • Sentra Spec V
      • Silvia
      • STurdteen Drift Car
      • Porsche
      • 991 GT3RS
      • Cayman (987)
      • Cayman T
      • Cayman GTS 4.0
    • Make S-Z
      • Scion
      • FR-S
      • Scion Tuner Challenge FR-S
      • TC
      • Subaru
      • Autocross BRZ
      • Legacy GT
      • STI (gen 2)
      • STI (gen 3)
      • WRX (GD)
      • WRX (VA)
      • Toyota
      • 4Runner
      • AE86 Corolla
      • GR Corolla
      • Starletabusa
      • Supra Mark IV
      • Tacoma
      • Tundra
      • Volkswagen
      • MKIV Jetta TDI
      • MKVI Golf TDI
      • MKVII Golf R
      • Sipster (Rabbit)
    • Other Projects
      • Powersports
      • Aprilia RS50
      • Aprilia SR50
      • Doodlebug
      • Ducati 998
      • Ducati Hypermotard
      • Honda Ruckus
      • Husqvarna TE610
      • Go Karts
      • Other
      • Sim Racer
      • Aurora Cobra
      • Garage
      • NP01 Prototype
  • Features
    • Features
      • Feature Cars
      • Drag Race Cars
      • Drift Cars
      • Land Speed Cars
      • Open-Wheel Cars
      • Rally Cars
      • Road Race Cars
      • Street Cars
      • Time Attack Cars
      • Drag Racing
    • Features
      • Events
      • Drifting
      • Land Speed Racing
      • Open-Wheel Racing
      • Time Attack Racing
      • Rally Racing
      • Road Racing
      • Car Shows
      • Columns
      • SlipAngle Podcast
  • Video
  • Shop *NEW*
  • MotoIQ Garage Services
  • About
  • Shop *NEW*
  • MotoIQ Garage Services
  • About
MotoIQ
MotoIQ
  • Tech
    • Tech Category
      • Engine
      • Bottom End
      • Rods and Pistons
      • Head and Headwork
      • Cams and Valvetrain
      • Cooling and Heat Management
      • Intake
      • Headers and Exhaust
      • Rotary
      • Engine Management and Tuning
      • Drivetrain
      • Transmission
      • Clutch and Flywheel
      • Differential and Final Drive
      • Driveshaft and Axle
      • Axles
    • Tech Category
      • Suspension
      • Shocks and Coilovers
      • Springs
      • Swaybars
      • Arms and Links
      • Bushings
      • Steering
      • Geometry Correction
      • Suspension Setup and Tuning
      • Brakes
      • Wheels and Tires
      • Fueling
      • Forced Induction and NOS
      • Aerodynamics
    • Tech Cat
      • Electrical
      • Battery and Power Distribution
      • Electronics
      • Wiring
      • Electrical System Education and Troubleshooting
      • Lubrication
      • Interior and Controls
      • Exterior
      • Paint and Bodywork
      • Wraps and Film Protection
      • Exterior Care and Maintenance
      • Data Acquisition and Tuning
      • Fabrication and Safety
      • Tips and How-To
  • Projects
    • Make A-D
      • Acura
      • Integra (DC2)
      • NSX
      • CSF RSX (DC5)
      • BMW
      • E30 (SR20 Powered)
      • E36 323is
      • E36 M3 (Black)
      • E36 M3 (Silver)
      • E39 M5
      • E46 M3
      • E90 M3
      • E46 Racecar
      • Yost Auto E92 M3
      • Yost Auto F82 M4
      • Chevrolet
      • Camaro Gen5
      • Corvette Stingray (C7 Z51)
      • Corvette Stingray (C8 Z51)
      • GMC Canyon
      • Dodge
      • Viper GTS
    • Make E-I
      • Ford
      • E350 Tow Rig
      • F150 EcoBoost
      • Fiesta ST
      • Focus ST
      • Mustang 5.0 (Grey)
      • Mustang 5.0 (White)
      • Mustang S197 (Budget Track Car)
      • Mustang S550 GT
      • Honda
      • Civic EF Racecar
      • Civic Si (Coupe)
      • Civic Si (EP3)
      • Civic Si (Saloon)
      • EJ Civic
      • Polystrand CRX
      • S2000 (AP1)
      • S2000 (AP2)
      • Infiniti
      • G20 Racecar
      • G20 (P10 AWD Turbo)
      • G35
      • G37S
    • Make J-M
      • Isuzu
      • Vehicross
      • Lexus
      • ISF
      • SC300
      • Mazda
      • V8 RX7 (3rd Gen)
      • RX-7 (3rd Gen)
      • RX-7 Restomod (3rd Gen)
      • Skyactiv 3
      • Frankenmiata
      • Miatabusa
      • My Girlfriend’s Miata
      • Mitsubishi
      • EVO VIII
      • EVO IX
      • EVO X
      • CSF EVO X Racecar
      • Professional Awesome EVO VIII
    • Make N-P
      • Nissan
      • 200SX
      • 200SX SE-R
      • 240SX Land Speed Racer
      • 300ZXTT
      • 350Z
      • 350Z Drift Car
      • 370Z
      • GT-R (R33)
      • GT-R (R35)
      • GT-R (Team America BNR32)
      • LS S13
      • NX GTi-R
      • Pathfinder
      • S13 Drift/Grip Do-it-All Mega 240
      • Sentra SE-R
      • Sentra Spec V
      • Silvia
      • STurdteen Drift Car
      • Porsche
      • 991 GT3RS
      • Cayman (987)
      • Cayman T
      • Cayman GTS 4.0
    • Make S-Z
      • Scion
      • FR-S
      • Scion Tuner Challenge FR-S
      • TC
      • Subaru
      • Autocross BRZ
      • Legacy GT
      • STI (gen 2)
      • STI (gen 3)
      • WRX (GD)
      • WRX (VA)
      • Toyota
      • 4Runner
      • AE86 Corolla
      • GR Corolla
      • Starletabusa
      • Supra Mark IV
      • Tacoma
      • Tundra
      • Volkswagen
      • MKIV Jetta TDI
      • MKVI Golf TDI
      • MKVII Golf R
      • Sipster (Rabbit)
    • Other Projects
      • Powersports
      • Aprilia RS50
      • Aprilia SR50
      • Doodlebug
      • Ducati 998
      • Ducati Hypermotard
      • Honda Ruckus
      • Husqvarna TE610
      • Go Karts
      • Other
      • Sim Racer
      • Aurora Cobra
      • Garage
      • NP01 Prototype
  • Features
    • Features
      • Feature Cars
      • Drag Race Cars
      • Drift Cars
      • Land Speed Cars
      • Open-Wheel Cars
      • Rally Cars
      • Road Race Cars
      • Street Cars
      • Time Attack Cars
      • Drag Racing
    • Features
      • Events
      • Drifting
      • Land Speed Racing
      • Open-Wheel Racing
      • Time Attack Racing
      • Rally Racing
      • Road Racing
      • Car Shows
      • Columns
      • SlipAngle Podcast
  • Video
  • Tech
  • Projects
  • Mitsubishi

The Impossible Evo X: Part 2 – How to use a BOV to control compressor surge

  • Daniel O'Donnell

On partial throttle, lower revs, my Evo X has turbocharger compressor surge. This is a phenomenon that occurs when the turbocharger compressor wheel is creating more air mass than the engine can ingest. This can happen in a variety of ways but the one most car folks are experienced with is when accelerating under boost and then getting off the throttle. Without a blow-off or bypass valve, the air between the turbo and closed throttle body has nowhere to go and the compressor tries to squeeze it until it can’t anymore. That air then comes back through the compressor wheel, making an audible choo-choo-choo noise in the process.

In certain situations (think large turbos and small engines), this can occur at full throttle. Under these high power situations, surge can easily damage turbo bearings due to the added thrust load going through the compressor wheel. A bad enough surge can even damage the blades of the compressor wheel!

Luckily, on my Evo X, this isn’t an issue, but surge does occur under partial throttle when there’s a pressure differential between the charge piping and intake manifold. It should be noted that even under lower loads, this can slowly cause wear on the turbocharger, but more importantly for me, it caused some funky driveability issues that manifested themselves as bucking and stuttering.

My surge occurred when there was a pressure differential, while under partial throttle and low revs, with less pressure on the blue line that connects to the intake manifold and more pressure on the red hose that connects to the charge piping side of the bypass valve. Seemingly, one of two things would happen. Either the valve stayed closed and excess boost went back through the compressor wheel or the valve would open, then lose its pressure differential, causing the BOV to slam shut and the process to repeat, even though throttle position hadn’t changed.

Two Problems.

Since I purchased the Evo X, I would occasionally find myself in surge at low rpm, low throttle angles, and having to drive around it. I was using the stock bypass valve, which is used by Mitsubishi as a safety switch in more ways than one. The valve works like any other BOV/bypass by opening at approximately 9-11 PSI of boost pressure differential. The second safety switch is that Mitsubishi integrated a bleed port from the charge pipe side of the valve to the side that attaches to a vacuum line. In other words, this helps control overboost by bleeding off excess boost pressure if it were to exceed what Mitsubishi intended. It’s a mechanical failsafe if something on the electric or pneumatic side stopped controlling the wastegate as intended.

Here is an OEM Mitsubishi BOV/bypass valve. The design has been around for decades now and I sold my original one before learning about the internal bleed valve. That’s right, I went through the trouble of ordering another one to take pictures for our fine readers!

To increase the boost pressure the OEM bypass valve can handle, it’s common to use an old-school DSM/Evo practice of crushing the top of the valve, effectively increasing spring seat pressure and making it a little harder for the bleed port effect to take place. What did this all mean for me in the end? As the OEM valve isn’t adjustable, I couldn’t tune it to get rid of the surge, and furthermore, if I ever wanted to increase boost, the stock bypass valve would bleed off some of that extra pressure!

In this image, with one of the BOV’s inlet ports removed, we can see the main pressure relief valve and the secondary, smaller bleed port. There are methods of disabling and/or modifying the bleed so the valve can work under higher boost pressures, but I went the easy route of working with Turbosmart!

This is where an adjustable BOV/bypass valve comes into play. As mentioned in the previous article, I use a Turbsosmart Dual Port BOV/bypass valve. The base setup has a spring rate and seat pressure that’s set to open at nearly the same point the OEM valve does. In addition, it has an adjustable cap to increase seat pressure, if desired, and it does this with much more precision than just crushing the top of an OEM valve. This increased seat pressure can come in handy when venting to the atmosphere while still running a mass airflow sensor, but I am not using it in that configuration. When set to open at factory rates, it performs exactly the same as the OEM valve, which meant when I switched to the Turbsosmart BOV, my compressor flutter problems weren’t immediately solved and some tuning and testing would have to occur.

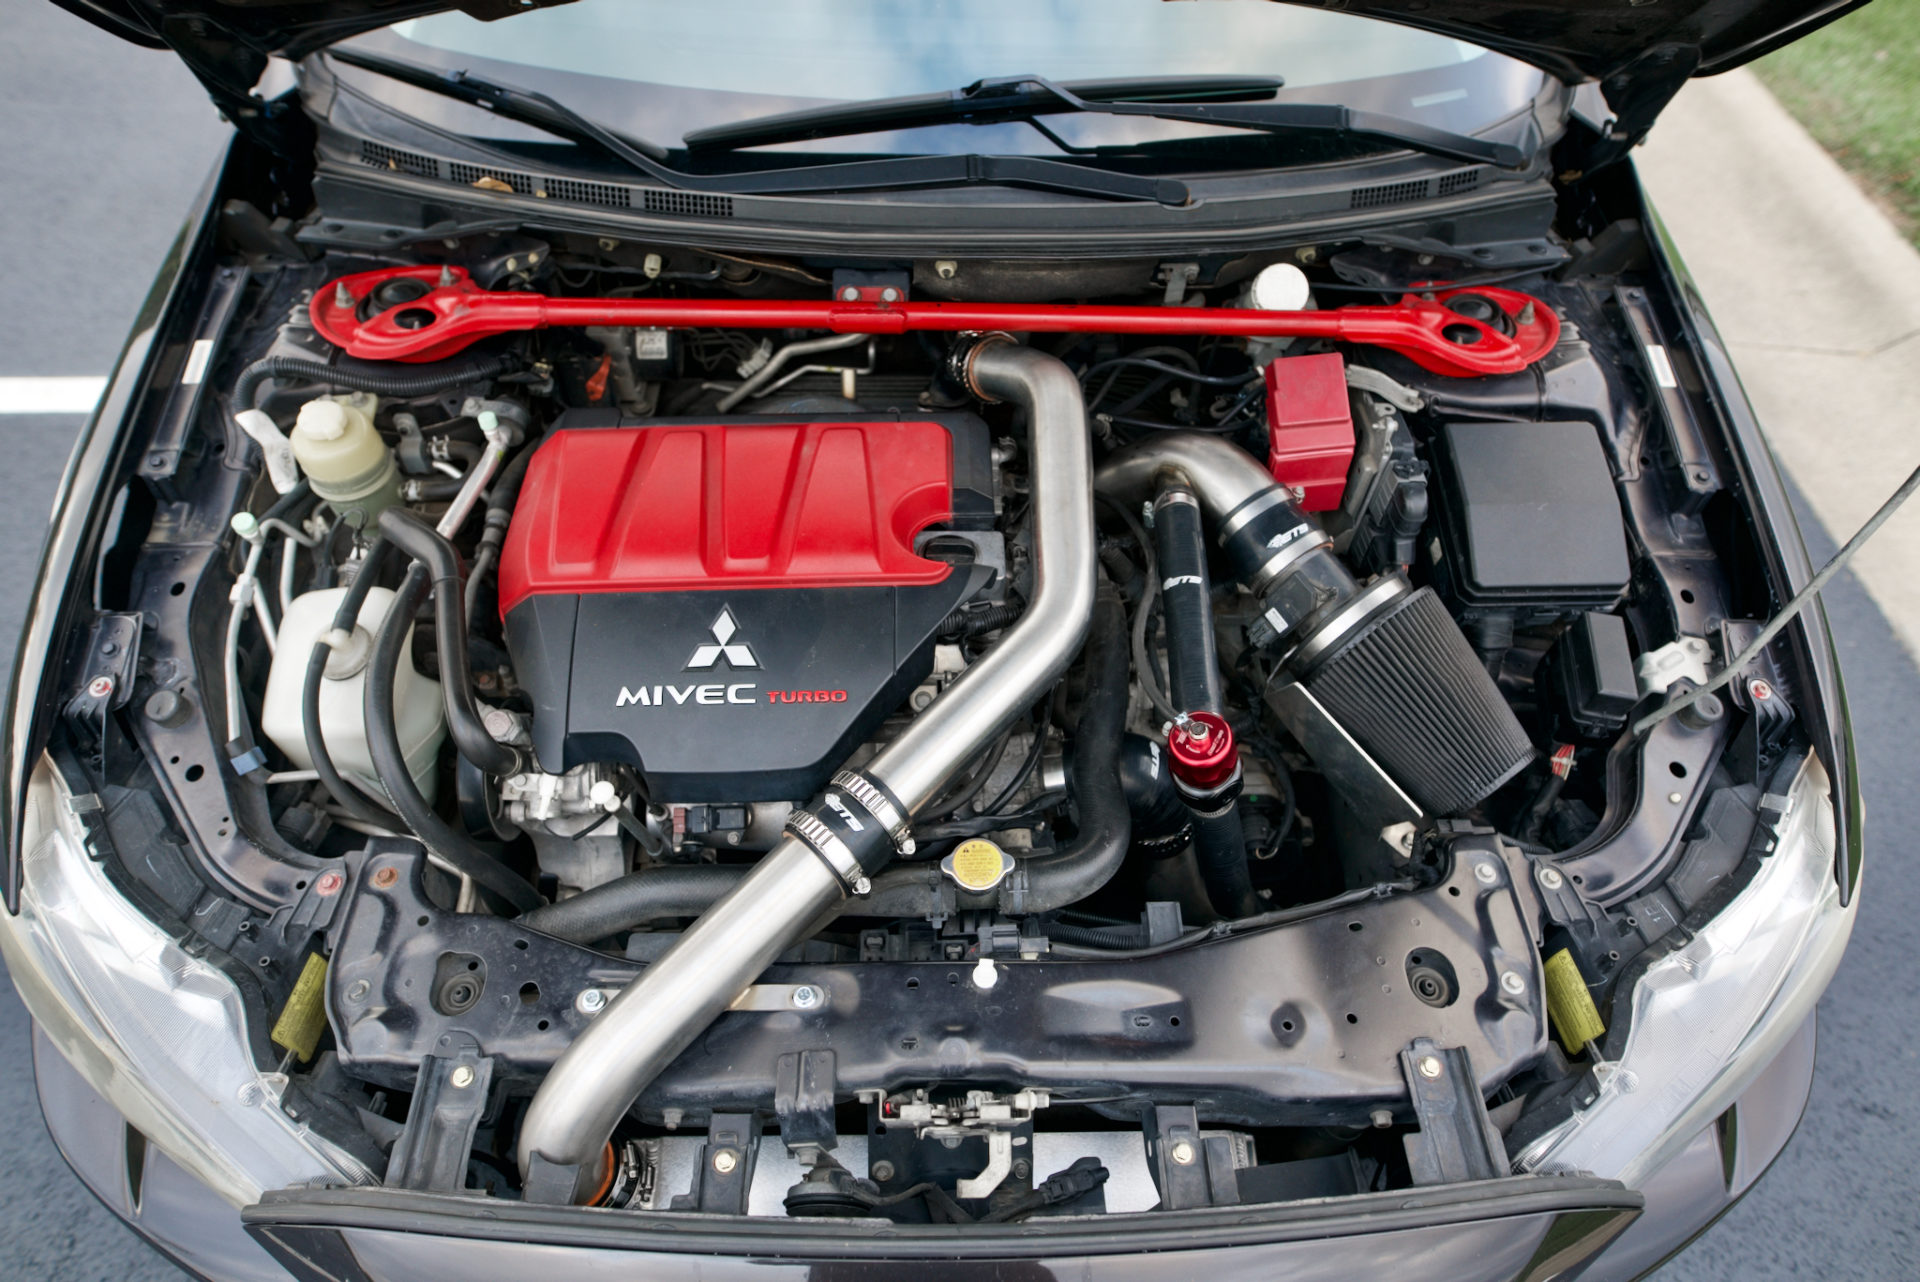
The Turbosmart Dual Port valve installed, run purely in recirculation mode due to running the stock MAF sensor. We can see the red cap is adjustable to increase or decrease valve seat pressure as desired.

Related

1 2Next page
Related Topics
  • Mitsubishi
  • Turbosmart
  • Professional Awesome Racing
Previous Article
  • Corvette Stingray (C8 Z51)
  • Chevrolet
  • Projects

Project C8 Corvette, Getting Track Safe with Peitz Performance and Simpson Safety

  • Mike Kojima
View Post
Next Article
  • Features

The Pagani Huayra BC Up Close

  • Mike Kojima
View Post
7 comments
  1. Avatar photo Mike Kojima says:
    October 13, 2021 at 9:29 am

    I guess the trick is to have the tension enough to prevent the BOV from opening so you don’t mess up your MAF readings during high vacuum periods.

    Reply
    1. Daniel O'Donnell says:
      October 13, 2021 at 11:16 am

      Because I am running recirc and the BOV lines are all post MAF, I think it’s why my setup works well. I never have unmetered air and it’s open in most low load situations. At least that’s my working theory.

      Reply
      1. Avatar photo Mike Kojima says:
        October 14, 2021 at 5:37 pm

        Makes sense.

        Reply
  2. Brian Brannon says:
    July 12, 2022 at 12:05 pm

    Cutting a spring makes it stiffer so you probably increased the holding pressure of the BOV not reduced it

    Reply
    1. Daniel O'Donnell says:
      July 12, 2022 at 12:54 pm

      Cutting off coils does increase the spring rate, but the spring was (and still is to a much lesser degree) compressed by the cap, so seat pressure is reduced greatly.

      Reply
  3. steven says:
    May 23, 2023 at 2:37 pm

    Hello Daniel.
    Would you mind sharing wich scan tool specifically and wich key fob you purchased.
    I bought an MR last year and only have 1 smart key with it.. paranoia of loosing it is a lot.
    Thanks man.

    Reply
    1. Daniel O'Donnell says:
      May 24, 2023 at 12:06 pm

      No problem!
      This is the scan tool I used: https://www.amazon.com/gp/product/B07N69PC3D/ref=ppx_yo_dt_b_search_asin_title?ie=UTF8&psc=1

      This is the fob:
      https://www.amazon.com/gp/product/B07MQ1CDSV/ref=ppx_yo_dt_b_search_asin_title?ie=UTF8&psc=1

      or these:
      https://www.amazon.com/gp/product/B07GQ11WGG/ref=ppx_yo_dt_b_search_asin_title?ie=UTF8&psc=1

      That being said, I could only get 1 fob and the valet key to program correctly at the same time. Every time I tried to do 2 fobs it wouldn’t work.

      Reply

Leave a Reply Cancel reply

Your email address will not be published. Required fields are marked *

Input your search keywords and press Enter.