• Tech
    • Tech Category
      • Engine
      • Bottom End
      • Rods and Pistons
      • Head and Headwork
      • Cams and Valvetrain
      • Cooling and Heat Management
      • Intake
      • Headers and Exhaust
      • Rotary
      • Engine Management and Tuning
      • Drivetrain
      • Transmission
      • Clutch and Flywheel
      • Differential and Final Drive
      • Driveshaft and Axle
      • Axles
    • Tech Category
      • Suspension
      • Shocks and Coilovers
      • Springs
      • Swaybars
      • Arms and Links
      • Bushings
      • Steering
      • Geometry Correction
      • Suspension Setup and Tuning
      • Brakes
      • Wheels and Tires
      • Fueling
      • Forced Induction and NOS
      • Aerodynamics
    • Tech Cat
      • Electrical
      • Battery and Power Distribution
      • Electronics
      • Wiring
      • Electrical System Education and Troubleshooting
      • Lubrication
      • Interior and Controls
      • Exterior
      • Paint and Bodywork
      • Wraps and Film Protection
      • Exterior Care and Maintenance
      • Data Acquisition and Tuning
      • Fabrication and Safety
      • Tips and How-To
  • Projects
    • Make A-D
      • Acura
      • Integra (DC2)
      • NSX
      • CSF RSX (DC5)
      • BMW
      • E30 (SR20 Powered)
      • E36 323is
      • E36 M3 (Black)
      • E36 M3 (Silver)
      • E39 M5
      • E46 M3
      • E90 M3
      • E46 Racecar
      • Yost Auto E92 M3
      • Yost Auto F82 M4
      • Chevrolet
      • Camaro Gen5
      • Corvette Stingray (C7 Z51)
      • Corvette Stingray (C8 Z51)
      • GMC Canyon
      • Dodge
      • Viper GTS
    • Make E-I
      • Ford
      • E350 Tow Rig
      • F150 EcoBoost
      • Fiesta ST
      • Focus ST
      • Mustang 5.0 (Grey)
      • Mustang 5.0 (White)
      • Mustang S197 (Budget Track Car)
      • Mustang S550 GT
      • Honda
      • Civic EF Racecar
      • Civic Si (Coupe)
      • Civic Si (EP3)
      • Civic Si (Saloon)
      • EJ Civic
      • Polystrand CRX
      • S2000 (AP1)
      • S2000 (AP2)
      • Infiniti
      • G20 Racecar
      • G20 (P10 AWD Turbo)
      • G35
      • G37S
    • Make J-M
      • Isuzu
      • Vehicross
      • Lexus
      • ISF
      • SC300
      • Mazda
      • V8 RX7 (3rd Gen)
      • RX-7 (3rd Gen)
      • RX-7 Restomod (3rd Gen)
      • Skyactiv 3
      • Frankenmiata
      • Miatabusa
      • My Girlfriend’s Miata
      • Mitsubishi
      • EVO VIII
      • EVO IX
      • EVO X
      • CSF EVO X Racecar
      • Professional Awesome EVO VIII
    • Make N-P
      • Nissan
      • 200SX
      • 200SX SE-R
      • 240SX Land Speed Racer
      • 300ZXTT
      • 350Z
      • 350Z Drift Car
      • 370Z
      • GT-R (R33)
      • GT-R (R35)
      • GT-R (Team America BNR32)
      • LS S13
      • NX GTi-R
      • Pathfinder
      • S13 Drift/Grip Do-it-All Mega 240
      • Sentra SE-R
      • Sentra Spec V
      • Silvia
      • STurdteen Drift Car
      • Porsche
      • 991 GT3RS
      • Cayman (987)
      • Cayman T
      • Cayman GTS 4.0
    • Make S-Z
      • Scion
      • FR-S
      • Scion Tuner Challenge FR-S
      • TC
      • Subaru
      • Autocross BRZ
      • Legacy GT
      • STI (gen 2)
      • STI (gen 3)
      • WRX (GD)
      • WRX (VA)
      • Toyota
      • 4Runner
      • AE86 Corolla
      • GR Corolla
      • Starletabusa
      • Supra Mark IV
      • Tacoma
      • Tundra
      • Volkswagen
      • MKIV Jetta TDI
      • MKVI Golf TDI
      • MKVII Golf R
      • Sipster (Rabbit)
    • Other Projects
      • Powersports
      • Aprilia RS50
      • Aprilia SR50
      • Doodlebug
      • Ducati 998
      • Ducati Hypermotard
      • Honda Ruckus
      • Husqvarna TE610
      • Go Karts
      • Other
      • Sim Racer
      • Aurora Cobra
      • Garage
      • NP01 Prototype
  • Features
    • Features
      • Feature Cars
      • Drag Race Cars
      • Drift Cars
      • Land Speed Cars
      • Open-Wheel Cars
      • Rally Cars
      • Road Race Cars
      • Street Cars
      • Time Attack Cars
      • Drag Racing
    • Features
      • Events
      • Drifting
      • Land Speed Racing
      • Open-Wheel Racing
      • Time Attack Racing
      • Rally Racing
      • Road Racing
      • Car Shows
      • Columns
      • SlipAngle Podcast
  • Video
  • Shop *NEW*
  • MotoIQ Garage Services
  • About
  • Shop *NEW*
  • MotoIQ Garage Services
  • About
MotoIQ
MotoIQ
  • Tech
    • Tech Category
      • Engine
      • Bottom End
      • Rods and Pistons
      • Head and Headwork
      • Cams and Valvetrain
      • Cooling and Heat Management
      • Intake
      • Headers and Exhaust
      • Rotary
      • Engine Management and Tuning
      • Drivetrain
      • Transmission
      • Clutch and Flywheel
      • Differential and Final Drive
      • Driveshaft and Axle
      • Axles
    • Tech Category
      • Suspension
      • Shocks and Coilovers
      • Springs
      • Swaybars
      • Arms and Links
      • Bushings
      • Steering
      • Geometry Correction
      • Suspension Setup and Tuning
      • Brakes
      • Wheels and Tires
      • Fueling
      • Forced Induction and NOS
      • Aerodynamics
    • Tech Cat
      • Electrical
      • Battery and Power Distribution
      • Electronics
      • Wiring
      • Electrical System Education and Troubleshooting
      • Lubrication
      • Interior and Controls
      • Exterior
      • Paint and Bodywork
      • Wraps and Film Protection
      • Exterior Care and Maintenance
      • Data Acquisition and Tuning
      • Fabrication and Safety
      • Tips and How-To
  • Projects
    • Make A-D
      • Acura
      • Integra (DC2)
      • NSX
      • CSF RSX (DC5)
      • BMW
      • E30 (SR20 Powered)
      • E36 323is
      • E36 M3 (Black)
      • E36 M3 (Silver)
      • E39 M5
      • E46 M3
      • E90 M3
      • E46 Racecar
      • Yost Auto E92 M3
      • Yost Auto F82 M4
      • Chevrolet
      • Camaro Gen5
      • Corvette Stingray (C7 Z51)
      • Corvette Stingray (C8 Z51)
      • GMC Canyon
      • Dodge
      • Viper GTS
    • Make E-I
      • Ford
      • E350 Tow Rig
      • F150 EcoBoost
      • Fiesta ST
      • Focus ST
      • Mustang 5.0 (Grey)
      • Mustang 5.0 (White)
      • Mustang S197 (Budget Track Car)
      • Mustang S550 GT
      • Honda
      • Civic EF Racecar
      • Civic Si (Coupe)
      • Civic Si (EP3)
      • Civic Si (Saloon)
      • EJ Civic
      • Polystrand CRX
      • S2000 (AP1)
      • S2000 (AP2)
      • Infiniti
      • G20 Racecar
      • G20 (P10 AWD Turbo)
      • G35
      • G37S
    • Make J-M
      • Isuzu
      • Vehicross
      • Lexus
      • ISF
      • SC300
      • Mazda
      • V8 RX7 (3rd Gen)
      • RX-7 (3rd Gen)
      • RX-7 Restomod (3rd Gen)
      • Skyactiv 3
      • Frankenmiata
      • Miatabusa
      • My Girlfriend’s Miata
      • Mitsubishi
      • EVO VIII
      • EVO IX
      • EVO X
      • CSF EVO X Racecar
      • Professional Awesome EVO VIII
    • Make N-P
      • Nissan
      • 200SX
      • 200SX SE-R
      • 240SX Land Speed Racer
      • 300ZXTT
      • 350Z
      • 350Z Drift Car
      • 370Z
      • GT-R (R33)
      • GT-R (R35)
      • GT-R (Team America BNR32)
      • LS S13
      • NX GTi-R
      • Pathfinder
      • S13 Drift/Grip Do-it-All Mega 240
      • Sentra SE-R
      • Sentra Spec V
      • Silvia
      • STurdteen Drift Car
      • Porsche
      • 991 GT3RS
      • Cayman (987)
      • Cayman T
      • Cayman GTS 4.0
    • Make S-Z
      • Scion
      • FR-S
      • Scion Tuner Challenge FR-S
      • TC
      • Subaru
      • Autocross BRZ
      • Legacy GT
      • STI (gen 2)
      • STI (gen 3)
      • WRX (GD)
      • WRX (VA)
      • Toyota
      • 4Runner
      • AE86 Corolla
      • GR Corolla
      • Starletabusa
      • Supra Mark IV
      • Tacoma
      • Tundra
      • Volkswagen
      • MKIV Jetta TDI
      • MKVI Golf TDI
      • MKVII Golf R
      • Sipster (Rabbit)
    • Other Projects
      • Powersports
      • Aprilia RS50
      • Aprilia SR50
      • Doodlebug
      • Ducati 998
      • Ducati Hypermotard
      • Honda Ruckus
      • Husqvarna TE610
      • Go Karts
      • Other
      • Sim Racer
      • Aurora Cobra
      • Garage
      • NP01 Prototype
  • Features
    • Features
      • Feature Cars
      • Drag Race Cars
      • Drift Cars
      • Land Speed Cars
      • Open-Wheel Cars
      • Rally Cars
      • Road Race Cars
      • Street Cars
      • Time Attack Cars
      • Drag Racing
    • Features
      • Events
      • Drifting
      • Land Speed Racing
      • Open-Wheel Racing
      • Time Attack Racing
      • Rally Racing
      • Road Racing
      • Car Shows
      • Columns
      • SlipAngle Podcast
  • Video
  • Tech

Turbo Tech: Compressor and Turbine Map Details

  • Khiem Dinh

,

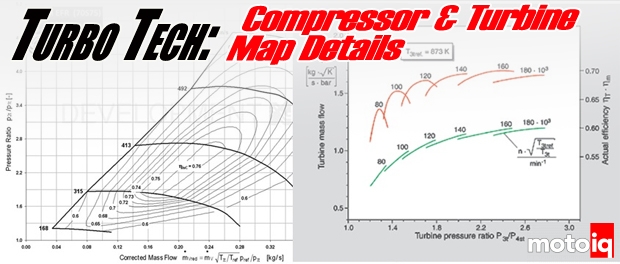
Turbine efficiency curves can take many shapes depending on the designs of the turbine wheel and housing. The above are just a few possible trends.


Two major variables affecting spool-up and transient response are turbine flow and efficiency.  The primary influence on spool-up is turbine flow with the turbine housing A/R being the primary method to adjust turbine flow.  A smaller A/R turbine housing, which has a smaller flow area, requires less flow to get the turbine wheel to spin up as compared to a larger A/R housing with its correspondingly larger flow area.  You can think of a small A/R turbine housing as a small diameter pipe (small flow area) and a large A/R turbine housing as a big diameter pipe (big flow area).  For a given mass flow rate of fluid through the pipes, the velocity coming out of the small diameter pipe will be higher than out of the bigger diameter pipe.  To spin up the turbine wheel, you need flow velocity and that is why smaller A/R turbine housings cause turbochargers to spin up sooner.


These plots above are a compressor map and turbine map for a turbocharger.  The turbine map shows plots for a small and a big A/R turbine housing.  As you can see, the big A/R turbine housing requires more turbine flow than the small A/R housing to get the turbocharger up to the same speed and compressor flow.  The upside of course is reduced back pressure.  Looking at the end of speed line #3, you can see how the larger A/R housing requires more flow, but also has a lower pressure ratio resulting in less back pressure on the engine; less back pressure improves the ability to make power by improving volumetric efficiency.


This is a turbine map showing matching flow and efficiency curves.  I plotted in a line showing the general efficiency trend.


Turbine efficiency is the other major player in affecting spool-up and transient response.  The variables affecting turbine efficiency are:  compressor wheel to turbine wheel match, turbine housing A/R, turbine housing volute shape, turbine wheel to housing clearances, and the bearing system.  I’m going to gloss over the last three quickly as an end-user has no control over these. 

The shape of the turbine housing volute, or gas passage, has an effect on turbine efficiency by how it directs the gas flow to the turbine wheel.  It is similar to aerodynamics where some shapes are more efficient than others.  Often times, the shape must be compromised due to space and packaging constraints; a compromised turbine housing that losses some efficiency is better than a turbine housing that does not fit at all.  The clearance between the blades of the turbine wheel and the walls of the turbine housing is a variable affecting efficiency.  The bigger the gap, the less efficient the turbine becomes because the gas essentially goes around the wheel instead of through the wheel and therefore does no work.  Ideally, there would be zero clearance, but that is impractical.  Clearances are required to prevent the turbine wheel from rubbing the turbine housing.  Turbine wheel movement that would allow a rub is due to shaft motion with the shaft motion being controlled by the bearing system.  The other considerations are thermal expansion and distortion of the turbine housing which can cause the turbine housing to come into contact with the turbine wheel.  As for the bearing system, we covered the types of bearings in Turbo Tech: Bearing Systems and how they affect turbine efficiency in Turbo Tech: Generating Compressor and Turbine Maps.


Related

Previous page 1 2 3Next page
Related Topics
  • Forced Induction and NOS
  • turbocharger
Previous Article
  • Uncategorized

ACURA NSX CONCEPT Movie by Gran Turismo

  • Aaron LaBeau
View Post
Next Article
  • Features
  • Projects
  • Volkswagen

Whiteline Flatout Heavy Duty Endlinks for VW and Audi

  • Jeff Naeyaert
View Post
9 comments
  1. Brian says:
    November 27, 2021 at 5:33 pm

    Using the compressor map and engine specs, is there a way to calculate or estimate what the boost threshold will be for a turbo?

    Reply
    1. Khiem Dinh says:
      November 28, 2021 at 2:10 pm

      Yup, and more critically, the turbine map. I did an example here.

      https://motoiq.com/turbo-tech-calculating-turbocharger-compressor-and-turbine-performance-advantage-with-the-new-honeywell-garrett-gtx-gen2/

      You can do it easier with the Borg Warner Matchbot app online. There are many assumptions you will have to make if you don’t have real world data for your engine. And the biggest assumption is the turbine efficiency to use during spool-up. It’s all guesswork on the pulse effect which effectively increases turbine efficiency. A twin-scroll setup will have a much stronger pulse effect which is why they spool up turbos more quickly.

      Reply
  2. Benjamin Dubrovner says:
    January 3, 2022 at 4:44 pm

    Assuming better turbine efficiency translates into more work being put into the shaft as torque to spin the compressor, how does a smaller a/r turbine housing produce better efficiency at higher flows and pressure ratios and a larger one better at lower flows and pressures. I always ran smaller a/r housings for spool and low boost set ups and bigger a/r housings for more boost at high rpm and flows with less backpressure.
    I must be missing something in the charts but ive read it several times over. Great article

    Reply
  3. Khiem Dinh says:
    January 3, 2022 at 6:55 pm

    Good question and beyond my knowledge. Definitely some complex fluid flow stuff going on! On the second page with my plot of big and small A/Rs and their flow and PR curves for the same shaft speed, those are basically same shaft power curves. Turbine shaft power is a function of mass flow, PR, and efficiency. Pretending the efficiencies are the same, the big A/R uses higher mass flow to generate the shaft power and the small A/R uses higher pressure ratio.

    The perfect A/R is where it is sized perfectly to generate the shaft power required and not wastegate any flow. This can be done on an application like a power generator set that runs at a constant speed and load all the time. Flow that is wastegated is basically like negative turbine efficiency. The more you have to wastegate, the more it basically brings down your effective turbine efficiency. Of course, if you actually want to have a wide powerband and be able to spool up at low rpms, you have to run a lower A/R and then wastegate the excess at the higher power levels.

    Your turbine housing sizing strategy is not a bad one. With a low boost setup, that implies a low power target, so you don’t need a big A/R to keep the exhaust manifold pressure down. To generalize turbine housing sizing, run the smallest A/R that you can and still be able to hit the power target. The type of application does matter though. One that does a quick pull and sees minimal time at high turbine pressure ratio can get away with a smaller A/R and subject the engine to higher exhaust back pressure. But something like a road course race car, or gen set, that speeds all of its time at peak power, the goal would be to minimize exhaust back pressure. A street car that needs a lot of low-end torque for stop light action can have the turbine housings sized where the exhaust manifold pressure is one bar higher than the intake manifold pressure; so and engine delta pressure of negative one bar. For a road course car, one would want engine dP as positive as possible at peak power, while still having a broad enough powerband. It’s made easier these days with race transmissions that can keep the engine rpms high keeping a big A/R turbo in the range it stay spooled. And with new e-turbos, the turbine housing A/R can be made bigger because the integrated electric motor adds the shaft power when the exhaust flow is not enough.

    Reply
  4. Charles Morrison says:
    November 12, 2022 at 3:26 pm

    Interesting article, thanks.
    I’m confused by turbine maps showing mass flow plateau at a given PR. Does running at greater PR increase absolute turbine output or can it actually hinder it? I’ve seen a case where the addition of a second wastegate reduced back pressure considerably while increasing boost pressure at the same conditions.
    Thank you.

    Reply
    1. Khiem Dinh says:
      November 13, 2022 at 9:15 pm

      The turbine maps show a corrected turbine mass flow. Corrected turbine mass flow is a function of actual mass flow divided by turbine pressure ratio. It’s typical to see the corrected turbine mass flow actually decrease at high turbine pressure ratios. That’s an indication the turbine pressure ratio is increasing faster than the actual turbine mass flow, so not a good thing.

      Reply
  5. Charles says:
    November 19, 2022 at 7:11 pm

    Thank you very, very, much.

    Reply
  6. Ian says:
    December 27, 2024 at 11:29 pm

    I understand that the turbine and compressor maps are related, but it is my understanding that the surge line of a compressor map is not calculated from the turbine map. There is someone on my forum claiming that the surge line of the borg warner EFR line of turbos is calculated with a twin scroll housing, whereas the surge line for the GTX line is based off a single scroll housing. This doesn’t sound correct to me, and makes comparing boost threshold between different turbo families extremely difficult. I am looking for insight from someone clearly more knowledgeable than me.
    Thank you.

    Reply
    1. Khiem Dinh says:
      December 28, 2024 at 9:50 am

      The compressor map is completely independent of the turbine side. The comp map is purely a function of the wheel and housing designs. What the surge line represents is the region where the flow gets unstable at low flow rates and high pressure ratios.

      Traditionally, the compressor map is generated by running a turbo on a gas test stand. I’ve been in the lab many times for these tests. The turbine map does depend on the compressor wheel attached as it’s the combination that determines the blade speed ratio on the turbine side. Different blade speed ratios result in different turbine efficiencies.

      Today, compressor maps don’t necessarily need to be made on a gas stand using a whole turbocharger. It could probably be done with just the compressor stage and spun up with an electric motor. That type of development was happening a decade ago when I left the turbo industry.

      Reply

Leave a Reply Cancel reply

Your email address will not be published. Required fields are marked *

Input your search keywords and press Enter.