,
In addition to COBB's intake we also wanted to clean up the engine bay so we installed their CNC oil cap, billet aluminum battery tie down, and Stainless Steel Turbo Heat Shield. OK so yeah, the Oil Cap and Battery tie down just look cool – so what? I will say that just like the other stuff COBB offers, the fit and finish are perfect.
 |
| The oil cap threads on as it should and when snug the logo faces exactly the way that it should to properly display the COBB logo. The oil cap features the proper rubber gasket. |
 |
| The proper steps are machined in the billett aluminum battery tie down so that it securely holds down the battery. No we did not bother weighing the two. In a car this heavy we'll leave the weight weenie antics to the Lotus people. |
We chose black everything as if you have ever seen Project 200SX we are looking for the blingingest anti-bling! The heat shield is a stainless piece that is laser cut and offers better fitment over aftermarket downpipes than the OEM piece. When we first installed our COBB down-pipe, we chose to cut our OEM heatshield; however if you want to keep that intact, do yourself a favor and order the Cobb Heatshield at the same time. Just like the intake all of these items fit perfectly and looked even better.
 |
| When you install an aftermarket downpipe they ALL require that you cut or remove the factory heat shield. If you want to keep from cutting the OEM piece do yourself a favor and include this piece of goodness in your COBB order. |
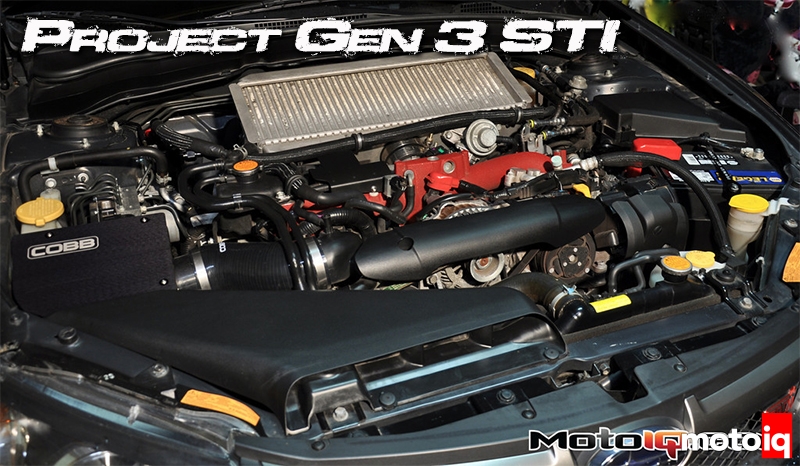
With these new goodies installed and the intake being different, we knew that we had to re-tune our AccessPORT to account for the new setup. We downloaded COBB's off the Shelf 93 octane SF+ plus MAP and for good measure we also downloaded both the High and Low wastegate versions of this MAP just to be safe. If you experience over or under boosting, having these maps on hand is crucial to keep things running properly. After downloading the MAPS to AccessPORT Manager on our computer we synced up the AccessPORT and installed all 3 MAPS to be safe. We got in the car and re-flashed to the Base 93 octane SF2 MAP and fired up the car. The first thing we wanted to do was use the AP to datalog and see peak boost and Feedback Knock. After double checking our install and doing some around town driving to make sure all seemed well, we did a 3rd gear pull to record our data. After review we logged a zero knock count and a peak boost of 18.6 PSI. Right on and likely a conservative off the shelf MAP to run.
One thing we noticed right away was the SOUND of the intake. Prior to our installation of the SF intake the turbo spool and OEM bypass valve were barely audible, after they were downright LOUD. You can clearly hear the turbo spool immediately upon tip in and the BPV is loud and clear upon throttle lift. This may or may not be up your alley. It certainly took some getting used to based on how quiet the factory intake is. I DO like the sound now as it allows me to hear more about throttle position and lift in an audible manner when driving at the limit. The one difference on this particular install is that we ran this base map for quite some time. Right around the time we finished this up Mitch was making a trip across the country to COBB SO-CAL and we knew it would be a little while before we could start e-tuning. The base MAP proved to work as expected. It offered good overall drivability and most people would be perfectly happy with leaving things as is. MOST people… We are not most people so we bugged the crap out of Mitch and sent him our datalogs so that he could begin working on a custom tune for us. One thing we wanted to correct was tip in as our previous AMS MAP was very responsive on tip in and offered great driveability and the best gas mileage we had yet recorded on project GR. This e-tuning was all done via e-mail and on average it took me about 2 minutes to download the data from the AP and e-mail it to Mitch. It's no wonder COBB has sold umpteen bajillions of their AccessPORT. On average for $500 it is an amazing tool with a lot of potential. YES, there are other open source options as well as other alternatives, but simply put the AP works and it works damn well.
 |
| Despite the stock appearance the sound is FAR from stock. The turbo sounds as if it will ingest small children when it spools and the bypass is now clearly audible. |
During our e-tune session we took time out to assist a fellow Subrau owner diagnose a issue he was having with his 09 WRX. I went over to give him a hand and after an hour of messing with a janky aftermarket TMIC and making sure the IC piping was all good we knew we had to troubleshoot something more serious. We first used the AccessPORT's live monitoring feature to check MAF voltage, yup all good. Based on Mitch's suggestion we then turned to cylinder roughness and looked at all 4 cylinders. 1,2 and 4 all logged zero while cylinder 3 was all over the board and OFF of it. We then swapped coils between 1 and 3 and logged the same result. A compression test then revealed nearly NO compression in cylinder 3. We stopped there knowing that either the dreaded Subaru ring land issue had reared its ugly head or a valve had been toasted. While this is not what we WANT to see, the AP was a great tool for helping us diagnose the issue. During our troubleshooting session MANY people from the “interwebz” were offering input that was easily weighed and ruled out simply by using the live monitoring feature on the AccessPORT. It is important to note that the car had a custom tune and the failure in NO WAY was attributable to a Cobb part or MAP, I was even hesitant to mention the failure, however it does serve to show how useful of a tool the AccessPORT can be!