
,
 The advantage of using torsion bars (for us anyway) is that they have a built in adjustment for ride height. Just tighten this giant bolt and measure your ground clearance until you’re satisfied. It’s a bit of guess and check, but it does the job. We ended up leaving the front a bit lower than the rear so we would not have a nose-up rake when towing, which can be very dangerous. Because the VX is so short, the radius arm mount for the rear axle is actually right next to the torsion bar adjuster. Talk about compact!
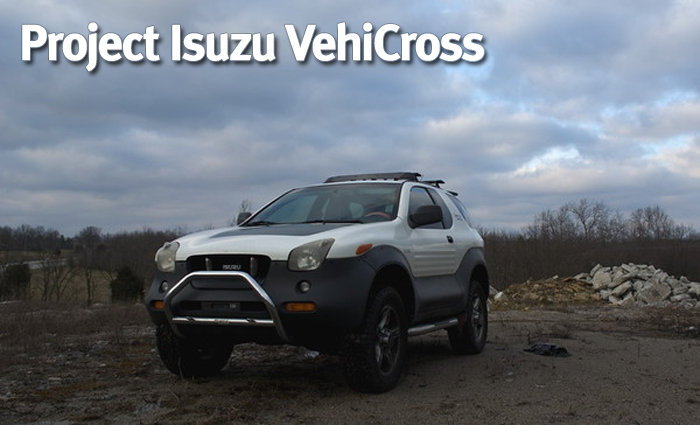
 Here’s our VX before we installed our OME lift kit. Not too shabby and actually, I really like this ride height. It’s just right for the body shape. Initially, I had reservations about doing the lift and screwing up the cool stance.
 Fortunately, the lift looks so much more badass. It’s more purposeful and not at all bro-truck like. The rear did lower itself a bit when the new springs had a chance to settle and break in. Overall, the new look is quite cool. It also allows us to run slightly larger tires if we so choose to in the future. However if we get too large, we will have to deal with fender clearance, and we are absolutely NOT cutting fenders on this truck!
After wrapping up our install, we took our truck to get aligned and went for a nice long drive. The new lift kit is a vast improvement. By lifting the truck off its bumpstops, the ride quality is night and day. Speed bumps, which used to fling rear passengers and cargo into the roof, are much smoother. Bumps and potholes are no longer met with gritted teeth and terror. We can drive it like a truck now! With properly functioning dampers, we no longer feel every single piece of road gravel. The VX is still a stiffly sprung truck and is not at all what one would call comfortable, but the ride is now liveable instead of just barely tolerable. That said, we did notice a few undesireable side effects. First, we noticed a bit of bumpsteer and more feedback from the wheel. Some of this is due to some worn steering components (they are on our to-do list), but the lift has excaberated the somewhat vague steering we've noticed since day 1. We are also a bit displeased with the OME dampers. Because our Isuzu dampers were so worn, it's impossible to give a true back to back comparison, but after 5,000 miles, the Nitrochargers are only a minor improvement over stock. Also, that pretty looking yellow paint flakes very easily and already some surface rust is poking through where the paint has been chipped off by road debris. Independent4x also offers the same rear springs with your choice of Skyjacker or Rancho 9000XL dampers if you so choose. They also offer upgraded torsion bars, new rear links, heavy duty tie rods, and extended stainless steel brake lines which we do have our eye on. Those heavy duty tie-rods may solve a lot of our steering issues.
However one problem we wanted to address quickly was a groaning noise coming from our driveline. Turns out 170,000 mile old U-joints are fine with the factory lift. But jack up the rear and they begin to complain. A squirt of grease into the zerk fittings quieted them a bit, so we hoped that new U-joints would solve this problem. Fortunately, I4X also offers good quality replacement U-joints at a great price. It is important to note that the U-joints in the VX are identical to the Trooper, but reversed (the front U-joint in a Trooper is the rear joint in a VX and vice versa). I4X does not specifically sell VX joints, but they do sell Trooper joints, so we picked up a set.
 Four Grade M8 bolts attach the driveshaft to the transfer case output shaft flange: four more hold it to the pinion input flange. A little wiggling and finessing, and we got the whole driveshaft out and on the bench. Pay special attention to how things are oriented. Remember, because the driveshaft is a spinning item, it needs to be balanced to prevent vibrations. You should mark the orientation of each end of the slip yoke and the U-joint flange. Isuzu made it extra easy for us by aligning all of the zerk fittings, so reassembly is hard to screw up. There is one in each U-joint and one on the slip yoke. It's also important to note that the transfer case U-joint is larger than the pinion side, so make sure the parts jockey hands you one of each.
  Here is one of our old U-joints. You can see some of the old grease oozing from the edge of the bearing cap, indicating the seals in this joint have had it. Another indication in this particular joint (on the pinion side) was that it was so worn it actually crunched when we wiggled it!
1 comment
I have really appreciated your Vehicross tutorials. I went with your advice on the Curt install and it made the project a breeze. I have a 1999 that I would like to tackle the lift on but with all the concerns you shed light on I am on hold for now. Looking forward to more of your posts.
Thank You