Now I turn the wheel in the other direction, setting it at the exact same angle as I did when turning it forward, 15 degrees in this case.I take my second camber measurement. I measured 1 7/16”, or 1.4375”, which when plugged into our camber equation yields -4.241 degrees of camber.Plugging all these values into our equation we get 4.264 degrees of caster! Again, make sure your calculator is set in degrees mode.After measuring the caster on both sides of the car, it’s time to make adjustments. As much as I love my Wisefab kit, my biggest complaint is the lack of double adjusters on the rod ends. This means I have to jack up the car and unbolt the rod end to adjust caster. This in turn, means I have to make a new zero toe reference when I put the car back down to check the caster again. Huge hassle.
After you’ve adjusted your caster to your desired settings, it’s time to do the camber. As you saw when measuring caster, your camber angle is highly dependent on toe. This means that you need to have your toe to be at least roughly near what you intend your final toe setting to be. I usually don’t nitpick too much, and will sometimes even just eyeball it, but you need to be aware that your camber can vary greatly with toe.
Now, before we proceed, I want to show you another way to measure camber. You see, the problem with the level and ruler method is that you have to align the level with so many references, but you only have two hands. Making sure that the level is perfectly vertical across the wheel, while watching the bubble to make sure it’s in the middle, while trying to ensure that the ruler is perpendicular to the level is very difficult to do in practice, especially if you don’t have a friend helping you. The solution is to use a cheap $30 angle finder with the level instead.
Simply rest the level across the wheel, and rest the angle finder on the edge to get the angle. You can also rotate the level so that you can use the bubble to ensure that the level is perfectly vertical across the lips instead of just eyeballing. This helps improve precision significantly. You can also use the level to zero the angle finder in the measurement plane beforehand to ensure accuracy.You may run into an issue where bulging tire sidewalls will interfere with the level. In that case, you can use equidistant shims to space out the level. For example, you could just simply grab two small pieces of 2×4 and duct tape them around the level to space it from the tire.
ATAN in excel returns the result in radians by default. Convert it to degrees by changing your formula to =DEGREES(ATAN((SIN(RADIANS(B64))-SIN(RADIANS(C64)))/(2*SIN(RADIANS(B65))))
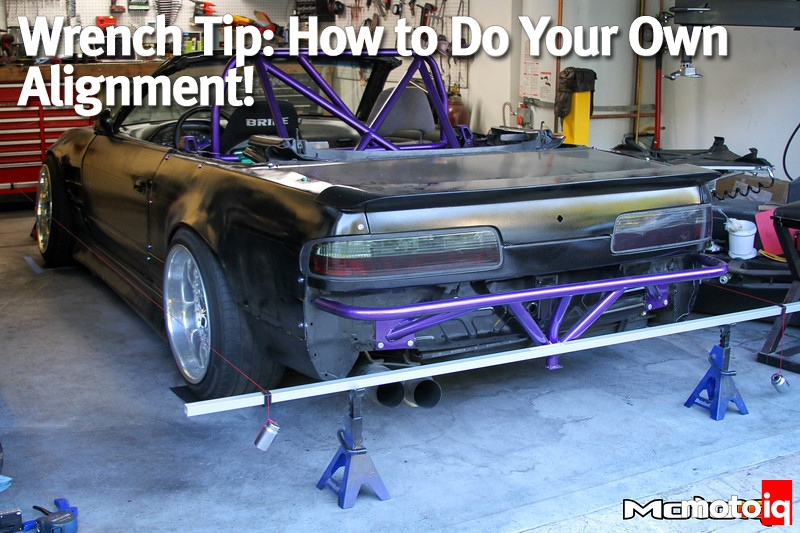
Great article and a very clear explanation of the string method for alignment but one query. You stress the importance of the bars being parallel to each other but presumably they don’t actually have to be square to the car – making a parallelogram out of the string and the bars is sufficient and they don’t have to make a rectangle. Would you agree?
This is correct, a perfect rectangle isn’t necessary. An isosceles trapezoid or parallelogram is okay. In either case, the string is spaced evenly from the hub cap on each side.


10 comments
Thanks for the guide but I have a problem.
I entered your shortened caster formula in Microsoft Excel, and got a totally different value.
=ATAN((SIN(RADIANS(B64))-SIN(RADIANS(C64)))/(2*SIN(RADIANS(B65)))
=0.05481679
Instead of 4.2
ATAN in excel returns the result in radians by default. Convert it to degrees by changing your formula to =DEGREES(ATAN((SIN(RADIANS(B64))-SIN(RADIANS(C64)))/(2*SIN(RADIANS(B65))))
This worked, thank you.
Great article and a very clear explanation of the string method for alignment but one query. You stress the importance of the bars being parallel to each other but presumably they don’t actually have to be square to the car – making a parallelogram out of the string and the bars is sufficient and they don’t have to make a rectangle. Would you agree?
This is correct, a perfect rectangle isn’t necessary. An isosceles trapezoid or parallelogram is okay. In either case, the string is spaced evenly from the hub cap on each side.
Thanks!
Thank you for the great article and explanation, you’ve inspired me to give it a try!
Is this an empirical formula? If not, could you provide the source? I’d like to know how it was derived.
You do know the average driver don’t want to change tires every 25 miles
Do you know the tires won’t wear out in anything close to 25 miles even with the most extreme racing settings?