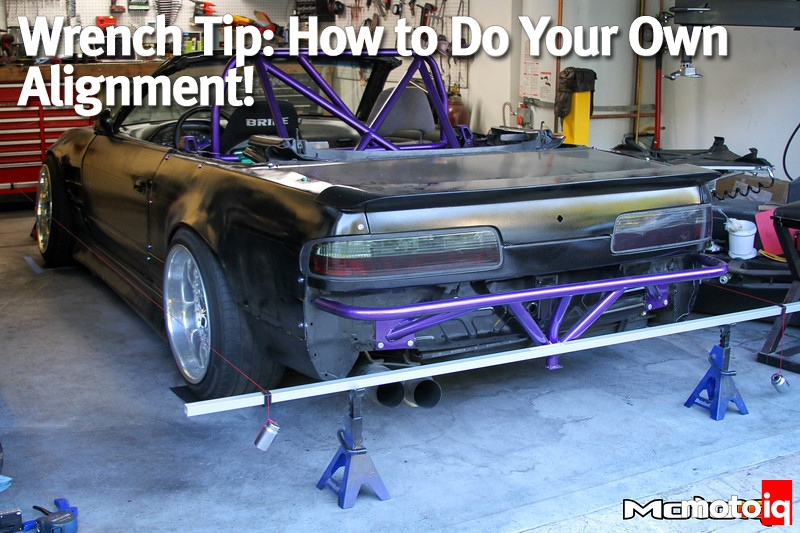
Run the string through the string guide on one end, loop it around the bar and tie a knot.Now run the string over the string guide on the other end. For string tension, I just grab the heaviest socket in my drawer and tie the string to it.Repeat for the other side.The next step is to make sure that the front and rear bars are perfectly parallel. If they are not parallel, then it will defeat the purpose of making the string guides equidistant, as one end will be effectively shorter due to the angle.To do this, I use a tape measure to measure the distance between the bars on both sides, and then nudge the jack stands forwards or backwards until the distance is equal on both sides.
ATAN in excel returns the result in radians by default. Convert it to degrees by changing your formula to =DEGREES(ATAN((SIN(RADIANS(B64))-SIN(RADIANS(C64)))/(2*SIN(RADIANS(B65))))
Great article and a very clear explanation of the string method for alignment but one query. You stress the importance of the bars being parallel to each other but presumably they don’t actually have to be square to the car – making a parallelogram out of the string and the bars is sufficient and they don’t have to make a rectangle. Would you agree?
This is correct, a perfect rectangle isn’t necessary. An isosceles trapezoid or parallelogram is okay. In either case, the string is spaced evenly from the hub cap on each side.


10 comments
Thanks for the guide but I have a problem.
I entered your shortened caster formula in Microsoft Excel, and got a totally different value.
=ATAN((SIN(RADIANS(B64))-SIN(RADIANS(C64)))/(2*SIN(RADIANS(B65)))
=0.05481679
Instead of 4.2
ATAN in excel returns the result in radians by default. Convert it to degrees by changing your formula to =DEGREES(ATAN((SIN(RADIANS(B64))-SIN(RADIANS(C64)))/(2*SIN(RADIANS(B65))))
This worked, thank you.
Great article and a very clear explanation of the string method for alignment but one query. You stress the importance of the bars being parallel to each other but presumably they don’t actually have to be square to the car – making a parallelogram out of the string and the bars is sufficient and they don’t have to make a rectangle. Would you agree?
This is correct, a perfect rectangle isn’t necessary. An isosceles trapezoid or parallelogram is okay. In either case, the string is spaced evenly from the hub cap on each side.
Thanks!
Thank you for the great article and explanation, you’ve inspired me to give it a try!
Is this an empirical formula? If not, could you provide the source? I’d like to know how it was derived.
You do know the average driver don’t want to change tires every 25 miles
Do you know the tires won’t wear out in anything close to 25 miles even with the most extreme racing settings?