,
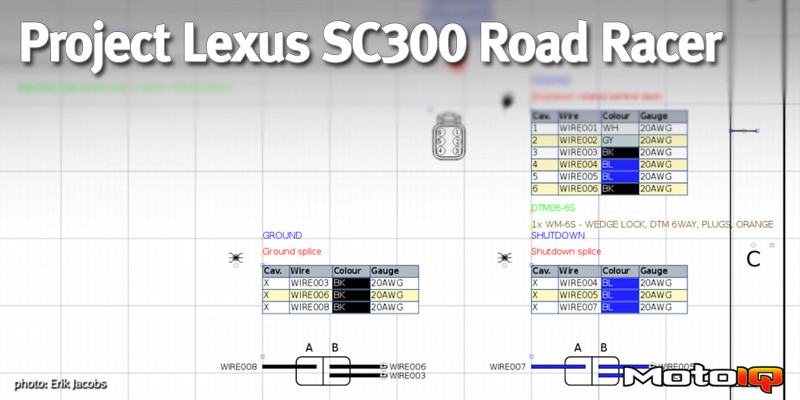
I started with a page just for the Racepak’s inputs and outputs, including its switch module. Using the Racepak Smartwire installation manual, I built the spreadsheet so that it indicated which pins corresponded to either inputs: 10-amp outputs or 20-amp outputs, and also which connector of the Racepak they were on. I indicated what the function of the circuit would be and then included an estimate for its current.
I also included some plans for future circuits, as well as indicating (with color highlighting) which inputs and outputs were unused.
Pen and paper scribbles work just fine, too, and I ended up with several of those.
 To keep this project simple and to keep costs contained, we would be using only a single gauge wire but in a few different colors. Again, military specifications come to our rescue.
What originally started as MIL-W-22759 (and in many cases is still referred to as such) is now known as SAE-AS22759. That’s the same Society of Automotive Engineers that you may have heard about. SAE International also has a lot to do with aerospace, too.
The specification details: sizing, weight, performance, chemical and temperature resistance, and other aspects of the wire, brought the industry to the point of standardizing part numbers. Much like with the military specification for connectors, this helps to provide for a wide array of manufacturers all competing on an absolutely identical quality product at attractive prices.
The “gold standard” in the motorsports scene has become Raychem’s Spec55 wire. If you are buying this military specification wire from a motorsports-focused supplier, you are likely getting Raychem Spec55. In fact, the Raychem brand's owner, TE Connectivity, also owns Deutsch, AMP, and just about every other major electrical component brand used in motorsports.
22759 mil-spec wire has a super thin but extremely durable, cut and chemical resistant insulator. The wire is flexible and strong, and it carries a good bit of current for its weight and diameter. This means that even bundles with high wire counts are still of a small diameter and also lightweight.
Unfortunately as it seems with just about everything on a wiring project, it means that some special tooling is required. The wire’s conductor-to-insulator ratio is much different than “normal” wire, and the insulation is much more difficult to remove.
 The Ideal Industries Custom Stripmaster Lite in 22759-trim from MilSpecWiring
A nice spring-loaded automatic, alligator-looking hand stripper from Ideal Industries, built for the 22759 standard and purchased via MilSpecWiring, is going to set you back almost $300 for the “cheap” one. Or, you can buy the inexpensive manual ones for $30. Considering how many times we have to strip wire on this project (one strips at each end of a wire, plus extras for splices, several hundred wires — close to 1000!), we splurged for the “nice” one.
Well, more accurately, since Tom and the crew at H Craft / Robertson Racing deal with real race cars and motorsport-grade wiring, they already had the nice one.
When it comes to purchasing wire for your project, you might be tempted to buy “automotive grade” GPT wire, or even “cross-link” wire. It’s definitely cheaper. The “cross-link” wire is much more durable than general garbage, and is built to a common automotive standard- SAE J1128.
Skip it.
Spend the extra few dollars and get the mil-spec stuff. The mil-spec wire is more flexible, lighter, a smaller diameter, and more durable. It’s the same type of insurance we’re buying with mil-spec connectors. Do all of the work right the first time so that you don’t end up spending more to do it twice… or three times… or worse…
 Time to start pulling wires, right? Well, not so fast.
As with the wishlist and the spreadsheets, having a plan makes everything easier. First, it helps to take some measurements.
Since we’ve finished almost all of the fabrication, which included locating all of the electrical components, we can start to take measurements and sketch out where we want harnesses to run. Get out your trusty tape measure and a pencil and paper (or your laptop, in our case) and get to work. Tom is locating the fuel tank pump and sensor connections, and he is measuring the distances to the lamp assemblies.
 Measuring isn’t an exact science. A little extra is better than a little too little.