,
Arcadia is really smart. It’s so smart, in fact, that it not only knows what wires are in the bundle, but, based on the specifications of the wire, it knows the diameter of the bundle, too. Well, assuming that you are properly concentric-twisting your harness (we’ll get to that later). This makes it trivial to select the right size heat-shrink tubing to go over the bundle.
Heat shrink? Yes, heat shrink. You’ll also learn more about heat shrink later during harness construction. Suffice it to say that proper harness design includes heat shrink tube over every bundle. And, for the really serious stuff, heat shrink boots over connectors to ensure an environmentally-sealed harness from end-to-end.
Arcadia also supports creating harnesses from spreadsheets, too. You have the ability to create a sheet of connectors (for example, in Google Docs) and load it into the software. Then, you would place them in your design and run your bundles. Next, you can also load a sheet of wires to populate the connectors. Loading things in this fashion would make the process much quicker and easier.
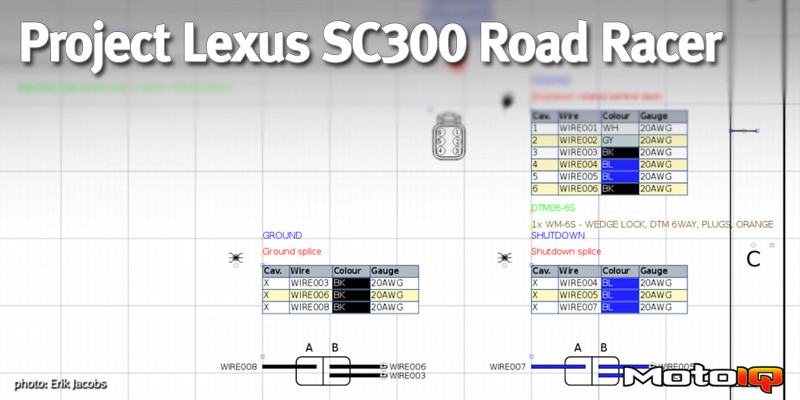
 Here's a closeup of a harness section.
Notice that connectors are named and the diagram also shows the wires in each cavity, and each wire is named, too. The diagram also shows that there is shrink tube over the bundles. It even indicates where splices are and which wires go on which sides. Yes- parallel splices. You will learn more about those, too!
Once your harness is designed, reporting makes things even easier.
 Arcadia has a number of reports that can be run, and one of them is the wire cut list.
The wire cut list report tells you exactly what wires to cut to what lengths, how long the strip length is (based on the terminal being applied), and where they go (source and destination connectors).
If you set up an assembly line in your shop with mounted spools of wire and measures, the cut list makes it extremely easy to quickly cut and label all of your wire lengths for your harness. If you were a mass producer of harnesses, you might even have a computer controlled machine that would do all of that work for you.
While we did not do it for our project, labeling each wire as it is cut makes it extremely easy to assemble your harness against your design. Once you cut thirty wires and have them in a pile, it can be hard to keep track of which one was which length and what part of the harness it goes with.
 Another important report is the bill of materials.
The bill of materials report makes it easy to know what to order from MilSpecWiring! If you had all of your costs loaded into the component database, it would also make it easy to charge your customer, or know how much a harness is going to set you back.
There are a number of other reports, including a design check for things like wires not fitting in the specified terminals and more.
Alright, now that you understand the basics it’s time to sit down for a hundred hours or so and out will magically pop some harness designs! In the end, my relatively simple club-level race car that doesn’t have many sensors ended up with 9 (nine!) harnesses / sub harnesses. Here are some PDFs and pictures of them, in no particular order.
You can click on the photos below to take you to the PDF directly on Google Drive. Feel free to download them and reference them for your own projects.
 This is the engine-bay portion of the vehicle kill switch.
Every vehicle needs an external kill switch. Mine will be mounted on the cowl, at the base of the windshield near the wipers. I designed the kill switch harness to be essentially self contained. It is not bundled in with other harnesses. I probably did not need to do it this way, but for whatever reason I felt that it was safer and a more flexible solution.
 This is a small sub-harness that will connect the dashboard kill switch to the main cabin harness.