,
It’s not hypercritical to get every measurement down to the fraction of an inch. You want wiggle room here. It’s nice to be able to drape harnesses naturally. You don’t want to have to try to pull things tight to make them connect. That’s not to say you want to add three feet to every measurement, but 55” is basically 60” (5 feet). “Measure twice, cut once” is an adage for a reason. Making a too-short run longer is quite a pain. Shortening something that is too long is just a side cutter away.
Since we are assembling the harness “in” the car, we can be sloppier with measurements. If we were detailing everything to send to MilSpecWiring to have them construct our harnesses, we would take a good deal more care. Using a flexible measuring tape, or even string, would allow for more accuracy and precision in measuring wiring runs.
 There’s nothing wrong with hand-drawn plans.
If you know what your own chicken-scratch writing means (or what Ed's chicken scratch means, after it's photocopied, in this case), you’re in good shape. Hand-drawn plans are what many, many race cars have been built from- if they had plans at all. But, we wanted to take things one step further, like we always do.
Enter, Cadonix.
 Cadonix is a British software developer located about an hour and a half northwest of London.
Cadonix makes a cloud-based CAD (Computer Aided Design – not cardboard!) suite called Arcadia that is focused specifically on automotive wiring design and manufacturing.
Cadonix was kind enough to provide me with access to their software suite for the purposes of this project. There are a few other software solutions for wiring harness design. I doubt that you’re surprised TE Connectivity (owner of all the things) has one; there are others. They are mostly all traditional-type software with a large up-front, one-time purchase followed by a support agreement that may or may not include product updates or upgrades. Arcadia’s cloud-based model means they can offer access to their software via a yearly subscription.
Some people will use software like Microsoft Visio to plan their harnesses, or even just draw diagrams with a vector-based program like Inkscape (free and open source) or Adobe Fireworks. It really doesn’t matter. The point is to create a plan for where wires will go and which connectors are at each end so that you can more easily build the harness later. Having a good plan also helps you if you need to repair your harness, troubleshoot, make a replacement, upgrade, or make improvements.
 Arcadia’s current version, at the time of this writing, was primarily focused on OEM electrical design work. It offers quite an extensive list of features.
While Arcadia may have been originally designed with OEMs in mind, it does have all the features needed to build motorsport harnesses, and more. Arcadia is working on adding several motorsport-specific features, but I was not able to try them out- yet!
When it comes to using Arcadia, firstly, there is a component database. This is a very sophisticated list of all of your electrical and electronic components, from wire to connectors to heat shrink tubing. Every relevant aspect of a component can be entered- from sizes and resistances to current capacities, weight, price and more. This makes it a trivial activity to insert a component into your design. It also means that other activities like reporting (for cutting wire or ordering parts) or picking components (like heat shrink tubing to go around a wire bundle) becomes much easier.
 Secondly, Arcadia supports low-level circuit design and testing with some intelligent analysis.
This means you can virtually wire up switches, relays, and other components and make sure that all of the behaviors of a circuit are correct, including current capacity. It allows you to model the real world without cutting a wire or pulling out the multi-meter (you have a good multi-meter, right?).
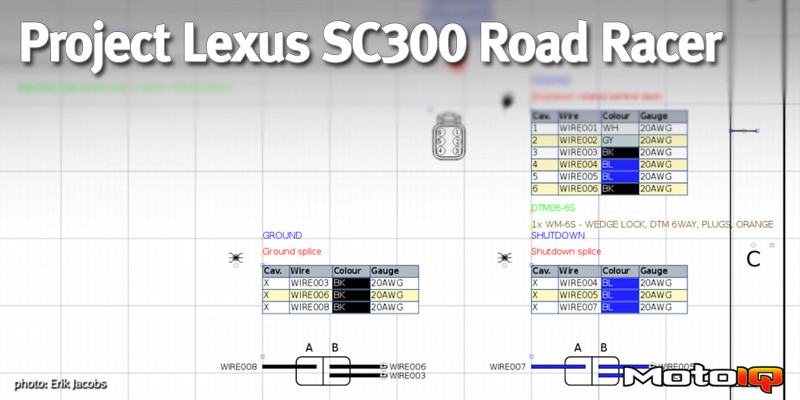
This feature proved very useful for when I was designing the cut-off switch circuit for the car (pictured above), as it is actually two circuits in one: one circuit to disable the contactor (which provides the main power for the car) and another to disable the Racepak just for extra insurance. It also needs an in-cabin and external switch.
Even in the case where the contactor doesn’t properly disable, shutting down the Racepak means that all circuit power is cut off. This double circuit provides a failsafe to ensure that the ECU and fuel system are turned off, which stops the car. We’ll discuss this circuit more in depth later.