
,
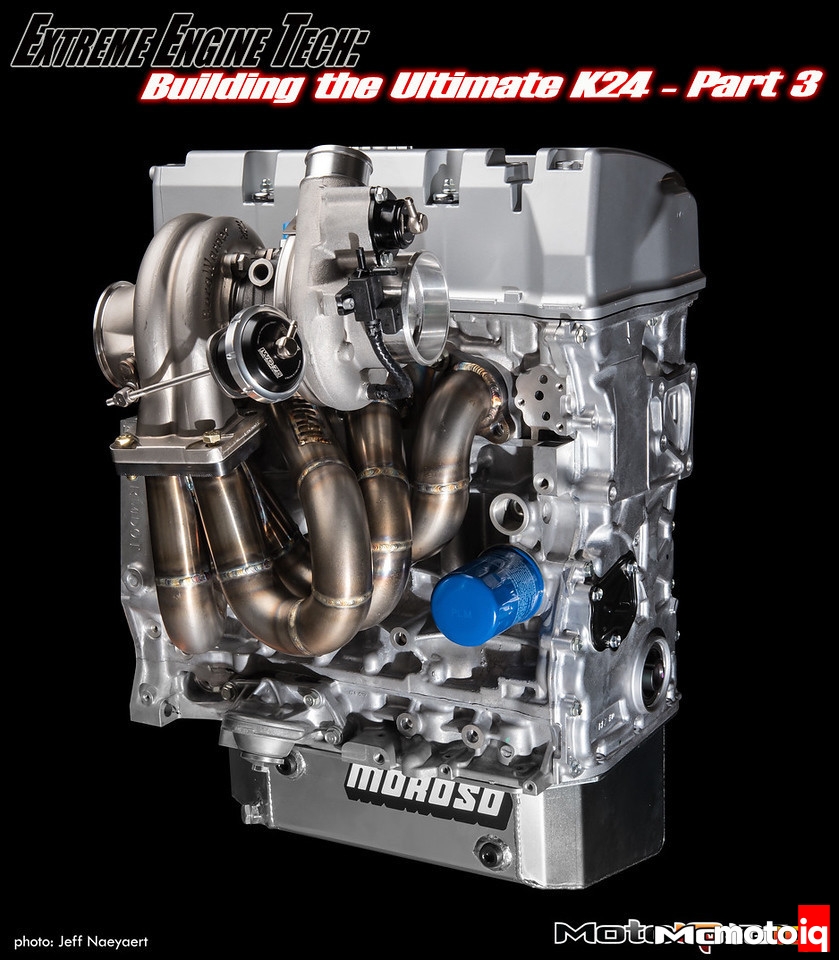
 A cool feature on Borg Warner EFR turbos is that the blow off valve is integrated into the compressor housing. Another EFR feature that we love is an integrated boost control solenoid. All you need is to hook this bad boy up to your engine management system and you get boost control in a simple clean package. These features simplify and clean things up in the engine compartment improving reliability and saving weight. Having all of this in one package also cuts down your fabrication time for building a turbo system and eliminates failure points. With a high flowing internal wastegate, a boost control solenoid and an integrated BOV you are actually saving money as well by not having to by these parts individually.
 We replaced the standard Borg Warner wastegate actuator with this high performance IWG-75 actuator from Turbosmart. The Turbosmart actuator has more diaphragm area for quicker response. The diaphragm is also made of very heat resistant silicone/nomex, a much higher rated material than stock. The Turbosmart actuator is also highly adjustable with springs from 3 to 26 psi available. By using a spring pressure close to the intended boost pressure, you have much more positive wastegate control which often equates to a faster build up of boost and better boost response than you can get with just signal control.
 The top of the Turbosmart wastegate actuator quickly spins off so the springs can be easily changed or the actuator quickly serviced if needed.
 We replaced the OEM Borg Warner plastic BOV with this cool Turbosmart Kompact shortie BOV. The Turbosmart BOV has an aluminum body that is not prone to cracking and has a fast acting O-ring sealed piston valve that replaces the leak prone diaphragm of the stock valve. The Turbosmart BOV can handle 30 psi of boost without leaking.
The Turbosmart Kompact BOV is a direct bolt on replacement as you can see here. The Turbosmart part is more responsive due to its piston design and its larger valve and radial exhaust port areas compared to the OEM Borg Warner part.


12 comments
On part 3 page 5 timing chain is fitted wrong. Timing marks are not correctly aligned and timing is not set properly . Little dots on cam gears should be between gold chain rings. Dashes on intake and exhaust cam gear should point to each other!
We were just doing a dummy fit up to check the tensioner so of course, we didn’t assemble the engine that way. Good catch though!
I appreciate the time, effort and great photos in this article guys, but there are some serious holes in the story here that need to be addressed. RBB valve cover to R40 timing cover does not seal. PRB non balance shafted oil pump conversion requires blocking the old feed port on the block beneath the oilpan. Youve used the incorrect chain tensioner for the r40 block as the old steel bodied tensioners have a slightly different oil port location. Moroso pan doesnt have provisions for the lower torque mount. Although you used aftermarket pistons maybe some measurements on a stock piston compression height and how that clears with these heads. Maybe spotlighting some of these details maybe help to better guide your reader base in tackling some of the hurtles of the R40 4-port conversion. Either way, great content and thanks for your contribution to our industry.
Its been a long time since we wrote the article but I am pretty sure we covered how to do that stuff in the other parts of the series. I know we did the balance shaft and cover stuff. Pretty sure we did the tensioner in other parts. I remember getting the new tensioner.
If there is a revised article beyond this “part 3” that covers these issues, I wasnt able to find it. Is it under this engine build article or something different?
I think there was up to a part 5. You know what, I think I covered this stuff more in our NA build. I am getting things confused. It’s been years!
I was wondering why the z3 head gasket was used vs the k24z7 head gasket?
I think either will work.
No, the k24 bore size is larger, must use k24 hasket
It is 87mm
Great article, Im wondering what engine wiring harness would be used for this build to go back in a 2012 civic si coupe?
TIA
Steve
Hasport or Rywire make conversion harnesses.