The 2J Racing Bumpsteer kit looks very beefy and the construction out of the box is impressive. Joe at 2J Racing advised that since the control arms being used were not new, that the ball joint should have a couple of spot welds to secure it – especially if it was seeing the track. This was the only instruction for installation that was provided – and nothing specific for the B13 install was found on their website. As of yet, no response has been received on the ball joint cotter pin hole being above the castle nut. Or the gap with the tie rod tapered bolt. Other individuals with the kit have told me that the tie rod end bolt doesn’t seat tight and that is what occurred with the NX GTi-R.
Finally, the tie rod ends result in massive toe in until the inner tie rods are shortened (there’s probably a better method but I don’t know it). Between the two inner tie rods 1.5″ had to be removed to get the settings required. 2J Racing’s response to these concerns is that almost 90 sets have been sold with no issues. The few B13 purchasers that I’ve talked to have either had these issues or something else. With the year of testing 2J says happened, this should have been corrected before being sold to the public and included a tip that the inner tie rods will need to be cut. The incorrectly placed cotter pin hole and the gap with the tie rod bolt made me think I was working with a prototype. That being said, I’d rather buy a prototype than nothing at all. Just tell me I’ve got some work to do and I’m all in. Poor communication and not listening to the customer gives the impression that they’re just not interested. That was disappointing. Hopefully the smiles on my face come track time will make up for this.


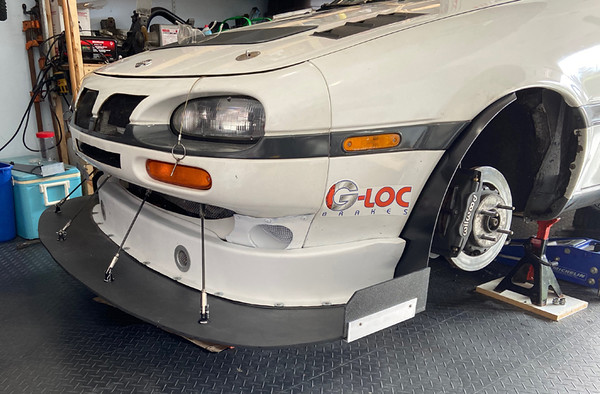
Facebook photos elicited some interesting responses, but from France I got some very strong encouragement along with a strong push to add tire spats to my project. This was intended, but likely not until 2021. With the car still on jack stands and time on my hands with parts not yet here, that gave time to work on tire spats so the CAD equipment was hauled out once again. Then it was transferring that CAD info onto 1/8″ ABS and pulling out the Bosch jigsaw to cut the ABS. This part was actually quite simple and quick to make. A piece of 2″x2″ aluminum angle provides great strength in holding the tire spat base and the splitter. It’s bolted to the tire spat but, to allow speedy removal, clevis pins are used to hold the tire spat/aluminum to the splitter. The ABS was drilled at the factory fender locations and the factory screws are used to attach the tire spat ABS to the fender. 1/4″ ABS and aluminum angle were used to create splitter end plates. You can literally shake the entire car with this end plate now that it is fastened down. In a do over, we’d probably make the splitter even wider by about 4 to 6 inches.