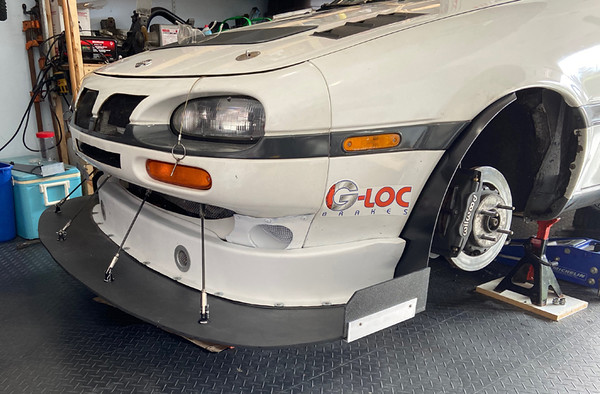

Bron’s wizardry with fiberglass changed everything. He made it look easy and didn’t even make a mess. With the duct tape gone and the styrofoam removed, the air dam looks part of the car. It is glued and bolted to the splitter. The front lip of the air dam was trimmed and then DAP caulking was applied to smooth out the edge. As the driver’s side receiver tongue was made longer, it’s easy to slide it into the receiver and then set up the passenger side. Then it just slides into place. That is a strong mounting point. Even more important, it should easily facilitate the installation and removal of the splitter and air dam for loading/unloading onto trailer/tow dolly or for when it just isn’t wanted for street use. I’ve also decided to carry a jig saw in my track tool kit, just in case I decide this is too large.
Of course, this monstrosity of a splitter needs support because as is it will be ripped off of the car at speed. For that I turned to Professional Awesome. It didn’t take much searching on Google to realize that there is no way the Professional Awesome splitter rods could be replicated for the price. They are simply incredible quality and the workmanship is ideal. Six were ordered – four for the NX and two for Jeremy’s car (he already has two and is adding two more). There will be more about installing these after a few more steps are covered.

The marine grade plywood was then painted/coated/not sure what the proper term is with fiberglass resin (don’t forget to add the hardener like someone the author knows) with black dye. Adding the hardener afterwards by spraying it on with a spray bottle really extends the length of time required to do the task – but it can be done. Then to allow the hardener to cure it must be set out to bake in the sun (easier said than done in the rainy Pacific northwest – the location of the Twilight vampire series because of the constant overcast/rainy weather) or heated with a heat gun. Also, painting it helps cure the resin. I did all three – painting it worked best. Phew.


You will notice that there are a few cuts in the splitter which reaches back to the front axle – again, the maximum allowed by current rules. The centre one is for the downpipe and exhaust which hangs lower than the splitter. The splitter is about 3.5″ off of the ground. The two sides are for diffusers that Greg Petroski (yes, the same Greg who blew me off of the track) and Ansix Auto builds. The camaraderie among racers really makes the sport what it is – drivers helping other drivers. So great to see. However, adding splitter diffusers just highlights another issue which is air trapped in the wheel well. Professional Awesome makes incredible fender vents for this very purpose and a wise builder would have quickly added them to their shopping cart. Thinking that the NX needed a narrower version, we hit Greg up with a build request. His response was no, they didn’t build them, but with a mold he might be able to help us out. Back to PAD and we came up with a fender vent and hood vent, formed from ABS, to alleviate the potential air flow issues I saw coming.