In the fall of 2019 an APR hardware kit was ordered as initial plans were to use the RX-8 upgrades. While the existing hardware was almost new, it had been sitting and one bolt seized and the others had been damaged by incorrect wrenching. After spending that money, this idea was scrapped as the Mazda uprights just didn’t look right on the Nissan’s hatch. That’s when I connected with Al, a retired welding instructor (easy to do in our circles, because though I write articles and run a small business, my official title is retired. Early retirement, for those thinking I’m not old enough), about doing some welding on this project. Al and his kids raced go-karts competitively back in the day. He was all over this project.

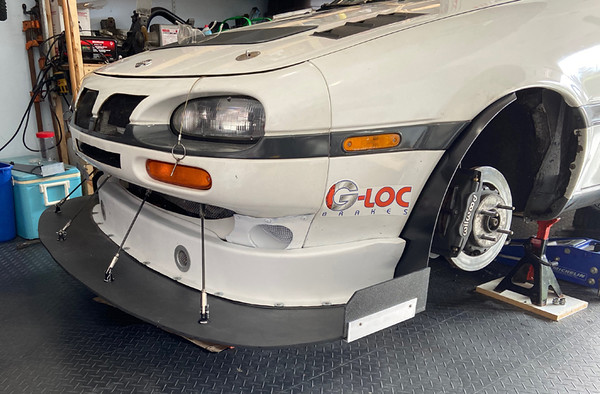
At this point when planning was changing to action, essentially red mist took over. Initial conservative thoughts and plans were set aside in favor of building to the maximum that rules allowed. That meant ensuring that the APR GTC200 wing was up nice and high. And that the splitter would be extended as far as possible. Everything to the limits of the rule book. As this is a Nissan NX1600, the little sister to the NX2000, I can guarantee you that production pieces to fit this car are virtually non-existent. A call to APR confirmed that there were no uprights available. Calls in previous years to a variety of aero manufacturers had obtained the same negative response. So taking up a pencil and paper, I started drawing out what had been dreamed about. The rear uprights would be fairly straightforward pieces of aluminum. The front was more complex as it required the ability to be removable – to be loaded easily onto trailers/tow dollies. After a few renditions, a trailer hitch style of splitter hardware was settled upon.

Once the paper sketches were set in place, we turned to PAD. You see, CAD (also known as cardboard assisted design) simply wasn’t the right process for this wing while PAD fit the bill. PAD, also known as plywood assisted design, was ideal for giving the support and allowing the flexibility of change necessary. I will tell you that people’s mouths fell open when they saw this PAD contraption duct taped onto the NX’s hatch (in my garage , of course. This never went on the street or track – PAD is for shop use only). Especially once I added some cross braces to ensure that it was stable. It seriously looked ridiculous; but it worked! The PAD templates were used to create the aluminum pieces.

The metal supply shop that Al introduced me to has a multi-ton shear that was able to slice through the 3/8″ aluminum faster than superman could install a jig saw blade. It is absolutely beneficial to know what resources and equipment local shops have available – without Al supporting me as my personal shopper I would have never known about the shop or their equipment.
Back to the NX to set the angles for the wing uprights and then put everything into Al’s hands for welding. And he did a fantastic job! Then drilling the holes to provide for an extensive amount of adjustability which led to the penultimate moment. Drilling the hatch. Seriously, once you start modifying a car you know that it will never be the same but once you begin on the body, you’re committed. (Of course, it helps to know that I have a spare white hatch, a spare blue hatch, the same for the hood, spare white T-roofs, white fenders, and so on). One of the joys of working on a 1992 Nissan is that it doesn’t seem like any body panel is symmetrical, in that one couldn’t use identical measurements on both sides as it would end up crooked. Measuring was always the starting point, but then some compromise had to occur. Duct tape worked for securing the template but then it came off and the drilling of the body panels began.